| Author | Message | ||
Geoff Wootton Grand Master Username: dounraey Post Number: 541 Registered: 5-2012 |
Hi Folks I am fitting a Powerspark electronic ignition kit and have a problem running the wires through the rubber plug on the side of the distributor. 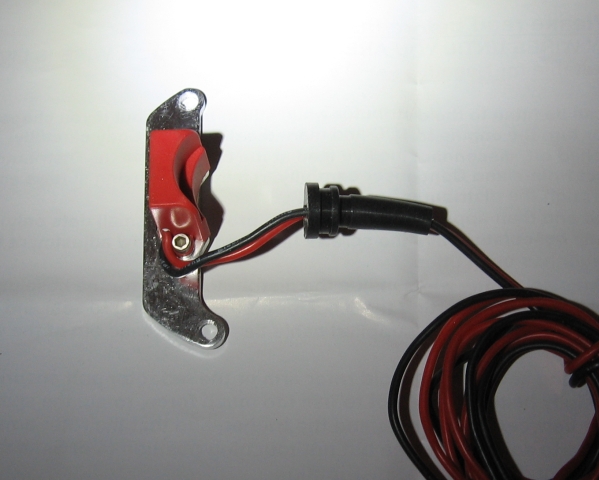 The original wire is arrowed in the following pics: 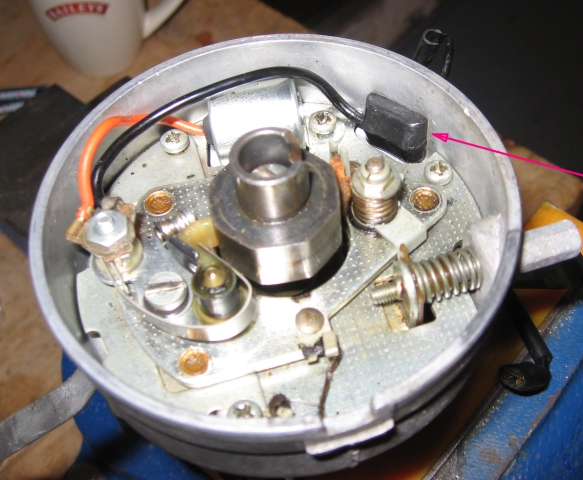 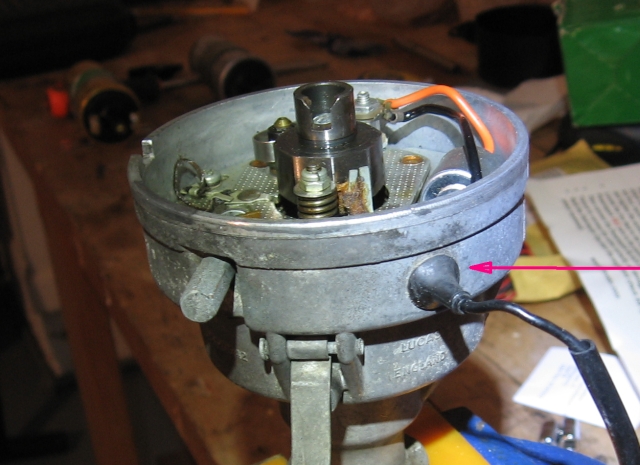 Should I just cut the old rubber plug off and press the new one (top picture) in. Does anyone know if the hole will be big enough to feed the connectors through and accommodate the new plug. The reason I am asking is I want to carry out this upgrade with the minimum amount of surgery to my distributor. Also, the instructions with the kit say "connect the RED wire to the positive (+'ve or 15) live terminal of the coil. Then connect the BLACK to the negative (-'ve or 1). Does this mean connect the black connector to the -'ve terminal on the coil, or to earth. Geoff | ||
Paul Yorke Grand Master Username: paul_yorke Post Number: 1330 Registered: 6-2006 |
Hi Geoff, try an electric heat gun to warm it and see if you can lip it back inside. I think it means negative on the coil. (from the 1 reference ) I haven't fitted one to a single points car though. Good luck, Paul. | ||
Brian Vogel Grand Master Username: guyslp Post Number: 1120 Registered: 6-2009 |
Geoff, This is a case where YouTube could be your friend if someone's done a video on the particular ignition model you're installing (or even something very similar). With regard to the original wire, is the stress-relief actually molded on or can the wire be moved through it if sufficient pull is applied? Depending on gauges of the wires in question, etc, there could be several options for dealing with this. Brian | ||
Geoff Wootton Grand Master Username: dounraey Post Number: 542 Registered: 5-2012 |
Paul It worked - thank you. Once the rubber became pliable I was able to lip it back and was able to remove it intact. I'm fairly sure now the black goes to the coil (-'ve). The kit makers should make their wording totally unambiguous. Thanks for the help. Geoff | ||
richard george yeaman Prolific User Username: richyrich Post Number: 236 Registered: 4-2012 |
Hi Geoff I think the model you have cant be fitted direct without being modified by drilling a hole somewhere between the module and the existing hole the red wire goes to the + side of the coil and the black wire to the - side of the coil if you make a mistake it is toast there is a different model available that you don't have to modify hope this helps. Richard. | ||
Paul Yorke Grand Master Username: paul_yorke Post Number: 1331 Registered: 6-2006 |
Make sure that the negative was connected to the points. Seen a few coils wired up back to front. | ||
Geoff Wootton Grand Master Username: dounraey Post Number: 543 Registered: 5-2012 |
Hi Richard It turns out the hole in the side of the distributor is 7/16" diameter. Easily large enough for the two wires and their connectors to be pushed through. This wasn't at all obvious when I first looked at it, with the single wire and original plug. I feared I might have had to resort to drilling a larger hole but thankfully this was not the case. Brian - I managed to pull the original wire through after snipping off the end connector. This made the removal of the plug much easier. I'm pleased I've been able to dismantle the distributor internals without any damage, other than snipping off the one electrical connector. Paul - The negative was correctly connected to the points on my car. I remember Hubert said on another (particularly useful) thread how his car had been wired incorrectly i.e. back to front, so I was careful to note the polarity. This is especially important as the new unit can be destroyed if connected the wrong way round. Many thanks to you all. I hope to find time tomorrow to complete the job. Regards Geoff. | ||
richard george yeaman Prolific User Username: richyrich Post Number: 237 Registered: 4-2012 |
Hi Geoff I meant that you will have to drill a hole in the actual plate to fit it to the base plate. Richard. | ||
Geoff Wootton Grand Master Username: dounraey Post Number: 544 Registered: 5-2012 |
Richard Thanks for the clarification. I will be fitting the new unit later today (hopefully), so I will bear that in mind when I come to match things up. Regards Geoff | ||
Geoff Wootton Grand Master Username: dounraey Post Number: 545 Registered: 5-2012 |
Hi Folks The electronic ignition is now fitted and delivering rock solid sparks. Here are some of the details for anyone interested. 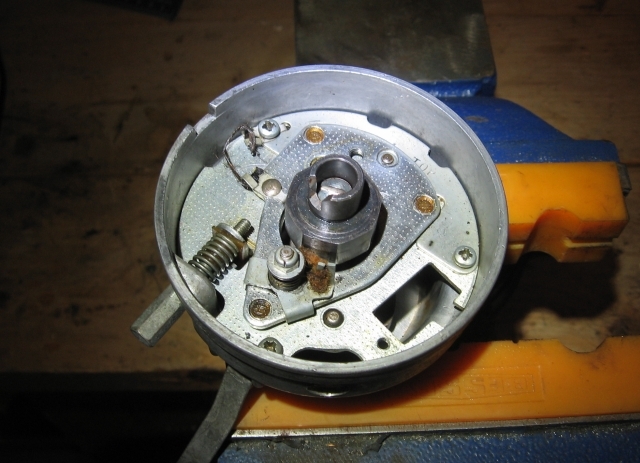 This pic shows the distributor with the rotor arm, points and condenser removed. The base plate also has to be taken out. Just a case of fully unscrewing the points adjustment screw, removing the spring and then removing the three setscrews on the perimeter of the base plate. The base plate can then be lifted out.  Here is the base plate and points slider mechanism. The nut arrowed has to be removed and the assembly disassembled. 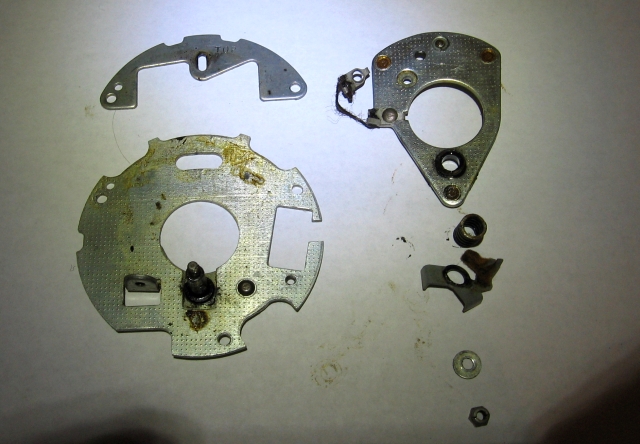 The only part required is the base plate. All other parts can be stored until such time as our cars are worth so much they need to be put back for originality. I suspect we might have a long wait. 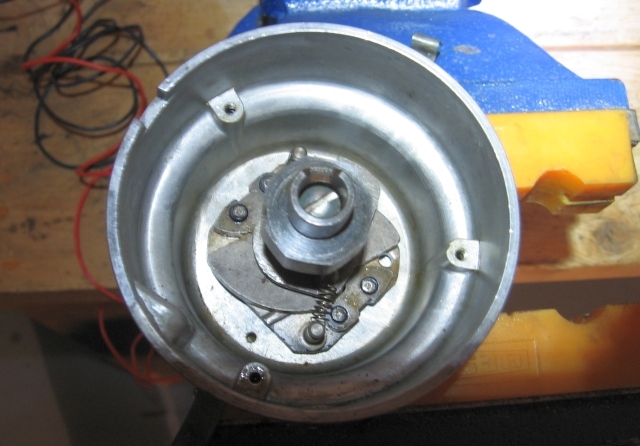 Now is a good time to clean and lubricate the centrifugal advance mechanism 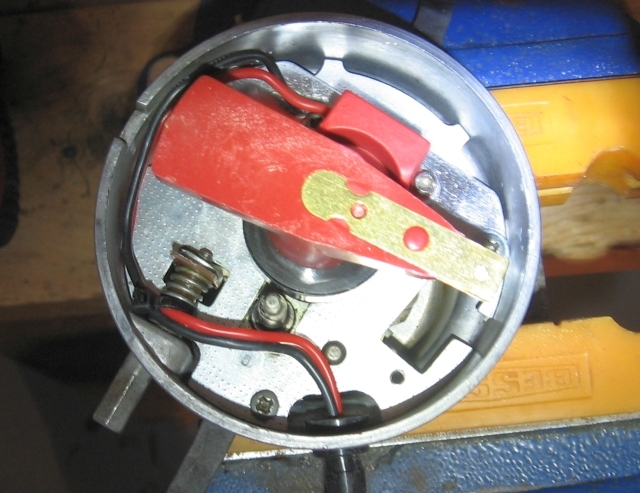 I forgot to take a pic of the ignition unit mounted on the base plate. Here is the finished upgrade. Note I have replaced the now defunct points adjusting screw and spring to stop the hinged adjustment mechanism from rattling about and to plug the hole in the side of the casing that accommodates them. The trigger ring just pushes onto the cam lobes and is held in place by the rotor arm. The car is a 74 SY1 (SRX18501) Geoff | ||
Bob Reynolds Prolific User Username: bobreynolds Post Number: 195 Registered: 8-2012 |
Interesting. I didn't realise that so much dismantling was necessary to fit these units. I assumed it was just a case of fitting the new pick-up in place of the old contact set, plus a bit of rewiring. I notice you've got the distributor out on the workbench, which would make the job much easier than trying to do it on the car. Have you noticed any improvement in running? | ||
richard george yeaman Prolific User Username: richyrich Post Number: 238 Registered: 4-2012 |
Bob I have fitted several of these units very simply by replacing the points with one of these units this particular one that Geoff has I haven't seen until now, I don't think it is really necessary to remove the distributor to do this simple but worthwhile modification IMHO. Richard. | ||
Geoff Wootton Grand Master Username: dounraey Post Number: 546 Registered: 5-2012 |
Hi Bob - I have not yet road tested the car as I intend to spend a couple of hours this weekend setting the timing and re-tuning the carbs. First indications however are very good. The reason I opted for electronic ignition was my car was developing a generalised misfire. This had got so bad the strobe on my timing light was dropping out so much it was almost random. It is now rock steady. The points on the car were badly pitted, even after just a few thousand miles from their being replaced. Possibly a faulty condenser, but that is all academic now. The tickover speed has also increased from 800 to 1237. This may well be because the timing is now too retarded - this weekend will tell. Richard - I guess different manufacturers do things differently and also it would depend on the model of distributor. Mine is the single points, centrifugal advance only (i.e. no vacuum advance) variety, fitted to a 74 SY1 (SRX18501). I do agree with you that this mod can be done with the distributor in-situ, however I found it so much easier to just pull it out and carry out the work on the workbench. So long as the engine isn't cranked and the position of the rotor arm and distributor casing are carefully noted (I take pics) then it can be replaced with sufficient accuracy to start the engine once refitted. For a mod like this, I would always check the timing, so nothing is lost in removing the distributor. I also replaced the coil. An afterthought is how does anyone manage to do this without a "bench" across the front suspension towers? I reproduce an earlier photo from another thread to demonstrate it. 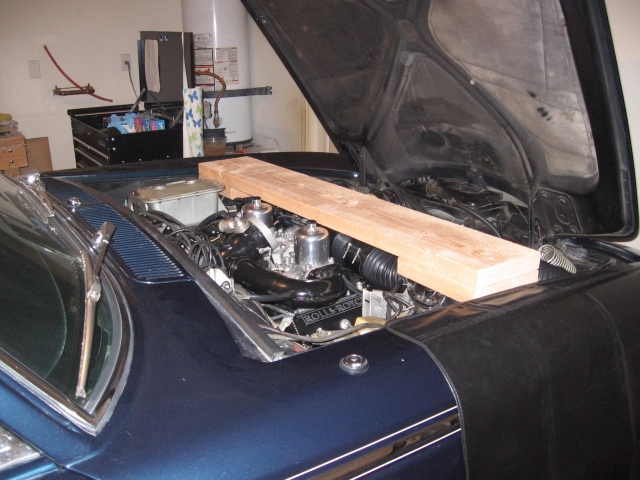 Replacing the coil would have been nigh on impossible for me, without being able to climb on top of the engine. I will report back when I have road tested the car. Geoff | ||
richard george yeaman Prolific User Username: richyrich Post Number: 239 Registered: 4-2012 |
Hi Geoff everything looks great my car is also a 1974 model SRH19529 and has the same Distributor as your own good luck with the carbs. Richard. | ||
Bob UKll Unregistered guest Posted From: 94.197.122.84 |
Notice the small hole is the bottom of the dizzy body. This hole allows excess oil ( or water) to drain. So when oiling the dizzy one can't really overdo it. Engine oil is fine for this application. The finished job looks nice and neat. I like the plank over the engine. Service tool R946/7. For ignition coil servicing (Message approved by david_gore) | ||
Bob Reynolds Prolific User Username: bobreynolds Post Number: 196 Registered: 8-2012 |
You ought to road test the car before you touch the carbs (or anything else). If it doesn't run smoothly you won't know whether it's the distributor or the carbs. | ||
Paul Yorke Grand Master Username: paul_yorke Post Number: 1332 Registered: 6-2006 |
I think the difference is between electronic ignition and electronic points. Electronic ignition needs an amp somewhere but is usually more intelligent than just a switch. It may have been possible to fit the part on the vehicle, but cleaning, inspecting and servicing the distributor would not be. And for the sake of two nuts..... changes a fiddly bending over job into a please tell kitchen table job. And for any electronic ignition owner feeling a bit smug and maintenance free.... remember that you still need to service your distributor feeding oil to the spindle, centrifugal weights and bushes. These can give all sorts of peculiar and intermittent running, cruising and starting faults when they start to seize.  | ||
Bob UK Unregistered guest Posted From: 94.197.122.77 |
The electronic dizzys are a victim of their own success leading some to mistakingly believing that the dizzy is maintenance free. The hole I mentioned earlier, a liberal dose of engine oil will find the bits that need an oil and then slowly drain out of bottom. Oil will not damage the electronics. Oil pad under rotor arm. Also fit arcing shield. Keep oil away from dizzy centre carbon brush. The dizzy still has a rotor arm and cap to be checked. 5 min inspection and oiling every six months will do nicely. This unit is negatively switched. Which is generally the norm with electronic ignition. I am impressed with the neatness. (Message approved by david_gore) | ||
Geoff Wootton Grand Master Username: dounraey Post Number: 547 Registered: 5-2012 |
As expected, the new electronic points work great - the engine is running really smoothly. I guess this could have been achieved by just replacing the points and condenser, but it really adds to ones comfort level knowing there are no points to slowly deteriorate as the miles clock up. Maintenance, as Paul and Bob point out now becomes a really quick and easy job. So much better than having to remove and clean up the points each year. The whole system, electronic points, high output coil and postage was less than a hundred bucks. A really worthy upgrade in my opinion. Many thanks for all the advice and comments in this thread. I have one final related question but will start a new thread to match the topic. Best Regards Geoff | ||
Hubert Kelly Prolific User Username: h_kelly Post Number: 138 Registered: 3-2012 |
Hi Geoff, delighted all went well. Hk PS the engine bay looks great.. | ||
Geoff Wootton Grand Master Username: dounraey Post Number: 548 Registered: 5-2012 |
Hubert - Many thanks - also for the advice you gave over private message regarding the ballast resister and other matters. Geoff | ||
Bob UK Unregistered guest Posted From: 94.197.122.74 |
�40 is not a lot more than buying points and condenser. Old points dizzy that have timming scatter will have less scatter if converted. Timing scatter is where one cylinder or more is firing late or early in comparison to whatever cylinder the engine was strobe on. Check with strobe light. Tip ex on crank pulley. Mine is still points and has less than 1/4 degree scatter which is very good. Holds the dwell angle for ever. (Message approved by david_gore) | ||
Mark Aldridge Prolific User Username: mark_aldridge Post Number: 180 Registered: 10-2008 |
Take the strobe pickup from the centre HT lead to check for drift caused by lobe or spindle wear, ie by comparing timing on 1 and 4 on a 4 cylinder engine etc. The results can be interesting even on a low mileage engine . Electronic ignition performs much better in this comparison. Mark | ||
Bob UK Unregistered guest Posted From: 94.197.122.81 |
In the good old days of points I used to check the time base on the oscilloscope. The Lucas dizzys always more precise than other makes the worst being the 4 cylinder Delco Remy used on GM vivas. The traces on the oscilloscope hop around the time base (x axis) the voltage ( y axis) would also vary. Then when revved a sweet spot would show up where the engine is smooth and the traces steady. After that dizzy they changed to Bosch which were as good as Lucas. Then they all went electronic. And my equipment became obsolete. However over the years I made a fair amount of money out of it. The methods discussed on this forum for tuning without a scope are good but time consuming. Using a scope cuts the time down to connect up start car and look at scope 2 mins. But diy who cares if it takes 1 hour. The scope quickly shows faulty stuff. But fixing it is the same as without the scope. (Message approved by david_gore) |