| Author | Message | ||
Chris Miller Frequent User Username: cjm51213 Post Number: 96 Registered: 5-2013 |
Hi Folks, I have a leak from the valve cover on the '72 (... and probably on the '71, too). I have not done anything on this project, yet. A brief survey of the project tells me that there is a lot of stuff in the way. I see air intake/carburetor plumbing and A/C. The timing for this project is perfect, since the A/C system is completely discharged and I have to rebuild the A6, anyway. What is the easy way to get to the valve covers to replace the gaskets? Are there any traps? ("Oh, geeze, Chris. You shouldn't have done that!") Are there any adjustments that I must record to be sure I restore the same settings? Thanks for the help, Chris. | ||
Jonas TRACHSEL Experienced User Username: jonas_trachsel Post Number: 49 Registered: 2-2005 |
Chris Make sure you get the new synthetic rubber type gaskets instead of the old cork ones. Jonas | ||
Chris Miller Frequent User Username: cjm51213 Post Number: 98 Registered: 5-2013 |
Hi Jonas, I was going to use Hylomar... Will I need more than that? Chris. | ||
Nigel Johnson Prolific User Username: nigel_johnson Post Number: 125 Registered: 12-2008 |
Hi Chris,As Jonas says get the synthetic rubber type. They are fitted with spacers so the clamping effect is set. I've just fitted them to my very early Spirit. Once the carbs are removed its just common sense. The only hard part is getting the remains of the old cork gasket off. No sealant is required and you can even paint the covers while you are at it. Regards, Nigel. | ||
Chris Miller Prolific User Username: cjm51213 Post Number: 102 Registered: 5-2013 |
Hi Nigel, Where can I find instructions for removing the carburetors? Thanks for the help, Chris. | ||
Nigel Johnson Prolific User Username: nigel_johnson Post Number: 126 Registered: 12-2008 |
In the technical library Chris. Regards, Nigel. | ||
Geoff Wootton Grand Master Username: dounraey Post Number: 425 Registered: 5-2012 |
Chris The carbs can be removed as a unit with the central plenum. Just disconnect the linkages, air intake duct, engine breather pipe and fuel pipes and then remove the single bolt on the top of the plenum. The whole lot lifts off as one - it's really cool. As Nigel says - the details are in the technical library. The photo below shows a top view with the position of the long bolt that secures the plenum to the intake manifold arrowed. I've just noticed at the bottom centre of the photo you can see one of my high performance toe tek workshop boots - you can never be too careful. 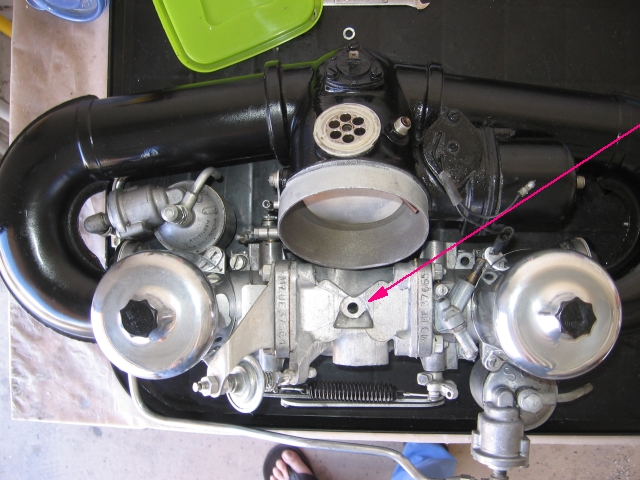 Geoff | ||
Chris Miller Prolific User Username: cjm51213 Post Number: 104 Registered: 5-2013 |
Hi Geoff, A picture is worth a thousand words! Now, see? That's what I'm talkin' about!!! Dude, that is extremely helpful. I never would have discovered that single bolt, until after I had disassembled the carburetor into a hundred components! <rant>Telling me something is "... in the technical library" is sort of like saying, "My brother is in Alaska.", which is technically correct, but not very helpful if you're trying to locate him.</rant> I probably don't need to elaborate on that theme; I doubt I am alone. Thanks very much for the help, Chris. | ||
Geoff Wootton Grand Master Username: dounraey Post Number: 426 Registered: 5-2012 |
Chris Another couple of tips: You only need to disconnect the fuel feed that enters the engine bay from the fuel tank. The coupling is located on the right hand side (as viewed from the driving seat) at the rear of the carbs. The fuel pipe that runs between the carbs does not need to be disconnected. There is a very thin paper gasket between the inlet plenum and the manifold. You might want to order one up front. When you put the unit back on make sure the linkage between the carbs does not touch the intake manifold. If this does happen there is a cam'd adjuster on the linkage. I mention this as the adjuster is not obvious. Geoff | ||
richard george yeaman Prolific User Username: richyrich Post Number: 170 Registered: 4-2012 |
Hi just a wee word from my own experience of fitting new rocker cover gaskets I used the cork type and fitted them without removing the carbs that was two years ago still no leaks. Richard. | ||
Chris Miller Prolific User Username: cjm51213 Post Number: 105 Registered: 5-2013 |
Hi Richard, > fitting new rocker cover gaskets ... without removing the carbs I'm very interested to hear how you got the covers free. Fewer steps; fewer mistakes. It looks like an impossible job. Chris. | ||
Brian Vogel Grand Master Username: guyslp Post Number: 866 Registered: 6-2009 |
As an aside, anyone contemplating working on the SY-2 series cars with HIF7 SU carbs owes it to themselves to take a look at the article entitled, Working on the SU HIF7 Carburetters, in Tee-One Topics, Issue 67. I have the feeling that many things discussed in this article would be of help to anyone attempting to remove the carbs from earlier vintage SY cars, too. Thank you, thank you, thank you Bill Coburn!!!! Brian | ||
Chris Miller Prolific User Username: cjm51213 Post Number: 106 Registered: 5-2013 |
Hi Brian, Where can I find Tee-One Topics, Issue 67? Chris. | ||
Brian Vogel Grand Master Username: guyslp Post Number: 867 Registered: 6-2009 |
Chris, Please look at my earlier post and click on the direct link I provided. Sheesh, you can lead a horse to water. . . Brian | ||
Chris Miller Prolific User Username: cjm51213 Post Number: 107 Registered: 5-2013 |
Hi Brian, I reacted to the e-mail notification which strips them out... Sorry for the bother... Thanks for the help, Chris. | ||
Geoff Wootton Grand Master Username: dounraey Post Number: 429 Registered: 5-2012 |
Chris The full list of Tee-One Topics can be found here: http://rrtechnical.info/TeeOne/teeone.htm It is part of the RROC Australia's Technical Library: http://rrtechnical.info/ It is essential reading for all RR owners. At the top of the TeeOne page there is an index to all the issues. Written by Bill Coburn, it is highly acclaimed. Not only is it full of information, there is a generous helping of humour as well. At the very least add these two pages to your favorites file. Many owners download their own copies. Geoff. | ||
richard george yeaman Prolific User Username: richyrich Post Number: 172 Registered: 4-2012 |
Hi Chris I am not one of these blow by blow detail people I try to disrupt as little as possible if you study each job that you are going to attempt you will find it possible to do a lot of stuff more simpler than it looks like replacing b4 spark plug without taking the engine out you will find a lot of help in tee one topics its a real good read, Mr Coburn gets to the nitty gritty. Richard. | ||
Randy Roberson Prolific User Username: wascator Post Number: 226 Registered: 5-2009 |
I just replaced the gaskets on my '70 after rebuilding the brake pumps. The b-bank cover was a little daunting, because of the heater piping and other things in the way, but I got with it and it was not as bad as I expected. I used the cork (original) gaskets as my Car had them and they were not leaking, although no telling how old. The new-style seals were rather more expensive. You must use a gasket because there is not a flat on the cover, it is designed to hold a gasket of rectangular section and without a gasket there is no flat surface to seal against the head with Hylomar alone. I bought the three rubber sleeve-grommet things for the attachment bolts, as mine were rather hardened. I also resprayed the b-bank cover due to poor paint. All in all, a very satisfying job and not as bad as it first appeared. Just a word; try to get the gaskets and other things you need before you start: this helps you get it back together before you forget how it came apart, and reduces delays waiting for parts. This is one of the reasons I am so slow in completing my projects on my car. | ||
Paul Yorke Grand Master Username: paul_yorke Post Number: 1211 Registered: 6-2006 |
HA! this was left as a preview - sorry if it's too late! Chris, are you talking about the two rocker covers or the single cam/tappet chest cover. The rocker covers have gaskets, cork or rubber. Hylomar will not do alone and chances are the old cork ones will be hard as rock. I'm a bit either way with the cork / rubber debate. Most of the cork o0nes give 20 years plus service but you have to tweek them every year or so. Plus side is you can use them again IF you need to take the rockers off for any reason. Rubber ones you don't have to retighten , but cost about �80 for a kit. They seem to stretch so when you take them off , they are impossible to refit. Second time around you don't the complete kit though. Pitfalls - the exhaust choke hot spot pipes nearly always break, so get ready to make or by some more  | ||
Chris Miller Prolific User Username: cjm51213 Post Number: 108 Registered: 5-2013 |
Hi Paul, > Chris, are you talking about the two rocker covers or the single cam/tappet chest cover. I'm not sure yet. I have a leak and I can see the result, but I don't yet know the source. There are too many things in the way for me to see, and by "things in the way", I mean A/C hoses, cooling hoses, brake lines, and wires -- and the carburetor. I suspect I am talking about the rocker covers. Where is the "single cam/tappet chest cover"? The first step is the carburetor and I have that quite loose. Once it is out of the way, I'll be able to see better. I've removed the bolt that Geoff identified. I have disconnected the throttle linkage. I have disconnected two steel lines on the right side (as viewed by the driver). I have disconnected two lines on the left side that I think are fuel lines, but now I'm not sure. They are stiff and coated with something that looks like calcified felt. Anybody know what they are? They are smaller gauge but of similar construction as the hose that vents the crankcase to reduce pressure (What is that called? I need to clean that attachment to reduce the chronic oil leak at the crankshaft sling-back.) The carburetor doesn't just lift off yet, but it is quite loose, so it is just a matter of time. I am going to try something radical, since this is a hobby... Can I fabricate a gasket from rectangular nitrile cord from Grainger? I don't know, but I can always buy a part from any of the suppliers, in the event this fabrication turns out to be too difficult. The nitrile cord costs about $5.00 for ten feet, so it is worth it to try this. What are the "exhaust choke hot spot pipes"? Thanks for the help, Chris. | ||
Randy Roberson Prolific User Username: wascator Post Number: 227 Registered: 5-2009 |
the "calcified felt" is probably asbestos: these are the heat lines to/from the exhaust manifold to the choke and they heat the choke after the engine is started so it goes off choke, therefore they have to be insulated. These are the "exhaust choke hot spot pipes". Anyway, there is not much of a gasket under the carbs, to the intake manifold (where you removed the single long bolt). I ordered one from Albers Bentley in Zionsville and I think it cost a dollar or two. I had to make new stove pipes for my car, and I insulated them with thermal insulating sleeve from Jeg's: it's black silicone ont he outside and no asbestos. Worked very well and almost no cost. | ||
Brian Vogel Grand Master Username: guyslp Post Number: 869 Registered: 6-2009 |
Randy, I, like you, used silicone encased fiberglass thermal insulating sleeve material to re-cover my stove pipe. The stove pipes are reasonably easy to make as well. See the article entitled, Making Stove Pipes, in Tee-One Topics, Issue 29, on the PDF page 10. I'd be inclined to try cunifer brake line rather than straight copper line since it doesn't have to be annealed and it is quite amenable to flaring and bending. Brian | ||
Bob uk Unregistered guest Posted From: 94.197.122.86 |
I made new stove pipes from copper nickel brake pipe I couldnt find any sleeve so I did without the choke works fine In cold places.I should think that sleeves will be needed May sleeves used on engine harness to oxygen sensor from modern scrap car I can get my carbietoots off in about 10 mins So fiddling around with them in the way is not time saving It makes jobs so much easier Rubber gaskets don't need gasket gloo because they are rubber I would evo stick on cover to gasket and engine oil head to gasket The evo stick will hold the gasket still And the engine oil will.allow a clean break making the gasket reusable they ain't cheap Cork gaskets are still ok to use These engines are not oil tight and smears are par No drips.just smears (Message approved by david_gore) | ||
Geoff Wootton Grand Master Username: dounraey Post Number: 430 Registered: 5-2012 |
I too used thermal sleeving from Jeg's when I replaced the stove pipes on my car. I would advise against not using insulated sleeving on safety grounds. My guess is the stove pipes get very hot, since they are being heated by exhaust gases at the manifold. The risk of burns to the forearm when working on a running engine are obvious. Geoff | ||
Geoff Wootton Grand Master Username: dounraey Post Number: 431 Registered: 5-2012 |
Excerpt from Tee-one topics - Issue 29 that Brian pointed to: "to avoid people working on the engine burning themselves they (the pipes that is)are covered with insulation." I thought I had read it somewhere - now I know. Geoff | ||
Paul Yorke Grand Master Username: paul_yorke Post Number: 1212 Registered: 6-2006 |
"my guess is the stove pipes get very hot" Tell me about it!  I think it is mainly because the uninitiated may not expect it to be hot. It is nowhere near as hot as the exhaust . . . But everybody knows that's hot, right? The stove pipe rusts where it's closest to the manifold. If floppy not springy it is most likely to be broken or braking. Same for the stove pipes I'm afraid. ;) Buy cork. its too much of a job for experiments with rope. �20 for twenty years. oil tightness . . . . or tightness . easy choice. Do not over tighten. Nip them up at annual service when tightening the manifold bolts and sump bolts. | ||
Chris Miller Prolific User Username: cjm51213 Post Number: 109 Registered: 5-2013 |
I have the luxury of "experimenting" on the '66, my cadaver car, but in this case the experience is not perfectly transferable since the engines differ; the '66 has the 6.2 and the '72 has the 6.8. There are, not surprisingly, substantial differences between the 6.2 and the 6.8. (This goes double between the '71 SRX and the '72 SRH) So, none of this project has actually been accomplished on the '72, which is where I need to do it for real. This does let me look ahead to know what I will encounter and prepare. This is a "remove, refurbish, replace" project, and the "refurbish" stage can sometimes take a long enough time that the "remove" knowledge is fuzzy by the time "replace" rolls around. Are the valve covers for the 6.2 and the 6.8 the same? They look the same. I would very much like to "refurbish" them, which I can do without extending the time between "remove" and "replace" on the 6.8 '72, if they fit, so I ask if I can refurbish the '66 6.2 covers and then put them on the '72 6.8 when the time comes. The valve cover on the right side (when viewed as the driver) is off (the '66 6.2) and was very easy. There was almost nothing on the way; just the spark plug wires and the chase. The cover on the left side is much more difficult and I need advice. I have lots of stuff in the way and I don't know how much to remove or which stuff is easiest to remove and replace. I've made the mistake of removing the obvious component in the past only to suffer hours trying to replace it. There are, at a minimum: o heater pipes running parallel just along the top and crossing at the southern end o high pressure brake lines from the pump o the oil fill assembly on the northern end o some sort of fresh air injection (I have no idea what this is, but the plumbing splits 8 ways and attaches to the cylinder head near the spark plugs.) Thanks for the help, Chris. | ||
Randy Roberson Prolific User Username: wascator Post Number: 228 Registered: 5-2009 |
Chris, the heater pipes aren't bad: one has a Tee on the firewall end, and on my car there is another tube connected to the end; think it is one of the transmission cooler lines. You have to pull this joint apart and it took some wiggling and pulling the coolant tube forward to get them apart. Where the front ends of the two tubes are connected: one to the to the casting behind the water pump with a single bolt flange with an O-ring seal, and the other to the cast pipe to which the lower radiator hose is attached. The latter is almost impossible to access with the alternator in place. Once I got the AC compressor and alternator out of the way, I could reach around/under/over, hold my mouth right, and get the bolt (7/16) out. I got the O-rings from Alber's for about 24 cents each. I repainted my B-bank cover with black spray paint. I cleaned it really good, including the raised lettering, sprayed everything, then used sandpaper (wet-n-dry) to clean the paint off the raised lettering once the paint had hardened. It really looks nice. You can use Imron or other high-tech paint if you prefer, but I used a quality brand of "rattle can". If I started from scratch to make a show car, I would get better paint, for sure. By the way, since you are beautifying during reassembly: my pipes seem to be plated with something, maybe nickle. I used 0000 steel woll to clean them up and they looked a lot better. IU waxed them with some leftover Collinite car wax I had, and they looked good and maybe the wax will help preserve the good looks for a while. You can clean all the bolt heads with a brass wire brush and 000 steel wool and clean the washers; it will really look better and you will be glad you did it.It makes a big difference (at least to me) for no money and some effort. I hope this helps and encourages you! | ||
Chris Miller Prolific User Username: cjm51213 Post Number: 110 Registered: 5-2013 |
Hi Randy, > I hope this helps and encourages you! More than you might realize. I have to remove the A6 compressor to rebuild it anyway, so your advice helps a lot. Thanks for the help, Chris. |