| Author | Message | ||
Chris Miller Frequent User Username: cjm51213 Post Number: 77 Registered: 5-2013 |
Hi Folks, Here at Hat Trick Labs, in Sacramento, we have been busy! (-: I have a check valve redesign that you can make with tools you already have (hack saw, file, drill press) and materials that you probably already have or can very easily get. You'll need a screw like this:  I used square drive, but I think Phillips would also work. I think the important part is the shape of the underside of the head, and the lack of threads, which the cabinetmakers will recognize lets the screw draw panels together. I can't tell you the specifications because I bought them years ago when I was building cabinets. Cut it to length and drill a 3/16" cup in the drive socket for the check valve spring to seat. I had a square drive, but Phillips would also work. Slotted might be more problematic because 1) the slot extends to the perimiter of the head and 2) your cup will not be automatically centered. Apply an o-ring. I used a A-006 Viton, but I'm pretty sure an A-004 will also work. 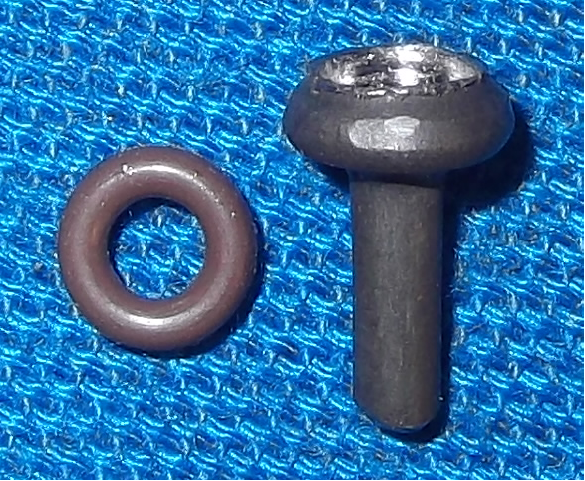 Assembly and deployment should be intuitively obvious. I can't think of any defects in my design and my experiments show zero loss over 24 hours at 125 PSI. I suspect that I will perform some experimental 1,000 PSI charges this weekend, and then I will have further results. I have another design that I made from bicycle inner tube and a flat head Phillips-drive screw. It has demonstrated the same zero loss performance and it was even less expensive, but I didn't have adequate glue, so I lost confidence in that design and proceeded with this one. It requires more tools, although you probably also have them, and more complicated assembly, but who doesn't have bicycle inner tubes sitting around?. If anybody is interested, I can add it as a reply in this thread, although, I can't imagine why anybody would use the less durable design, given that neither costs more than a beer. When I say "less durable" I mean that I foresee that the valve design could disassemble during charge owing to inadequate glue, which is not dangerous, but hugely inconvenient. Chris. | ||
Brian Vogel Grand Master Username: guyslp Post Number: 851 Registered: 6-2009 |
Chris, A clever homemade design very similar to the one sold by Flying Spares. Given that the screw head resides very far below the port opening and beneath the spring you wouldn't even have to worry if the polish on the edges where you drill out the seat is not perfect. Deburring and a few passes with sandpaper should be more than adequate. The worst part of the rebuilding job for me was getting that *&*%^*! micro circlip back into place to hold the spring. I thought getting it out was a fidgety process, but had no idea how challenging getting the thing back in would be. Brian | ||
Geoff Wootton Grand Master Username: dounraey Post Number: 416 Registered: 5-2012 |
Chris An ingenious use of a wood screw. I also cannot think of any defects in your design. I agree with Brian that removing the burr would be a good finishing touch. This would prevent any micro fragments entering the sphere. Nice one. Geoff | ||
Chris Miller Frequent User Username: cjm51213 Post Number: 79 Registered: 5-2013 |
Hi Brian, Yes. The design is similar. That's not an accident. What is substantially different, is the cost. My design costs literally pennies; Flying Spares doesn't sell the valve alone and the kit is market priced, but very expensive if you don't need to replace the diaphragm. Since I have done it about a thousand times, now, I can tell you how re-setting the clip-ring is done. Lay the clip in the bowl, and cover it with your thumb. Slide it over the aperture and press it in place. It will compress to fit and it will stay in place, although it will not be properly seated in its groove. Now use a 5/16" nail or bolt head to press it into the channel and work it into the seating groove. Do not fear that you might push too far and pass the seat because you probably won't, but if you do, you simply turn the accumulator over and push against the check valve. One of these passes will quite gracefully seat it. Chris. | ||
Chris Miller Frequent User Username: cjm51213 Post Number: 80 Registered: 5-2013 |
Hi Folks, To be perfectly honest, I didn't realize there was such a burr! It is only apparent because of the magnification of the picture. It didn't feel excessively ragged, but with that picture... Chris. | ||
Chris Miller Prolific User Username: cjm51213 Post Number: 141 Registered: 5-2013 |
Hi Folks, Check Valve Postmortem: So, six weeks, and fifty miles along, the accumulators signaled "zero Pressure" failure; well one was zero and the other something substantially less than spec. My first thoughts were that either the pump or the ACV had failed, because I was so confident in my check valve and secondary seal, that I was pretty sure I could rule out loss of nitrogen. I was wrong. I confirmed that the pump was working by attaching my brand new vacuum bleeder, sans vacuum cleaner, to the bleed valve of the front caliper. I opened it and a small amount of fluid emerged. I started the engine, and pressed the brake pedal. Fluid emerged in a steady stream. Pump was working functionally at least, so whatever problem I had had to have been in the accumulator -- malfunctioning AVC or loss of nitrogen. I will be able to test pump pressure in situ after I have bench tested the ACV and re-installed the accumulator. Turned out to be loss of nitrogen at a minimum. I will know about the AVC after I bench test my new check valve design in the next few days. So, not only did my check valve fail, but my secondary seal, normally accomplished with the crush PTFE ball, also failed. The o-rings are interesting because they failed in different ways for different reasons. Here is one: The failure here is that I have the wrong size o-ring. This is a Harbor Freight Tools o-ring collection, and I suspect that during packing a larger o-ring was accidentally dropped into the set of smaller. You can clearly see that it buckled. I should have been more vigilant and discovered this during rebuild, but I didn't and this is the result. 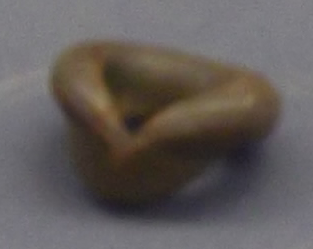 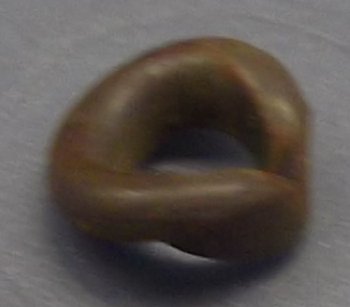 Here's the other one: The failure here is that the o-ring did not seal against the post of the valve stem. You can see that the pressure crushed it and you can also see the tears. The view from the other side looks good based on the witness mark, but it has been mis-treated badly; the pressure was more than this design can withstand. Possibly this failure could have been avoided had I coated the o-ring with castor oil which would have allowed it to find a more natural seat.  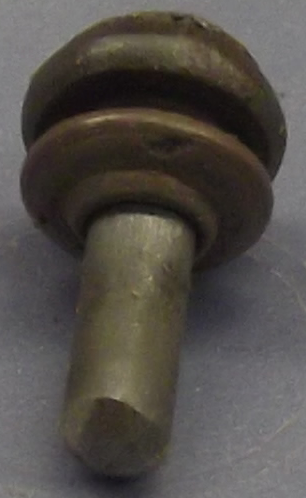 So, I'm not sure if the problem is the o-ring material, the o-ring size, failure to lubricate, or the shape of the valve stem, but clearly this is not a good design. However, I have a new design, and I am hopeful that it does not exhibit any of the same problems. Time will tell, and so will I. Chris. | ||
Brian Vogel Grand Master Username: guyslp Post Number: 912 Registered: 6-2009 |
Chris, Two things: 1. You do need to lubricate the O-ring that you use to slide on to whatever object you're using as your valve pin. 2. You need to be certain that whatever you use as lube is compatible with the seal material. If you use water based lube you should be safe, period. Since this seal will never come in contact with brake fluid except in the case of a catastrophic diaphragm failure it shouldn't matter whether the O-ring for this application is made of EPDM. It does, however, need to be "soft enough" to form a good seal. It seems to me that a correctly sized silicone o-ring or square ring (possibly even a slice off a silicone hose) would probably work well with a bit of silicone grease. Silicone grease would likely be better than water-based lube as far as retaining its lubricating properties over the long term. Clearly your basic concept is valid since a very similar technique has been in use by Flying Spares for some years now. Brian | ||
Chris Miller Prolific User Username: cjm51213 Post Number: 144 Registered: 5-2013 |
Hi Brian, Yeah... I think it is a valid design, as well. And I've given a lot of thought to the o-ring material. It has to be "soft" enough to form a seal, but "hard" enough to resist 2,500 PSI. I picked Vitron, because I think it will work... I may have many more trials before I reach a conclusion. If I knew more about materials I could probably simply do the math, but I know the math and not the measurements. I think my cabinet screw design would have worked, had I coated the correctly sized o-ring with castor oil, which would have allowed it to seat naturally, rather thank tear from friction with either the valve stem or the sphere seat, probably escaping "pinching" as well. I am working on a similar design with a pop-rivet, that I think is actually better than the cabinet screw design. I'll post it when I have results that are interesting. Chris. | ||
Brian Vogel Grand Master Username: guyslp Post Number: 913 Registered: 6-2009 |
Chris, You've now caught on to why every "rubber" piece in the ACV and accumulator is lubed with brake fluid where surface to surface contact is expected. Even the outer edges of the diaphragm, which you explicitly avoid exerting any twisting force on, only clamping force, is lubed with brake fluid. I really doubt your material is going to matter all that much as long as it's an o-ring. These are all meant as seals and, given the tiny space you're dealing with, will be squashed in plenty tight to withstand the pressure. A pop rivet is definitely the right shape. I've just never seen one that's as small as the opening into which you plan to drop it, though I am quite sure they exist. It should hold the spring and the seal quite nicely. Brian | ||
Bob uk Unregistered guest Posted From: 94.197.122.86 |
Does the final cap not completelying seal the nit charge. Like tyre valve caps? (Message approved by david_gore) | ||
Brian Vogel Grand Master Username: guyslp Post Number: 916 Registered: 6-2009 |
Bob, No, it doesn't though it cuts down on the leak rate significantly. The whole reason for the "crush ball" was to create a gas-tight seal by blocking off the charge port opening. I've typically had to use a fine drill bit to make a tiny hole then screw in a tiny screw to pull the crushed ball out. Only then could I get something in to the ball bearing to let out the remaining gas before taking the sphere apart. Even that didn't quite work all the time, hence the introduction of the in-cap o-ring as a tertiary seal. Brian | ||
Chris Miller Prolific User Username: cjm51213 Post Number: 153 Registered: 5-2013 |
Hi Folks, So, my initial results with a pop-rivet are looking pretty good, although I suspect that part of this is the result of my cabinet screw experience and learning that I should lubricate the o-ring to help it find a natural seat. Here is a side-by-side comparison for scale. Notice that the pop-rivet is hollow, so I removed the post, cut it to length and epoxied it protruding above the crown so the spring has a registration point. Of course, it is still too soon to say, but if there are any developments, I'll publish them. 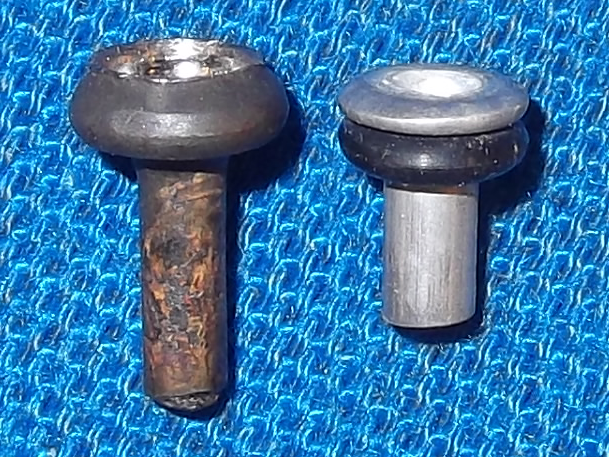 For your consideration, Chris. | ||
Patrick Lockyer. Grand Master Username: pat_lockyer Post Number: 891 Registered: 9-2004 |
No, it doesn't though it cuts down on the leak rate significantly. Yes it does as far as i'm concerned, with the use of a ball bearing the correct size and nipped up with the charging valve cap. IMO the nylon ball will not hold pressure from leakage from the charging valve at any time. Use common sence to stop the warning plates moving arround. It seems mine are fit and forget, maybe the thread is still here when I did mine some years ago. I dismantled the spheres with a four jaw chuck with the head stock locked with the use of chain wrench undoing the clamping ring The clamping ring on assembly just nipped up. some folk it seems delight in making jobs sound dificult keep it simple. |