| Author | Message | ||
Chris Miller Frequent User Username: cjm51213 Post Number: 68 Registered: 5-2013 |
Hi Folks, I'm trying to remove the window assemblies from the '66. Ultimately, I want to put the front ones in the '71, because the '66 has triangular "vent" windows that open and the '71 does not. Nobody has vent windows any more, and they are just so cool! ... but I digress. I have removed all the bolts that I can see, but the window assemblies are still attached to something. The attachment is clearly along the line defined by the bottom of the window and the top of the door, meaning the point where the metal stops and the glass begins. There is a seal there, so I know there must be some attachment, but I can't see any. I suspect I could solve this problem if I could lower the glass in the window, but there is no electricity, so I'm thinking I need to simply disconnect the glass from the elevation mechanism. This is proving more difficult than I would have expected. Does anybody know where there is a description of how to: 1) remove the window assembly -- or -- 2) separate the lift mechanism from the motor -- or -- 3) detach the lift mechanism from the motor so the glass can slide down -- or -- *) anything else that will help me rescue these window assemblies. Finally, I have a battery sitting around, so I could jumper power, if I knew where to apply it, and then simply lower the window like it was meant to be lowered. (Richard Treacy is the expert on this area, among other areas) Thanks for the help, Chris. | ||
Geoff Wootton Grand Master Username: dounraey Post Number: 409 Registered: 5-2012 |
Hi Chris My car is a 74 SY1 so there may be differences. This is how I would proceed on my car. The window is attached to the lift mechanism with a pinch bolt. I cannot imagine how you would have access to it with the window fully up. I would run a jumper to the motor and lower it so you can gain access and undo this bolt. I would then push the window back up and tape it in it's closed position so you have access to remove the winder assembly. I always remove the solenoid in-situ and then remove the motor and winder mechanism by carefully pushing the top of the assembly to the rear of the door and then maneuvering the motor end of the mechanism through the aperture in the door. The whole thing will pull out but be careful not to snag the window. Geoff | ||
Kenneth B Wood Yet to post message Username: razagood Post Number: 1 Registered: 12-2013 |
Hey Chris, lift assembly and motor come out as a unit with artful rotation but do remove the window switch assembly because that helps by giving you a little extra much needed rotational space. As Geoff says, two pinch bolts (large and small) with spacer between drive plate and metal window drop channel/support rubber (Metalastic) bushing. Lots of concealed nuts and bolts and spacers to remove plus 7 or 9 (I've forgotten) pop rivets need to be drilled out then lift the whole window frame out complete with glass. Glass needs to be all the way up or all the way down to see these rivets(it was last year I did mine)and glass held up in place if required with duct tape to see these rivets. It's pretty straight forward. Once everything is out you can easily service the chain drive, motor/helical gears, quarter lite vent window pivots etc etc. Let me know if you have any questions on this cos I did all four on my 67 SRH2350. **Important** There are hidden spacer/washers below the vent window that secure the frame to the door and they must be replaced exactly or you may cause some damage/distortion to the inner door section. Good luck! | ||
Bob uk Unregistered guest Posted From: 94.197.122.73 |
Remove wood trim Underneath is a black plate about 6 in deep and 2 foot long Remove Then the access is better (Message approved by david_gore) | ||
Chris Miller Frequent User Username: cjm51213 Post Number: 70 Registered: 5-2013 |
Hi Ken, I am salvaging this '66, so I have removed almost everything from the door, and it is hollow except for the window assembly. I have found and removed a small number of bolts from the interior that attached various rails and struts to elements of the door. The window assembly wobbles like loose tooth with some sort of hinge point where the shell of the door ends and the glass of the window begins. There is clearly an attachment that I can't see and your description of "pop-rivets" sounds exactly right. Are the "pinch bolts" holding the lift assembly to the door, or the glass to the lift assembly? Why can't I see these mysterious pop-rivets? Obviously they are not visible from the outside, but I have completely stripped the door and I don't see them on the inside either... So, I'd like to roll the window down. I have a battery, and all I need is the insulation codes for the window assembly and I can jumper 12 volts and roll the window down like a boss. I see the relay that the switch operates, and there are five wires. I assume that two are the switch and the remaining three, I suspect must be "up", "dn", and "gnd". Can you advise me here? Thanks for the help, Chris. | ||
Bob uk Unregistered guest Posted From: 94.197.122.74 |
The window motor has two wires Applying power to these wires works the motor reverse the polarity and motor direction changes DC electric motor DISCONNECT WIRES FROM LOOM because the circuit works by connecting these 2 wires to live + When a switch is operated one of the wires is connected to earth This allows the second switch and allows both switches to operated contrary to each other Loosen off the 2 bolts hold the window lift brake assembly (Message approved by david_gore) | ||
John Kilkenny Prolific User Username: john_kilkenny Post Number: 165 Registered: 6-2005 |
Chris, The 66 car will have the solenoid brake on the window lift assembly. Removing this will let the window glass drop. 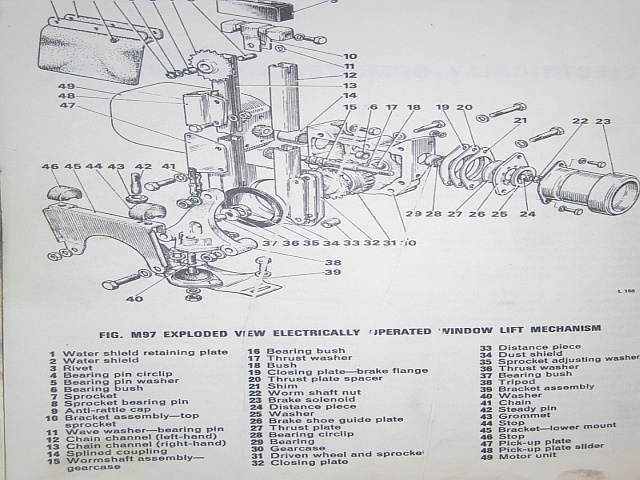 | ||
Geoff Wootton Grand Master Username: dounraey Post Number: 410 Registered: 5-2012 |
John That's a very good point. I knew the early cars had a rudimentary clutch mechanism on the window lifts but forgot that all that is required is to remove the solenoid brake and the window should slide slowly down to it's fully open position. This means that Chris does not have to run a jumper to the motor. Geoff | ||
Chris Miller Frequent User Username: cjm51213 Post Number: 72 Registered: 5-2013 |
Hi Folks, Success! I have extracted the lift mechanism! This did not happen the way I expected, but it is now clear why I was advised the way I was. I *really* wanted to be able to hot-wire the window, but I couldn't get it to work. Now, with the entire mechanism on the bench, I'm sure I can get it to operate, but it is also now clear that even had I been able to hot-wire it, I would *still* have had to remove the "23 - Brake Solenoid", to fit the lift mechanism through the assess port in the door, so "hot wire" would not have been the right approach. The key was the advice I got to remove "23 - Brake Solenoid", which did two things: 1) It exposed the axle that operated the lift mechanism which allowed me to turn the window down by hand. 2) It reduced the size of the lift mechanism so it fit through the cut-out in the door. Once the window was rolled down, I was able to see the row of seven pop rivets which form the attachment that was preventing me from simply lifting the window frame out from the top of the door, but more importantly, I was also able to see and remove the one bolt that held the glass to the lift mechanism, and detach that with ease. So, now I have the lift mechanism out and on my bench, so I can experiment with it, and among the experiments I plan is Richard Treacy's window accelerator module. There is still a row of seven pop-rivets along the top of the door which attaches the window frame to the door and I have to remove these to salvage the chrome window frame and the static triangular vent window. Anybody want a left hand rear door? It's in fine shape with no damage or deformities. I suspect I will have to scrap it... As far as that goes, I have a hood and trunk (bonnet and boot?) also... Do we have a "Parts Exchange" anywhere? We should... Thanks for the help, Chris. | ||
Geoff Wootton Grand Master Username: dounraey Post Number: 411 Registered: 5-2012 |
Chris It might be worth putting an ad up on ebay. I suspect there are many more SY owners out there who do not use the forums. Also there may be parts suppliers who may be interested. Geoff | ||
Chris Miller Prolific User Username: cjm51213 Post Number: 101 Registered: 5-2013 |
Hi Folks, I have removed everything from the doors except the stainless steel/chrome window frame and the window glass. The frame wobbles like a lose tooth, but is attached probably with the row of pop-rivets. I have drilled out three, but the remaining rivets are "protected" by the glass; I can neither raise it nor lower it enough to expose them. The glass is not restricted from it's full liberty of travel, but it is simply the design that I can't get there from here. Can anybody tell me any more about how to remove the window glass? Thanks for the help, Chris. | ||
John Kilkenny Prolific User Username: john_kilkenny Post Number: 168 Registered: 6-2005 |
Chris, Instructions for removing the window glass are in Section S1 in the Car Body chapter of the Workshop Manual for SY cars 1965-76. Go to rroc.org.au and follow the links. | ||
Chris Miller Prolific User Username: cjm51213 Post Number: 103 Registered: 5-2013 |
Hi John, The manual was not helpful, but as I was reading it, I realized that there had to be a way for the glass to escape the captive sliding channels. It occurred to me that maybe they would spread, but investigation proved that to be fruitless. However, it lead me to the solution -- one of the channels had material that slides out and releases the window. Thanks for the help, Chris. |