| Author | Message | ||
Chris Miller Experienced User Username: cjm51213 Post Number: 38 Registered: 5-2013 |
Hi Folks, I remember a thread from months ago which devolved into a comparison of accumulator wrenches. Since I have just completed disassembly of the accumulators from the '72, I wanted to share the experience. Of the two, one was probably perfectly fine. The other was only defective in the failure to hold Nitrogen pressure, which meant that when I opened it, the diaphragm was "glued" to the lower half of the sphere. I peeled it off and it seems to be completely intact. So the rebuilding job is actually only the gas valve for one accumulator. Any advice on how to polish the seat? I also need to know where to get a spring for the nylon ball. So, opening these babies is a challenge. I bought two pieces of 1/4" thick steel and had a machine shop mill the large central holes for the sphere proper and drill and tap the four holes I used for the ring engaging pins. I used five feet of 1" black pipe for the handle.  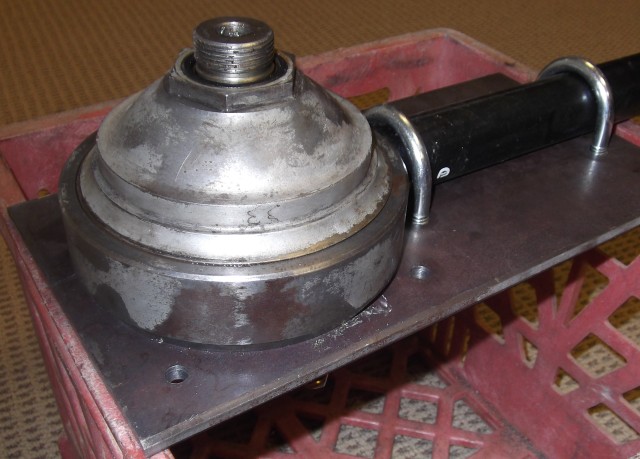 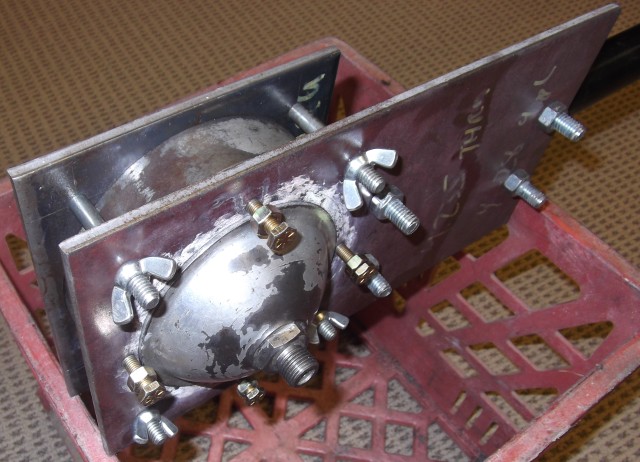 The biggest problem, believe it or not was the fabrication of the four ring engagement pins. Recently I hit on the idea of mounting the hardened bolts in the drill press and using the side of a file to give me these very nice and uniform pins: 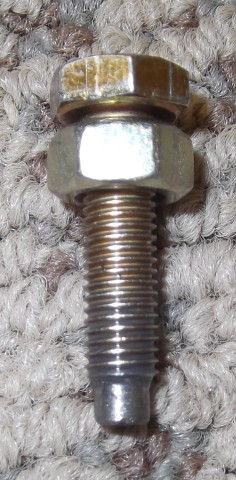 In addition to the above wrench, which cost in the $150 area, most of which was machine shop and well worth the price since the pins were precisely matched to the purchase points in the ring. I had to buy a 27/16" socket, which was another $25. Of my two accumulators, the one that was not in need of rebuild opened right up, with no problem. The other resisted me victoriously. I mounted an 18" sliding breaker bar in the hitch of the truck and pulled on the five foot wrench handle with no luck. I bent the breaker bar. The deformation you see in the image is not an artifact of the photo; it is a real bend that I put there, although it is less apparent in the picture then the full extend of the damage. Fortunately, it is Craftsman, so I can just go get a new one. 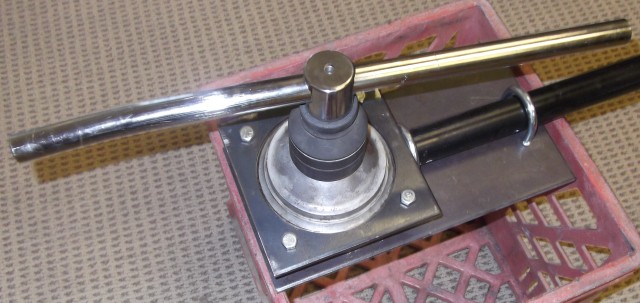 Feeling defeated, I doused the accumulator with WD-40, which conveniently collected in a moat formed by the steel plates of the wrench, and I went for a couple of beers while I considered what I was going to do now and how I could escalate beyond a five foot handle... Maybe I could back the truck against a tree? Hell, I'd already bent the breaker bar, so that was the weak link, not my ability to pull the handle, so adding force with the truck was the wrong approach. Several hours later, I thought I'd try again, and to my astonishment!!! it was almost finger loose! I'm not really a WD-40 fan, but in this isolated case, it worked a treat! So, fresh from my victory over the evil hydraulic accumulator twins, I needed to share by joy. I win! Chris. | ||
Brian Vogel Grand Master Username: guyslp Post Number: 785 Registered: 6-2009 |
Jim Walters gave me the best advice I've received on polishing the seat for the *metal* ball bearing that is supposed to be under the spring and seated there: I meant to tell you earlier that I have a 3/16ths inch ball bearing silver soldered onto the end of a steel rod. I use this to lap the seat onto which the ball bearing seals using Timesaver, a lapping compound. I finish off with automotive polishing compound, and test the sealing with a hand held vacuum pump on the charging port. I lap them until they will hold a vacuum indefinitely. Sometimes this takes two minutes, and sometimes fifteen. It just depends on how rough the seat is. This ensures you do not lose some of the charge while trying to get the nylon ball in and the cap tightened up. The nylon or PTFE ball is an external secondary seal that is dropped on to the opening in the charging port and gets crushed into same as the cap is tightened on. There is an O-ring that goes into the base of the cap as well that serves as a tertiary seal. I've known very few who can get a perfect or nearly perfect seal on the main sealing seat. This was a chronic problem "from the beginning" which resulted in the use of the nylon/PTFE secondary and o-ring tertiary seals. Flying spares has a rebuild kit that includes a redesigned primary seal mechanism that is far superior, in my opinion, to the original. Most people I know "overcharge" a slight bit knowing that there will be some slow leaking from the charge port until the secondary and tertiary seals are put in place when the cap's screwed on. If the leak is fast enough (and that's not very fast at all) to blow the nylon/PTFE ball off the charge port there is usually a small divot in the center of every charge port cap I've seen. The o-ring is placed inside at the base of the cap and you can balance the ball in that divot. Then you can usually screw the cap on to the charge port with the port pointing toward the ground with the ball remaining centered or close to such that the port opening itself finishes centering as you crank down the cap. You should be able to source the spring you need from amazonsupply.com if you have the other for reference. I've done that in the past for myriad small parts such as this but you have to know what you need to order. Brian | ||
Chris Miller Experienced User Username: cjm51213 Post Number: 39 Registered: 5-2013 |
Hi Brian, So this accumulator has apparently already been rebuilt and incorrectly at that. Well, if I've already gone to all this trouble, I think I owe it to myself to do the job right. The polish technique mentioned above is brilliant and I'm sure I can do something similar. I think I need to check out "Flying Spares" kit... Thanks for the help, Chris. | ||
Brian Vogel Grand Master Username: guyslp Post Number: 786 Registered: 6-2009 |
Chris, Yours is not the only one that some genius decided to put the "plastic" ball inside. I had one that was done that way, too. The level of polish on the nylon ball is generally none too high so it forms an absolutely horrible seal even if the seat is polished to perfection. Here's the link to the Flying Spares Accumulator Seal Kit Brian P.S. I long ago posted photos of the custom made accumulator wrench I used. The similarities between yours and mine are rather striking. | ||
Chris Miller Experienced User Username: cjm51213 Post Number: 40 Registered: 5-2013 |
Hi Brian, How did you make your pins? That kept me up nights for a long time. The rest was pretty obvious. What did you use where I used the 27/16" socket and 18" sliding breaker bar? Why did I not know about your wrench so I could have rented it? Geeze! The stuff you learn after it is too late... Thanks for the help, Chris. | ||
Geoff Wootton Grand Master Username: dounraey Post Number: 390 Registered: 5-2012 |
Hi Chris Nice work. You join the small band of people on this planet who have actually managed to separate a Rolls accumulator - no mean feat. I'd just like to give my recommendation for the FS rebuild kit that Brian mentioned. The ball bearing is replaced by a machined pin which is much more effective. When you come to rebuild the accumulators, keep the hemispheres stationary and use your pin wrench to tighten the collar. This will provide a clamping action on the diaphragm and prevent tearing it. Depending on how you mount the diaphragm on rebuilding the spheres, expect to hear a loud crack as you pressurize the accumulator with argon gas. This loud crack is the diaphragm snapping itself "inside out". I mention this as the men who pressurized my spheres required a change of underwear after hearing this noise. Geoff | ||
Brian Vogel Grand Master Username: guyslp Post Number: 787 Registered: 6-2009 |
Chris, I didn't "make my pins" (I didn't make the wrench, either, but worked with a local metalworker) - they're nothing more than hex cap screws made of hardened steel of the appropriate diameter to fit into the holes on the retaining ring. Even though they might seem insufficiently robust, they've been serving the purpose quite well. The idea was also that these are instantly replaceable should one break. You can see detailed photos of my wrench and the setup I used to hold the accumulator in the threads entitled Charging Accumulators (toward the end) and RR363 leak Accumulator/valve (in the middle). A number of your recent questions arose in earlier forms there (not that this is a surprise and it never hurts to revisit and/or clarify existing information). After you've taken a look at the photos I'll be happy to answer any questions you might have based upon same (or other ones, too). Brian |