| Author | Message | ||
Brian Vogel Grand Master Username: guyslp Post Number: 673 Registered: 6-2009 |
There are a number of brackets for the exhaust system, among other things, that use what's often called "Brillo" in their construction. Does anyone happen to know what this stuff actually is? Is it available for purchase? The final exhaust suspension bracket in my Shadow II appears to be almost entirely intact except for the "brillo" having vanished from inside the spring over the years. It's insane to spend $184 for one of these things (UR19153) if the missing component can be replaced. Brian | ||
Chris Browne Prolific User Username: chrisb Post Number: 127 Registered: 2-2010 |
Brian, If the exhaust suspension brackets contain the same "Brillo" material as the rear subframe compliance mounts, it is stainless steel wire knitted into mesh which is formed into doughnut shapes. Several of the doughnuts are then fastened together with a sleeve knitted from stainless steel wire. When the compliance mounts fail, the stainless steel sleeve fractures and bursts which causes the stack of doughnuts inside to collapse. I assume the failure occurs because of metal fatigue in the wire rather than corrosion. I have never seen the bushes which fit inside the exhaust brackets available as a separate part but perhaps others know different. Kind regards, Chris | ||
Brian Vogel Grand Master Username: guyslp Post Number: 674 Registered: 6-2009 |
Chris, I believe it is the same material. As it turns out, I was wrong about this being gone. It was so difficult to see or feel this while the bracket (or at least the lower part of it that U-bolts to the exhaust) was still in place. I decided to use my grinder with cut disc to cut the U-bolt so that I could get this part out to get a better look. Here's the lower part: 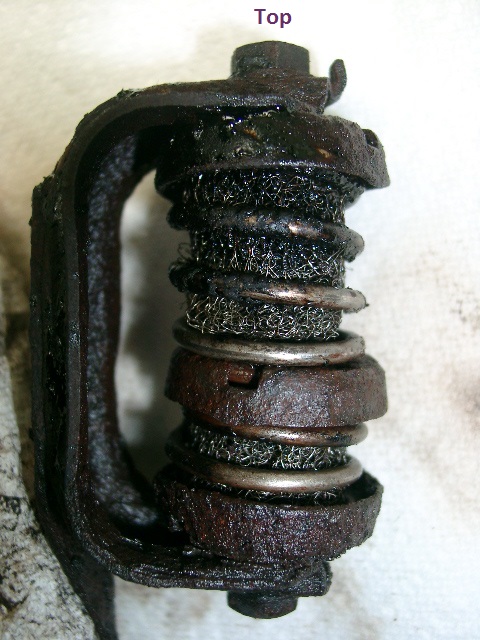 As you can see, the stainless mesh donuts are all there and appear to be in perfect shape. Although there's a bunch of surface rust on the this, it's still in pretty good shape. It looks wet because it just came out of a mineral spirits bath and hadn't dried off yet. It's interesting that the three small rivets that hold the part of the bracket through which the U-bolt goes appear to be made of stainless, or at least of some silver metal that doesn't rust like the main body of this part. What I can't figure out is how this piece is supposed to connect to the part that bolts to the car, and the parts manual picture isn't helping. I'm not even sure if UR19153 is the whole assembly, except for the U-bolt, or if it's only the part of the assembly that's the stack of mesh donuts. It's quite hard to tell. While I could go and pull this from my Wraith II I'm hoping someone out there might know how this part was connected to the remaining bit that's bolted to the car and/or have a picture of the whole assembly out of the car. Brian | ||
David Gore Moderator Username: david_gore Post Number: 1351 Registered: 4-2003 |
Hi Brian, If you are going to "de-rust" your parts, you might find the following links useful: http://www.moreg.org.au/dissolving_rust.htm http://www.aulro.com/afvb/projects-tutorials/115028-rust-removal-molasses.html I prefer the molasses solution but it does take time; the caustic soda electrolytic process is quicker but invariably involves the use of "elbow grease" to remove stubborn rust deposits that act as an insulating barrier to the current. The caustic soda will not affect the stainless steel but is lethal to anything made of Aluminium or Zinc. | ||
Brian Vogel Grand Master Username: guyslp Post Number: 676 Registered: 6-2009 |
David, My intention is to use one of my favorite products, Ospho, to stabilize the rust after getting rid of the loose stuff, priming it and then painting it with high-temperature paint like that used on gas grills. My biggest question now is how the upper and lower parts of this contraption are correctly (or even semi-correctly, but functionally) connected to one another. I want to get this thing fixed as part of putting the exhaust system back together. From what I can see it appears that someone once took this thing apart and never put it back together correctly. Brian | ||
Chris Browne Prolific User Username: chrisb Post Number: 128 Registered: 2-2010 |
Brian, it look like one or more parts of your mounting are missing. The photograph may not be exactly the right bracket but the basics are there. 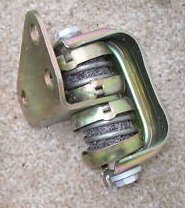 There should be two dished washers within the mesh and springs with the bracket between them. The idea is that the weight of the exhaust is suspended on the springs and mesh so there is no direct contact with the bracket to transmit noise and vibration. There should be two dished washers within the mesh and springs with the bracket between them. The idea is that the weight of the exhaust is suspended on the springs and mesh so there is no direct contact with the bracket to transmit noise and vibration. Kind regards, Chris | ||
Chris Browne Prolific User Username: chrisb Post Number: 129 Registered: 2-2010 |
Brian, Here are some more photos of part numbers UR18216, UR19153 and UR19246, 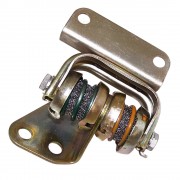  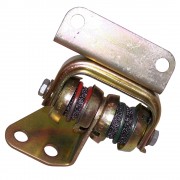 for post 30001 chassis number cars, courtesy of Flying Spares catalogue. for post 30001 chassis number cars, courtesy of Flying Spares catalogue. Hope this helps, Kind regards, Chris | ||
Brian Vogel Grand Master Username: guyslp Post Number: 678 Registered: 6-2009 |
Chris, Thank you. It would definitely be the the UR19153 in the center of the three above. One of the other two is used mid-way back to suspend the system. It's fairly obvious that this thing was taken apart at some time in the past. Given the nature of the corrosion I don't think that missing center disc rusted away. Now what I'll be curious to see is whether the angle bracket part of the thing corroded through the hole that runs "center stack" or whether someone just decided to not put it all back together. It's been as it is since I got the car in 2006. This has been one of those "ultra-low" on the priority list things to deal with. But since I'm now "in the area" it's time. Brian | ||
Jan Forrest Grand Master Username: got_one Post Number: 521 Registered: 1-2008 |
This type of 'compliance mount' is Crewe's way of replacing a perfectly adequate rubber bush/hanger with something ... better. What annoys me is that it's like the rest of the exhaust system in that parts of it are made from stainless steel while others are made from ordinary mild steel. This means that some could last for decades or even generations of keepers while others will need replacing in just a few years! It's not as if you can replace just the mild steel parts unless you have access to someone who can copy them accurately (in stainless of course) and then weld them to the good bits. Somehow I don't consider this situation to in keeping with Sir Henry's ethos of how to make 'the best motor car in the world'. | ||
Brian Vogel Grand Master Username: guyslp Post Number: 679 Registered: 6-2009 |
Jan, You and I are on the same page on this one. This is a bit of "boutique engineering" that while different, does not seem to me to be particularly better. Given the way these things are constructed I would actually expect that there's a greater likelihood of vibrations transferring back to the car body. The springs are very solid and everything's made of metal. I'm going to be very curious to see what I find, exactly, when I get the small 'L' shaped piece that bolts on to the car removed. After doing further exploration on the part that's already out, my theory about some sort of bolt running down the center on to which that piece would be held appears to be incorrect. I'm now suspecting that the two metal caps/discs in the center between the springs have (or in my case, had) something running between them to hold that piece in place and they are held in place by the spring tension. As I've commented elsewhere before, I believe the financial difficulties that occurred at RR during the 1970s resulted in some compromises, particularly for "things not seen." Brian | ||
gordon le feuvre Experienced User Username: triumph Post Number: 22 Registered: 7-2012 |
A read of section "Q" of workshop manual will enlighten on the mounts, how to fit to allow for system expansion, colour coding for different weight loadings etc. Very interesting | ||
Kelly Opfar Experienced User Username: kelly_opfar Post Number: 18 Registered: 7-2004 |
At the risk of outraging purists, I'll submit my solution. I bought soft polyurethane bar stock from McMaster-Carr and drilled a hole in it with a lathe. The poly fits snugly inside the newly plated springs and should work fine. My car won't be on the road for years yet so I can't state for certain that it is a perfect solution. 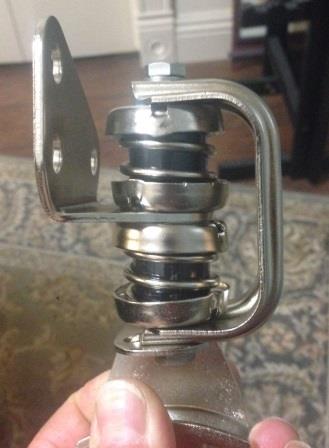 | ||
Brian Vogel Grand Master Username: guyslp Post Number: 680 Registered: 6-2009 |
Kelly, You certainly won't outrage me. Each and every one of us should feel free to pursue experiments, particularly those that pose very little to no risk. I am curious, though, as to how you came to be "brillo-less" in an exhaust bracket that is that brand new looking. I could never restore what's left of mine to that condition. Brian | ||
Kelly Opfar Experienced User Username: kelly_opfar Post Number: 19 Registered: 7-2004 |
I think the brillo was eyballin' me funny and had to be taught a lesson.  I really just didn't like the look of the brillo. It was misshapen and rusty and I couldn't figure out a way to restore it. The steel parts were sandblasted to remove rust and then glass bead blasted to put a satiny sheen on them. They were then electroless nickel plated and put back together with stainless hardware. Caswellplating.com sells home electroless nickel plating kits but I found the process to be too cumbersome after a little while. I now prep all my own parts then send them out for plating. |