| Author | Message | ||
Chris Miller Experienced User Username: cjm51213 Post Number: 31 Registered: 5-2013 |
Hi Folks, I am disassembling a 1966 Silver Shadow and I have removed the rear bumper. In this case two of the bolts that fasten the spring-like bracket that attaches in one spot on the frame just under the lights and two spots on the bumper proper are obstinate. One is still soaking in a fluid that I've heard is a good penetrating lubricant and one now sheered off. The second one may also sheer off; it is behaving like it wants to. First the sheered bolt: The right answer here is to stop trying to extract it and to simply promote it; the bolt now with no head can simply drive right through, and I know these threads are not caked with rust having already been extracted from the captive nut. "Easy-out"s don't work this way. So, it occurs to me that I can do almost the same thing. I could drill the bolt, tap the carcass, and thread a grade 8 bolt into it effectively giving me a new head, albeit a head that only works in one direction � fortunately it is the direction I want. This is a very appealing idea to me, but I have some reservations: 1: If the grade 8 bolt is too thin, then it will probably sheer it off, too, and I'd be worse off because I now have a much harder material in the way. 2: If the grade 8 bolt is too thick, then The walls of the broken bolt will express the pressure caused by threading the grade 8 bolt into the center against the walls of the captive nut � maybe. I'm not really clear on how much of the force of threading the grade 8 into a blind hole will cause the body of the stuck and sheered bolt to expand against the captive nut. Additionally, it may tear the sheered bolt at the now much thinner walls, which is probably a step in the right direction. So, I seek advice. My preference is to avoid the small gauge grade 8 bolt and the hazard of creating a bigger problem than I currently have, but I don't know where "too small" becomes "too big". I don't want to embark on some solution only to find some unanticipated consequence that lands me in even hotter water. What is a good way to extract/promote the sheered bolt from the captive nut? Second the penetrating lubricant: I've seen other discussions comparing various commercially available lubricants of the WD-40 variety, and almost all conclude that, ironically, WD-40 is the least effective of the bunch. The fluid that seems to get the best reviews is 90:10 ATF+Acetone. This is what I am trying. Has anybody else ever tired this? Has anybody else ever heard of this? Does it matter WHICH automatic transmission fluid I use? Is there something special about ATF that is not special about, for example, brake fluid? How about plain old motor oil? As you can see, I have lots of questions and I'm anxious to hear what else there is to know. Thanks for the help, Chris. | ||
Paul Yorke Grand Master Username: paul_yorke Post Number: 1118 Registered: 6-2006 |
instead of drilling and tapping a smaller hole inside the bolt. drill and tap to the correct size. | ||
Chris Miller Experienced User Username: cjm51213 Post Number: 32 Registered: 5-2013 |
Hi Paul, I thought about that, but there is no guarantee that I will tap the new threads in exactly the same phase as the old threads. Think of the worst case that I am 180 degrees off... Then I am tapping away the only threads I have. Thanks for helping me out, Chris. | ||
Omar M. Shams Grand Master Username: omar Post Number: 356 Registered: 4-2009 |
Dear Chris, If it was me - i would use the thin grade 8 bolt. The bolt that was holding everything together in the first place was impossible to move for two reasons. Firstly the threads were full of debris (corossion products or crap or both) and secondly the tension of the threaded portion becasue someone had previously tightened that bolt several years ago. Now that the hex head has broken off there is only one of the two factors holding things together. The chances are that the debris and corrosion contribute less to overall stubbornness than tension. When you put the new thinner bolt in, feel your way and apply judgement as to whether it is working or not. Then apply some light taps to the new hex head using a mallet to loosen the debris/corrosion. This is no time for gorilla tactics. Nice and easy. Good luck. Omar | ||
Geoff Wootton Grand Master Username: dounraey Post Number: 318 Registered: 5-2012 |
Hi Chris I would go with Paul's suggestion. My approach would be to drill the bolt to within 1/8" wall thickness to relieve the pressure and see if I could then remove it. I would then go for the same size as the original to see if I could match the threads. Finally, if all fails I would go slightly oversize. If you could upload a photo it would be useful in envisaging the problem. Geoff | ||
Omar M. Shams Grand Master Username: omar Post Number: 357 Registered: 4-2009 |
just a small note - have you ever used stud extractors? they have reverse threads on them and i have had lots of success getting broken spark plugs out of cylinder heads using those. This is what I mean in case you have not used them in the past http://www.ebay.co.uk/itm/5PC-SCREW-BOLT-STUD-EXTRACTOR-REMOVER-EASY-OUT-OUTS-/380536216001?pt=UK_Hand_Tools_Equipment&hash=item5899b9d9c1 | ||
Carl Heydon Experienced User Username: car Post Number: 47 Registered: 2-2004 |
Just to add...I love left handed drill bits! | ||
Paul Yorke Grand Master Username: paul_yorke Post Number: 1119 Registered: 6-2006 |
Try snap on parallel type bolt extractors. They will screw either way. | ||
Chris Miller Experienced User Username: cjm51213 Post Number: 33 Registered: 5-2013 |
Just because I've never seen such a thing, I shouldn't have assumed an "Easy-In" doesn't exist. And Snap-On no less! I'll find one and try it. I have pictures, and you can see that the head has sheered off, but you will have to take my word that the exposed threads are known to be good, since until recently -- very recently -- they were mated with the attendant nut. I think my best strategy is to promote the bolt, rather than extract it. Certainly if Snap-On makes a bi-directional "Easy-Out", that is a very good strategy. My next door neighbor, an old railroad guy, suggested that I should heat the bumper strut to expand it, and that is just an excellent idea. I tried it on the intact bolt, but that bolt was already too far gone. With very little provocation, it also sheered off, so I have the same problem twice, now. I think heat might be a good strategy, but it is difficult to manage because I don't know at which point I have heated the bumper strut sufficiently and not heated the bolt. More on this story as it progresses, but it will likely be two weeks as I leave for Lake Winnipesaukee in New Hampshire Thursday, and I will notbe able to get a Snap-On Post Extractor tomorrow. Stay tuned... Chris. Here is a broad view of the corner of the bumper with the bracket in place. Notice that there are two bolts that hold the bracket in place. The one on the right has been sheered headless, in the picture. In reality, both are now headless... 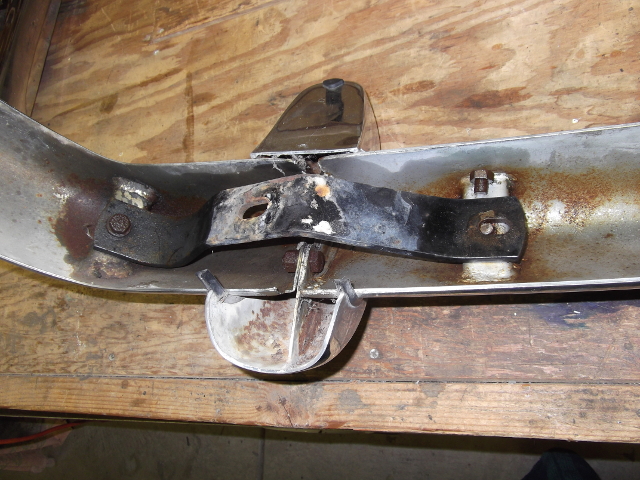 Here is a profile of the headless bolt with the bracket still in place. 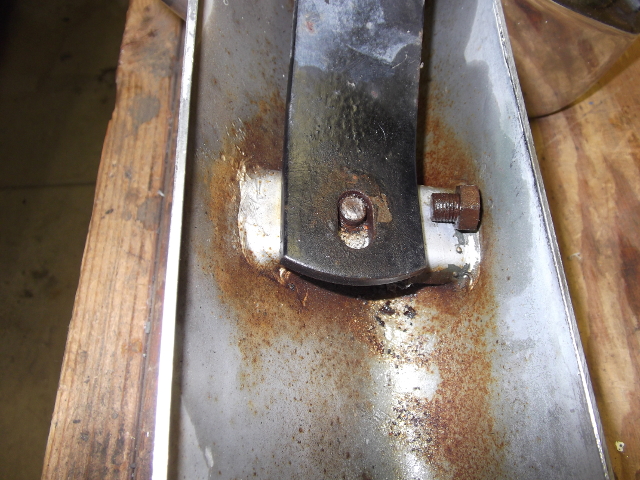 Here is the headless bolt with the bracket removed. I propose that I try to thread it back into the nut, rather than try to extract it. There is about 5/16" or 3/8" exposed. The Snap-On post extractor is my best choice, if it really does go both ways, and if not, then I need to find the "goldilocks" gauge for a grade 8 bolt -- not to big and not too small. 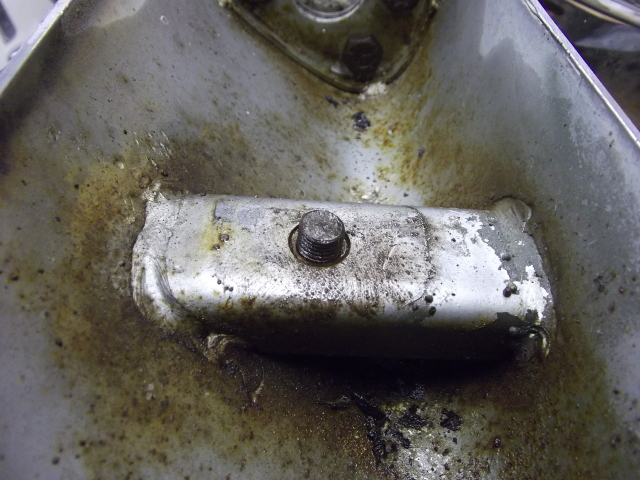 | ||
Brian Vogel Grand Master Username: guyslp Post Number: 629 Registered: 6-2009 |
Chris, The heat treatment doesn't require you to be careful, at all, about trying to differentially heat the objects in question. Most of the "grip loosening" occurs during the cooling phase, which is pretty much guaranteed to take place at different rates at the micro level, where it matters and works its magic. On several occasions when I've had to extract threaded fasteners that had frozen I did anywhere between four and seven cycles of heating very thoroughly with a torch and cooling completely between each cycle. Another option, which would likely require outside intervention, is to weld a new head on to the part of the bolt that remains embedded. I've seen this done and seen it work more than once, but have never had to resort to that myself. Brian | ||
David Gore Moderator Username: david_gore Post Number: 1334 Registered: 4-2003 |
"Another option, which would likely require outside intervention, is to weld a new head on to the part of the bolt that remains embedded. I've seen this done and seen it work more than once, but have never had to resort to that myself." I have also seen this done by a US friend who is a very experienced millwright with many years experience in maintaining earthmoving equipment and industrial machinery. I am firmly of the opinion the heat from the welding process is the catalyst for the subsequent undoing of the fastener as it is much greater than that available from alternative heat sources such as hot air guns or gas torches where one is over-cautious in their use to avoid heat damage. The nut is simply a means of facilitating the use of a spanner for undoing the recalcitrant fastener after the heat has done its job. | ||
Brian Vogel Grand Master Username: guyslp Post Number: 630 Registered: 6-2009 |
David, I'm inclined to agree almost entirely with your thesis. Having a new bolt head to use with a spanner and/or a "persuader" extension to the spanner is just a huge bonus. Your comment about the amount of heat generated by this process, and my own experiences with "torching something nearly to death," is why I said that one doesn't need to be overly careful/cautious in the heat application stage. Brian | ||
Geoff Wootton Grand Master Username: dounraey Post Number: 319 Registered: 5-2012 |
The thing that concerns me, and I ask this in all humility as I do not know the answer, is what happens to the chrome plating on that bumper if you apply the kind of heat required to weld a new bolt head on to the embedded bolt stem. Geoff. | ||
Chris Miller Experienced User Username: cjm51213 Post Number: 34 Registered: 5-2013 |
Hi Folks, I doubt that welding a new head on the bolt will change anything. The shaft is already sufficiently wedged that I have twisted the head off once. Adding a new head will not change that, unless the heating cycle has a profound effect. Drilling and taping the carcass has the same effect of adding a new head, with the limitation that I can only promote the bolt, not extract it. But, I can't extract it under current circumstances anyway. And this is where the gauge of the grade 8 bolt becomes important. The strength of the grade 8 bolt as expressed by gauge must be greater the the stuck bolt which has already failed under the strain. It turns out that I dare not use an "extractor", even if it will work "in the other direction", meaning promote, not extract, because the extractor will spread the body of the bolt and then I will have a bolt that I can neither extract nor promote. After some consideration, I'm going to try to drill and tap the carcass, but I want the treads to end at a depth which would be the equivalent of just emerging from the captive nut, so if the grade 8 bolt exerts sufficient pressure to fracture the broken bolt, it will do so at the "waterline" of the captive nut, so to speak. In that case, I will have a hollow stuck bolt, which I think can be sliced and broken out, without any effect on the captive nut. I think this is a risky strategy, because it requires a fairly precise hole for the tap. Any divergence from parallel to the axis of the stuck bolt, and I may intercept the captive nut, which would make any movement impossible, as well as damage the nut and require that I drill and tap the nut, which I would prefer to avoid, or would restrict the diameter of the hole to a smaller gauge grade 8 bolt then might otherwise be possible. I'm off to New Hampshire for nearly two weeks, so I'll try this when I return and let you know how I made out. I really hope I won't have to report that I fumbled it and I had to re-thread the captive nuts... Thanks for the help, Chris. | ||
Carl Heydon Experienced User Username: car Post Number: 48 Registered: 2-2004 |
Chris, I must agree with David. By far the quickest and most reliable extraction would be to weld a nut to the remains of the bolt and let it cool. Drilling and tapping should be a last resort. So many ways to go wrong. Have you ever tried to extract a broken easy out or tap? There is lots of bolt standing proud so a reasonable welder can get excellent penetration. It should come out so easily you will wonder why you worried. Carl | ||
Geoff Wootton Grand Master Username: dounraey Post Number: 321 Registered: 5-2012 |
I absolutely agree the heat cycle on that bolt if a nut was welded to it would almost certainly free it, but the problem remains, at what cost to the chrome plating on the other side of the bumper. Geoff | ||
David Gore Moderator Username: david_gore Post Number: 1337 Registered: 4-2003 |
A competent MIG/TIG welder will control the heat input during welding to minimise any problems. The mass of surrounding metal in the bracket and the bar itself will provide a more-than-adequate heat sink such that distortion/cracking of the Chromium plate is highly unlikely. Given the age of the vehicle, it is likely the traditional Copper/Nickel/Bright Chromium plating process would have been used and the base Copper plate is a highly effective conductor of heat so the possibility of distortion and/or discolouration is further minimised. If you want to be ultra-conservative, localised overheating likely to cause distortion can also be minimised by preheating the bracket and immediate adjacent areas of the bumper bar to 100/150 deg Celsius. Whilst this may seem counter-intuitive, preheating serves to even-out temperature gradients within the metal reducing local hot-spots and spreading the heat over a larger area thus reducing the highest temperature reached during welding. My procedure for removing the remains of the bolt would be to weld a nut onto the residual shank, let it cool and then soak it with "Inox" for at least 24 hours before attempting to undo it. I have found "Inox" to be very effective as a penetrating oil if given sufficient time to "wick" into frozen threads. A compressed air impact wrench gives a greater chance of successfully undoing "frozen" fasteners than spanners as the impact vibrations help break the bond between the fastener and the surrounding metal without the higher static loadings needed for a spanner to rotate the fastener. On another tack, there are a lot of antique farm machinery restorers in my part of the world and they have a number of "home brews" they use to disassemble old machinery that has been buried or left exposed to the elements for decades. The use of 50/50 kerosene/automatic transmission fluid blends to free frozen fasteners and pistons stuck in cylinders is wide-spread however allowing enough time for penetration is the key to success [sometimes weeks even months] - acetone evaporates too quickly to be effective so is not used. Molasses is a very effective rust remover that doesn't affect the base metal but, again, patience is a virtue. |