| Author | Message | ||
Brian Vogel Grand Master Username: guyslp Post Number: 332 Registered: 6-2009 |
Hello All, Work is continuing on LRK37110. I have posted in the past about the really strong exhaust fumes when the car is run. I'm now moving into virgin territory as far as knowing what I'm looking at and what that should tell me about the car's past or what I should do in the future. First, a diagram so that we're all on the same page. If I've screwed up by A Bank versus B Bank please let me know, but I think I've got this correct: 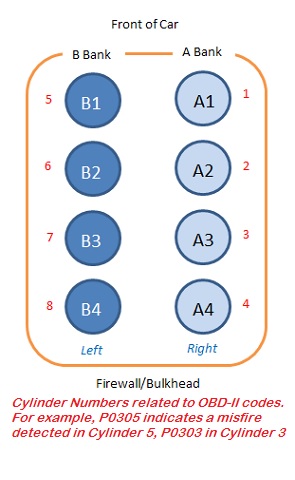 Today I pulled the A Bank spark plugs and a raft of pictures will follow. I found different conditions present in different cylinders and also that the gap setting on three of the four were approximately the same but one had a much greater gap. All plugs are Champion RN14YC plugs. 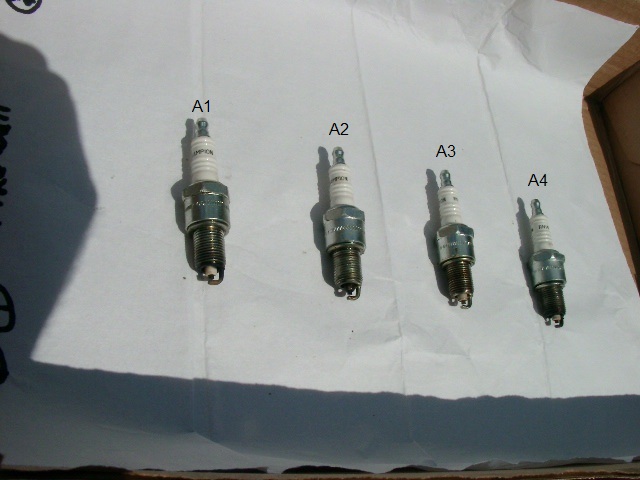 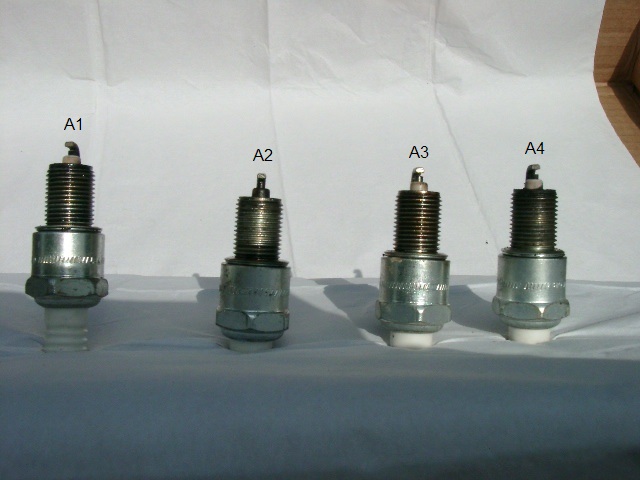 Close-ups of each spark plug's "working end" with gap data: 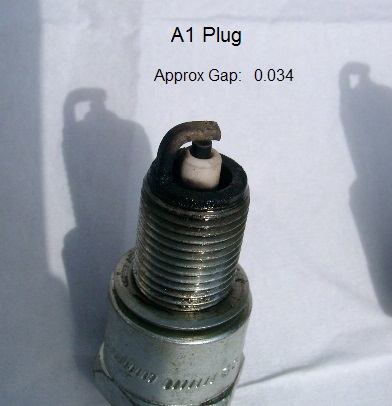 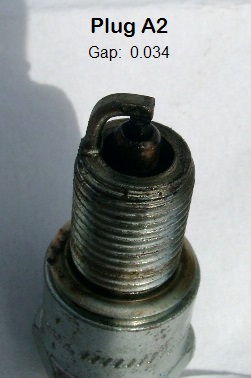 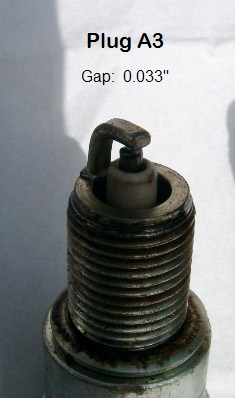 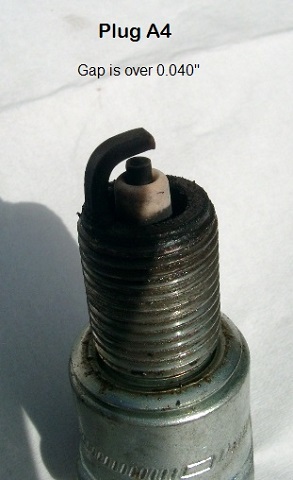 And, finally, the well-worn plug gap gauge I used to get the gap measurements. If anyone can explain the correct technique to use this thing to adjust the gap on new plugs that would be helpful, as I presume I'll need new plugs and will have to set the gaps. I really don't know what "the plugs are telling me" about what's wrong and what would be the most appropriate thing to do next. Also, am I remembering correctly that one should only use copper-based anti-seize lubricant when installing spark plugs in our cars? Brian | ||
Paul Yorke Grand Master Username: paul_yorke Post Number: 1004 Registered: 6-2006 |
I'd start with getting a set of NGK's, fitting them and repeating the testing. You might want to keep a few of the cleaner Champions though, they can be used for blocking water hoses and the like while you carry out other jobs.  | ||
Geoff Wootton Prolific User Username: dounraey Post Number: 163 Registered: 5-2012 |
Hi Brian My personal view is that the sparks plugs are not telling you much at this stage, other than there are no big problems e.g. a badly oiled up plug which would indicate it is not firing at all. Your plugs, with the possible exception of A2, appear dry, which means they appear to be firing ok. They are slightly sooty, which indicates a rich mixture strength, however if you have just been running the car in the garage for short periods of time, then you would expect them to be. For myself, plug colours are part of the tuning process. My approach is as follows: Compression test each cylinder Set ignition dwell angle and timing to factory specs Balance carbs and set the mixture strength This gives you a starting point for road testing and fine tuning. It is during the fine tuning stage that I will start looking at the plugs and interpreting what they are saying. The important thing when setting plug gaps is never use a screwdriver or such implement to prise the outer electrode - you may damage the centre electode or insulator. My spark plug gapping tool is in the form of a small lever that hooks onto the outer electrode and allows it to be carefully bent in either direction. It would be interesting if you could upload the picture of your gapping tool. Geoff. | ||
Brian Vogel Grand Master Username: guyslp Post Number: 333 Registered: 6-2009 |
Geoff, I thought I had uploaded that picture. I realized last night that I hadn't included it in the original post. I must have hit something wrong, because the post was composed and ready to go. Here's the ancient tool I have in my possession: 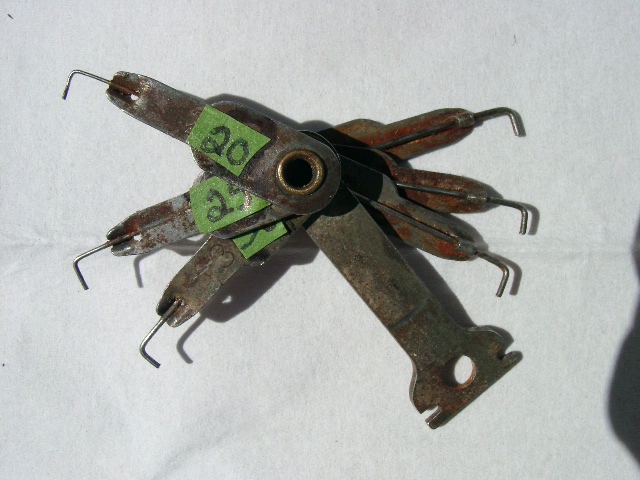 Brian P.S. to Paul: I have a set of NGK iridium plugs but I don't want to fit those until I at least have the car running so that they don't instantly get fouled. There has also been significant variance of opinion on the RROC-US as to whether new "high tech" plugs are really any better in cars of this era or not. | ||
Paul Yorke Grand Master Username: paul_yorke Post Number: 1005 Registered: 6-2006 |
Hi Brian, try a set of cheap NGKs then. Might be catch 22 otherwise! Also completely new fuel etc. with no condensation in the tank. (Wynns dry fuel treatment) | ||
Brian Vogel Grand Master Username: guyslp Post Number: 334 Registered: 6-2009 |
Paul, NGK recommends their V-Power series BPR4EY plugs for the SY series cars. At $2.03 each from my least expensive local auto parts emporium this will be one of the cheapest experiments I've ever undertaken with either of my cars. At that price even the idea of cleaning the existing plugs is ludicrous. Now I'll add two questions, one a repeat: 1. Should I use copper-based anti-seize lubricant when putting the new plugs in? 2. What are the thoughts of the cohort regarding using a spark indicator device? I have something that you put in line between the plug wire and the plug (temporarily, of course) that gives off a tiny pulse of light with each spark signal. This seems to me a good way to check each plug while the engine is running, shutting off between each plug to move the tester. 3. Can one use the existing washers on the new plugs or are new ones required? I've had nothing but new fuel in the tank since I drained it last year. I've only been putting in two gallons at a time so I have run it out most of the time between refills. Since virtually all of our fuel here in the US has 10% ethanol, absorption of water and passing it right along is almost never a problem. Brian | ||
Geoff Wootton Prolific User Username: dounraey Post Number: 164 Registered: 5-2012 |
Hi Brian That is the type of tool I like as you can use it to close as well as open the spark plug gap. The round ones that look like an oversize 25c coin with a small hole to lever the gap open cannot be used to narrow the gap. I believe the convention is to tap the outer electrode on a piece of wood. BTW - It is worth putting a meter on your spark plug wires. Anything over 15 kOhms and they are best replaced. When I checked mine there were two leads that appeared to be open i.e. no reading at all. There was no noticeable misfire so I believe that some of the electrons were managing to jump the gaps, but the quality of the spark must have been very poor. Needless to say, I replaced the lot. Geoff | ||
Paul Yorke Grand Master Username: paul_yorke Post Number: 1006 Registered: 6-2006 |
1. Should I use copper-based anti-seize lubricant when putting the new plugs in? Tiny amount 2. What are the thoughts of the cohort regarding using a spark indicator device? I have something that you put in line between the plug wire and the plug (temporarily, of course) that gives off a tiny pulse of light with each spark signal. This seems to me a good way to check each plug while the engine is running, shutting off between each plug to move the tester. good but they are pretty sensitive. See checking lead resisyance 3. Can one use the existing washers on the new plugs or are new ones required? bargain, new ones are included. You can not reuse. | ||
Brian Vogel Grand Master Username: guyslp Post Number: 335 Registered: 6-2009 |
Well, I purchased 8 of the BPR4EY plugs and learned, as Paul notes, that the washers come with them. The only prior plugs I'd purchased were for lawn mowers (or at least ones I'd looked at - I don't think I've ever even opened the boxed of GR4IX plugs after the advice I've received about waiting until you know that fouling is unlikely). Getting the A bank plugs out and in again was a fairly simple proposition. I also had little trouble getting all of the B bank plugs to break loose, but that's where I stopped. The B Bank plugs, particularly B3 which is located below the hydraulic reservoir, are quite difficult to get your hands to if you can do it at all. I'm sure I could manage to get the existing plugs out, it's getting the new ones back in with out committing hara kiri that may be questionable. What are the "old mechanics tricks" related to these cars and the B-bank as far as getting the new plugs back in place and properly threaded? Also, what, if any, cautions are necessary if one is using a torque wrench with an extension and a universal joint? There is absolutely no way to get a "straight shot" to tighten these plugs. That was true even on the A bank for two or three of them. It only occurred to me afterward that perhaps a torque wrench (click type) should not be used with extensions and/or universal joints. Since I'm using copper anti-seize I'm using the low figure of 13 ft-lb. Brian | ||
Geoff Wootton Prolific User Username: dounraey Post Number: 166 Registered: 5-2012 |
Hi Brian My method is the extensive use of extension bars. On the SY1 all B bank spark plugs can be removed without recourse to universal joints by using extension bars made up to the right length. B3 on an SY1 can be reached with a 16" extension bar. The end where the torque wrench/ratchet fits is between the hydraulic reservoir and the front wing. Any longer and it would foul the edge of the wing, any shorter and the reservoir gets in the way. For B4 I use a very short extension bar and the ratchet fits in the gap between the reservoir and the side of the cylinder head. I find that most bolts are accessible in this way. Refitting spark plugs is the reverse. I load the spark plug into the spark plug socket and very carefully position it at the spark plug hole using an extension bar. Good illumination and a light touch is essential. I have never had a problem using this method and find it much more accurate than trying to feel my way with the spark plug in my hand. Geoff | ||
Brian Vogel Grand Master Username: guyslp Post Number: 336 Registered: 6-2009 |
Geoff, While I truly appreciate the advice I can guarantee you it doesn't apply to the unbelievably messy configuration of a U.S. spec SY-II with pollution control system in place. I was already using an extension on an extension, between 18 and 24 inches depending on the combination, and there was still no way I could find to get anything near to a "straight shot" in to the B bank plugs. This is not really a problem as far as removing them (or at least it's a small one) but it is as far as directing them back in. Brian | ||
Geoff Wootton Prolific User Username: dounraey Post Number: 168 Registered: 5-2012 |
Hi Brian I am starting to appreciate just how much easier it is to work on an SY1. It hadn't occured to me just how many differences there are and how difficult it is to work on a SY2. I shall bear this in mind when any questions are asked in future regards the SY2. Geoff. | ||
Brian Vogel Grand Master Username: guyslp Post Number: 337 Registered: 6-2009 |
Geoff, While there's a great deal of truth to, plus ça change, plus c'est la même chose, with regard to cars from Crewe there are also some very specific and important exceptions!! Brian, who's now wondering whether another articulating arm that I have might serve the purpose for directing the plugs in without the need for a universal joint for that step | ||
Paul Yorke Grand Master Username: paul_yorke Post Number: 1007 Registered: 6-2006 |
we have a special tool for these kind of jobs. Unfortunately it's home made . Our good old octomonkey . Made by graphing monkeys hands onto the end of an octopus's tentacles - perfect for situations like these . Always. Always Always screw spark plugs in by hand until they reach the washer , or at least half way . Never start with ratchet or bar . if b4 is truly impossible , try from under the car behind the rear engine mounting . when tightening plugs with crush washers then down to the washer (by fingers should be possible ) and an extra three quarters of a turn . You should feel it stop . | ||
Jeff Young Prolific User Username: jeyjey Post Number: 137 Registered: 10-2010 |
On a related note, my plugs came with steel crush washers. Seems a little iffy with an aluminum cylinder head, but I'm only guessing. I have some copper crush washers. Do folks usually replace the steel ones with copper, or are the steel ones fine? Thanks, Jeff. | ||
David Gore Moderator Username: david_gore Post Number: 1269 Registered: 4-2003 |
Brian, A useful method for starting the plugs in locations where large hands are a hindrance is to insert the plug into the end of a short length of garden hose and then use the flexibility of the hose to line up the plug and start insertion. With a little experience [test with some old plugs], you will quickly feel the difference between cross-threading and proper thread engagement. The secret of the hose is its flexibility, the "feel" transmitted by the hose and the fact the hose will slip on the plug if you apply too much force. Rule 101, if the plug doesn't start to screw in smoothly with minimal effort; it isn't properly aligned so just reverse to free the plug, reposition and try again. Once properly engaged, finish insertion by hand, pull the hose off the plug and use a plug socket, "wobble" extensions and/or a universal joint to complete installation. | ||
Randy Roberson Prolific User Username: wascator Post Number: 119 Registered: 5-2009 |
I endorse David's suggestion as it worked for me, and I don't think I would have ever got B4 in there without using it. I had some rubber fuel hose which would slip over the insulator of the plug, and it is amazing how it lets you turn the plug in an awkward position and feel what it is doing. Gool luck.It can be done, so don't give up. | ||
Brian Vogel Grand Master Username: guyslp Post Number: 338 Registered: 6-2009 |
Thanks to all for the hose suggestion. I have some sections of both garden hose and silicone tubing that might work well for this exercise. On the A bank I did exactly what is described with my hands: screwed the plug all the way down using my fingertips. If it's in correctly it simply glides in, and even more so if a bit of anti-seize has been applied. Then I attached the extensions and universal joint (when needed) and used a torque wrench to tighten them to 13 ft-lb. For all the complaining about plug B4 (and I've seen plenty over the years) it's B3 that's the nightmare on this car! There's just too much "stuff" making any line of sight almost impossible to get and getting a hand or equipment in there just as difficult. I also worry about knocking some sort of crud loose and getting it in the cylinder when trying to get the B bank plugs back in. Brian, who very, very seldom gives up and who's willing to take days thinking about options before acting [life teaches you things, patience when it's required being one of them] | ||
Randy Roberson Prolific User Username: wascator Post Number: 121 Registered: 5-2009 |
As we say, with sweat in our eyes and expensive RR363 dripping off both elbows, "That is part of the charm.". | ||
Geoff Wootton Prolific User Username: dounraey Post Number: 169 Registered: 5-2012 |
Brian I've constructed a "bench" that rests across the two front suspension pillars. By kneeling on this bench it gives me great access to the centre, rear engine area. It would also allow access to the B bank spark plugs. http://au.rrforums.net/forum/messages/17001/12559.html It's hard to tell from the photo, but when you are kneeling on it you are right above the engine and makes a lot of hitherto difficult areas very accessible. Would this method help on the SY-II? There is also Bill's method of removing the front wheels and resting the car on the bottom swivels of the suspension which would allow easier access from above. | ||
Brian Vogel Grand Master Username: guyslp Post Number: 340 Registered: 6-2009 |
Geoff, I recall that post. Since the bonnet is off the car, and I can get some awfully good shots looking into the engine compartment from above I need to do that. It is very difficult for me to explain just how much more "cramped" the engine compartment is in LRK37110 compared to SRH33576. I'd presume that even SRH33576 has more "junk" in there than the earlier cars do, though not nearly to the extent that LRK37110 does. Brian, who has access to the materials and tools necessary to build said bench if it looks like it will help | ||
David Gore Moderator Username: david_gore Post Number: 1271 Registered: 4-2003 |
Brian, problems with replacing B3 were the reason I used the hose method in the first place. Absolute cow of a job getting under the reservoir if you have large hands like yours truly. As far as getting crud in the engine through the spark plug hole goes, I always washed the plug area with kerosine using a compressed air engine cleaning gun tool followed by a blow-dry with a compressed air blow gun to remove any crud before it became a problem. | ||
Brian Vogel Grand Master Username: guyslp Post Number: 341 Registered: 6-2009 |
David, While yours truly is tall and thin I also have large hands. This might be handy were I a concert pianist but not when I am a DIY mechanic. Geoff, pictures were promised and here they are. I hope that these may prove helpful to those doing spark plug replacement on a Shadow or Wraith II with pollution control equipment in the future. Engine Bay from Above - Merged from two photos [externally hosted - exceeds 640x480 pixels] The A Bank, exposed by removing the air warming intake and segment of the air trunk toward the front: 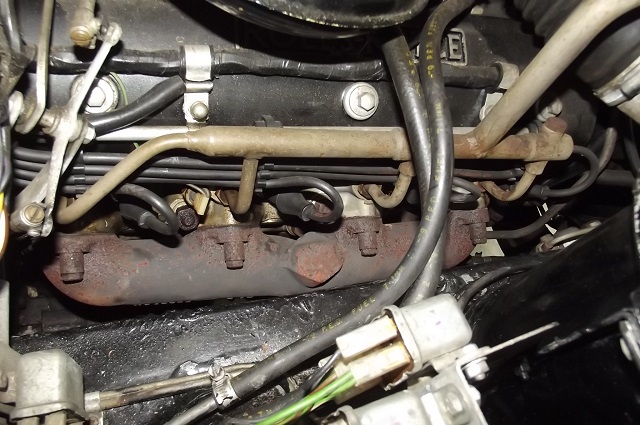 The B Bank, from the front of the car. The picture really does tell it all as far as access goes: 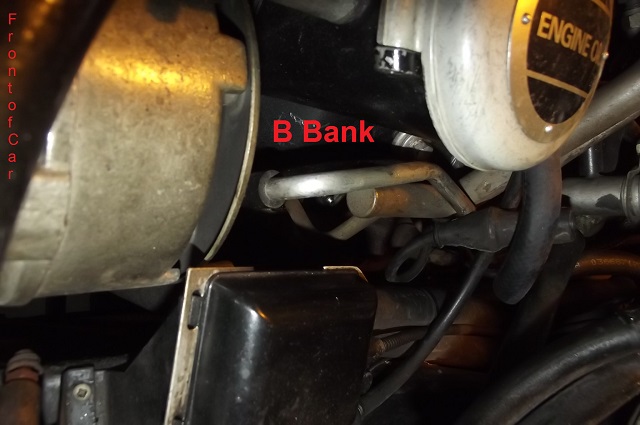 Plug B4, which at least you can get a line of sight on. B3 is hidden to the right: 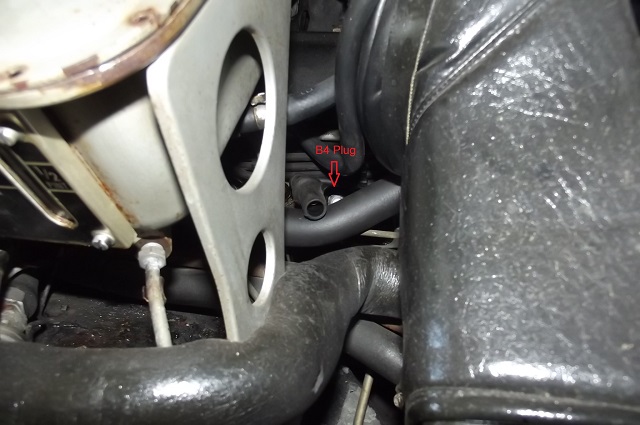 Plug B4, shown with extension, universal joint, and plug socket in place: 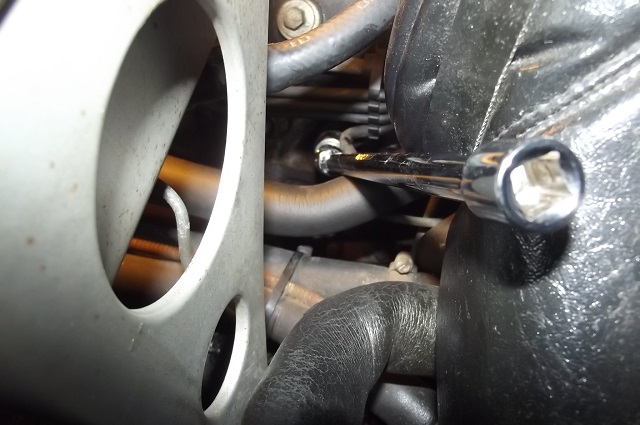 Finally, the B3 plug shown with extension, etc., from the easiest access direction. Notice how the oil dipstick adds to the challenge of getting to this plug: 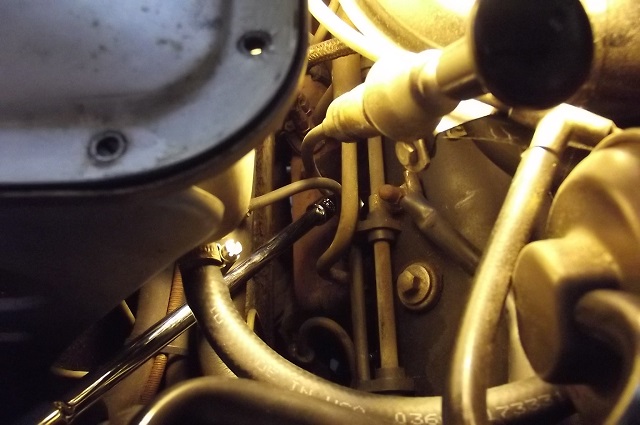 I've now received the "use a piece of hose" advice from at least four sources with the only thing changing being the specific type of hose preferred. I have convinced myself that this will work, and work relatively easily, so that I can cope with continuing!! ;-) Brian | ||
Paul Yorke Grand Master Username: paul_yorke Post Number: 1008 Registered: 6-2006 |
Un bolt the dipstick tube. Don't bother to try it without doing that first. | ||
Benoit Leus Frequent User Username: benoitleus Post Number: 60 Registered: 6-2009 |
When I was investigating the rough idle on my Shadow, I regularly took out the plugs. I found that the cheapest and most basic tool worked best. With this tool and after a few tries I can now replace all 8 spark plugs in 30 minutes. regards, Benoit 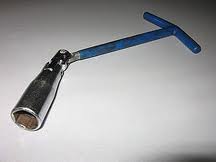 | ||
Brian Vogel Grand Master Username: guyslp Post Number: 345 Registered: 6-2009 |
Benoit, That tool is simply a T-bar variant of extension, universal joint, and spark plug socket. I've definitely got the functional equivalent already. I'm sure this, like all things, gets easier with practice. My hands are large enough that I can guarantee you that it will never be an easy proposition for me to get any of the B bank plugs started by using my actual hands. I am really hoping that I can get a good groove going using the piece of hose to start the plugs so as to avoid cross threading. After that it is a relative cinch to tighten them down. My primary worry is getting the new plugs to begin threading in to the engine correctly. All else is really a no-brainer after that. Brian | ||
Brian Vogel Grand Master Username: guyslp Post Number: 354 Registered: 6-2009 |
Now that I've managed to get the B Bank plugs removed and replaced I thought I'd share some photos, ask some questions, and share some answers. First, here are the B Bank plugs: 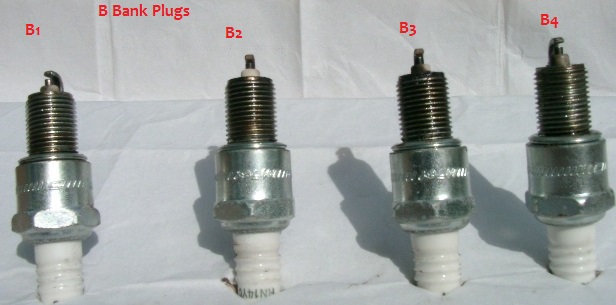 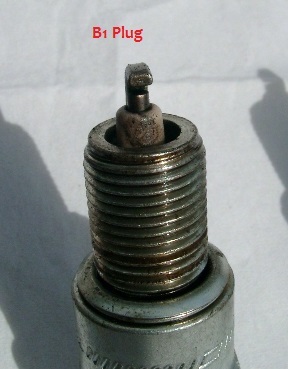 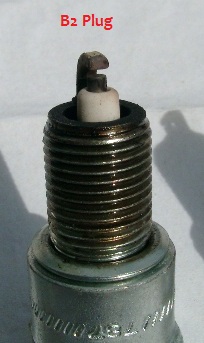 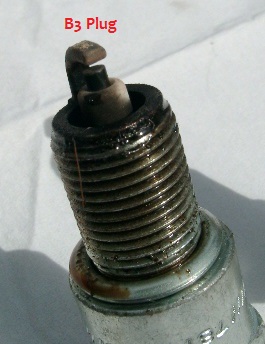 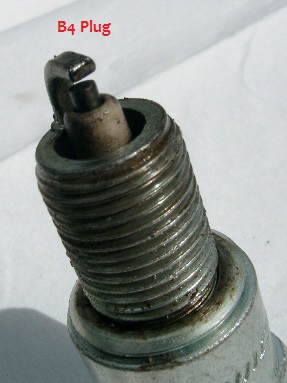 After considering several options, and playing with them a bit, I found that the ideal tool to use to screw in the plugs to their respective holes was 3/8" ID heater hose. It holds the individual plugs very firmly, has the necessary flexibility to allow the necessary threading of the hose for the trickier approaches, yet has enough structural stiffness to keep the plug from flopping around on the end of the hose. It also transmits "feel" when threading exceptionally well. The B3 plug is by far the trickiest as far as finding a viable approach to get the plug positioned correctly, so that's the one I've documented here: 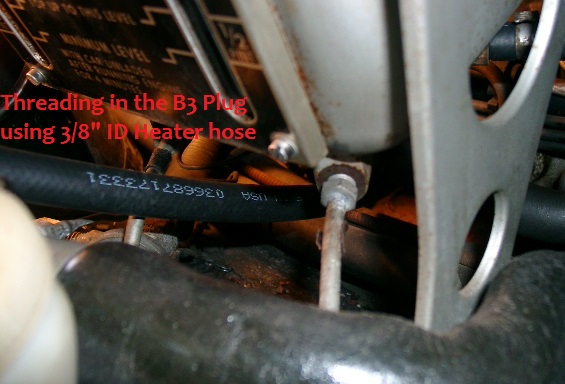 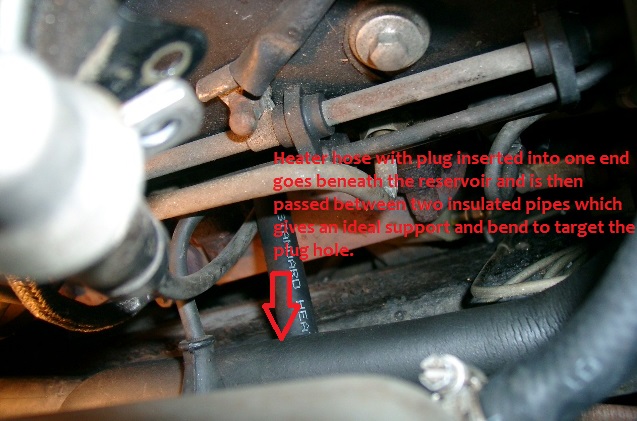 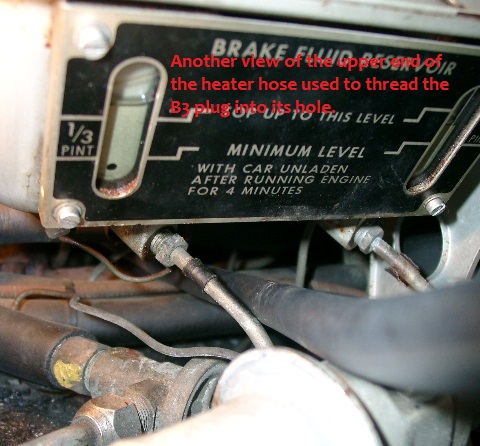 I accidentally forgot to put the copper anti-seize on the B2 plug when I first tried to thread it in. I can report that the presence of anti-seize lubricant made a world of difference as far as ease of getting threading to start and continue smoothly. I would never consider doing this job without using copper anti-seize after just that single counter-example after having done all the others with. The behavior of the car upon starting, as far as the ultra-aromatic exhaust fumes at low idle and the tendency to stall out if you press the accelerator and allow the engine speed to come back down. I really think that the next step is to try adjusting the idle mixture to lean it out quite a bit, but if I'm mistaken on that next step please tell me (and tell me why). Brian |