| Author | Message | ||
Dave Puttock Experienced User Username: ariel Post Number: 12 Registered: 5-2010 |
I have a 1971 Shadow 1 which has been stood more than 7 years. Most of the flap actators are noisy or dead. Before I start, does anyone have any advice on how I take them apart, and what to look for. | ||
Paul Yorke Grand Master Username: paul_yorke Post Number: 713 Registered: 6-2006 |
Hi Dave, They are pretty simple, just allow plenty of time and patience. The motor bushes dry out causing the 'scream' and seizure. The finger contacts inside can corrode giving poor connections etc. Other than that they are fairly robust. The brushes and springs are tiny and the lead contacts clip on so come off with a jerk allowing the brush and spring to ping into the distance unless you keep your finger over them. Use an oil or very thin grease. Oh, and there is a resistor there which can slow things down too much. I can't decide if it is intended to stop it sounding frantic or to stop it turning too quickly and overshooting it's stop point, or indeed something else that I haven't considered. Good luck with them  | ||
John Kilkenny Prolific User Username: john_kilkenny Post Number: 109 Registered: 6-2005 |
Dave, In Tee One Topics Issue 88, Page 1201 there is an article with a full description on how to service these actuators. | ||
Patrick Lockyer. Grand Master Username: pat_lockyer Post Number: 834 Registered: 9-2004 |
"something else that I haven't considered." Like the flap assembly dropping out and jamming, making the the actuators run all the time.[noise] Did a mod on this with my failed bush housing, re old posting! | ||
Dave Puttock Experienced User Username: ariel Post Number: 13 Registered: 5-2010 |
Thanks Paul and John, I knew it was worth asking, before I started. (I usually jump in with both feet and then spend 2 hours looking for the bit that flew off). In John's Tee One article he mentions that the segmented disc is rubbed by spring contacts. Does this also need cleaning. If so can I separate the Plastic front cover from the steel backing plate, without all the gears falling out of place. I have already machined up a load of bronze bushes, responged and remounted the flaps, and its a job I definately only want to do once, so it needs to be right. | ||
John Kilkenny Prolific User Username: john_kilkenny Post Number: 110 Registered: 6-2005 |
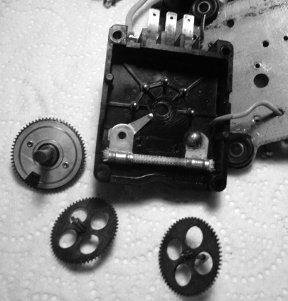
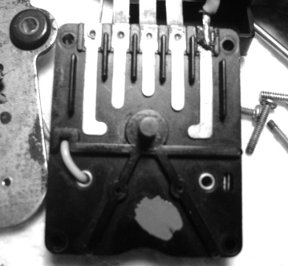
Dave, While it is possible (though not easy)to remove the plastic cover, once this is done it is not all that difficult to take it apart for cleaning and re-assemble it. However in most cases this is not necessary and I suggest you follow the article procedure first and then check it with 12 volts on a bench. Here are a couple of photos of the broken down assembly. The spring contacts force little metal cylinders (which very easily drop out and get lost !)on to the timing disc.   | ||
Dave Puttock Experienced User Username: ariel Post Number: 14 Registered: 5-2010 |
Brilliant, just what I needed - first one purrs nicely now. | ||
Dave Puttock Experienced User Username: ariel Post Number: 15 Registered: 5-2010 |
Just one more thing, I had assumed that the actuators ran in both directions but looking at the circuit diagram I see that that is not the case as the earth pin is always earth. That being so it would seem that the adjustment on the rods must always allow the arm to go over TDC and BDC so if you are in position 2 and you switch to position 1 the actuator has to step through 3,4 & 5 and past there round to 1 again. That seems quite important as I need to bed in new foam lining on the flaps, so the fully closed position needs to be at the middle of the cutout in the cam wheel not at the start of it where the current breaks otherwise it might strain something when I want to go past closed, back to open. Am I right? | ||
John Kilkenny Prolific User Username: john_kilkenny Post Number: 111 Registered: 6-2005 |
Yes, the timing disc turns one way only so the closed position will not vary regardless of how you get there. | ||
Paul Yorke Grand Master Username: paul_yorke Post Number: 714 Registered: 6-2006 |
Dave the stop position is not crucial as you adjust the cam after it's stopped. Do not too much pressure to keep the flap closed, you are only trying to stop low pressure air so as long as there is contact there you should be fine. If you quash the foam too hard it will just end up squashed sooner. I'd be tempted to stop it slightly after 'bdc' so the foam is starting to open the flap and the motor will not need as much torque to start turning. Just a thought. | ||
John Kilkenny Prolific User Username: john_kilkenny Post Number: 112 Registered: 6-2005 |
Dave, This site has all the service manuals for your car. Go to http://rrtechnical.info then select 004 Silver Shadow, then select Workshop Manual for SY Cars 1965-76, then select C-Air Conditioning where you will find setting up procedures for the actuators. It is not rocket science, but as Paul says don't force the flaps too hard against the aperture in the closed position. |