| Author | Message | ||
Peter Davidson New User Username: pedrotheswift Post Number: 3 Registered: 7-2004 |
I need to remove the auto box to get at and remove the ring gear as teeth are badly worn. does any one have the info to do this job,thank you,Peter | ||
Philip Sproston New User Username: phil2025 Post Number: 3 Registered: 7-2006 |
Peter, first thing to do is to price up a ring gear assembly. Next is to look at is if the auto is working correctly and how long it has been since the last overhaul, because it would be a shame to have to redo the work in 6 months when the gearbox fails. First make sure the car is somewhere it can stay for two months (minimum) - preferably on a hoist. To remove the gearbox slide out both front seats and then remove the big floor pan underneath the seats. That will take two days, and you'll probably break every second bolt. Once this is out you can see everything. It's straightforward to undo and remove, except for the torus bolts (there are a lot of these). When putting it back together the torus only goes in one way and you must use the correct gasket. The gearbox and the torus are bolted up at the same time (together). After considering all that, you might want to think about selling the car instead - it would probably be less stressful! | ||
Richard Treacy Grand Master Username: richard_treacy Post Number: 1148 Registered: 4-2003 |
Phil, you write: �First make sure the car is somewhere it can stay for two months (minimum) - preferably on a hoist. To remove the gearbox slide out both front seats and then remove the big floor pan underneath the seats. That will take two days, and you'll probably break every second bolt. Once this is out you can see everything.� I do suggest that this is all overstating the tasks. Having done a few of these, my own twice on B174UM included using only a ramp and a garage jack, I can assure you that there is no need to do anything inside the car at all. I overhauled a friend�s Silver Dawn transmission not so long ago too, using a hoist and a tall jack for the transmission. The whole job took about 10 hours over a day and a half (start in the morning, drive to lunch the next day), replacing all the usual parts including seals, bearings, clutches and bands. The transmission should come out in less than two hours. The oddities are the ride control pump and brake servo, but in reality they only add minutes to the job. In many respects, the job is more straightforward than on, say, a Holden, although the transmission is rather heavy (no issue with a proper jack). The transmission overhaul takes around 5-6 hours on the bench provided that the whitemetal bearings do not need replacing. To replace the ring gear (flywheel) alone will be a 5 hour job or less. As a minimum, it is advisable to replace the transmission front seal at the same time (see the service bulletin in TSD471 attached concerning the spacer washer). There are various types of ring gear, the most usual being integral with the crankshaft side of the torus cover, usually referred to as the flywheel (see photo attached). They are very expensive, and my spare is not for sale. Best is to check the transmission serial number to be sure: mine is X53-48 for example, and it is stamped on the identifier plate on the side of the transmission. The Hydramatic manuals in the Technical Library accurately outline the details of how to remove the transmission. Attached: vehicle on the hoist, transmission removed showing the flywheel with integral ring gear (B174UM and SNF95 are identical). TSD471 supplement 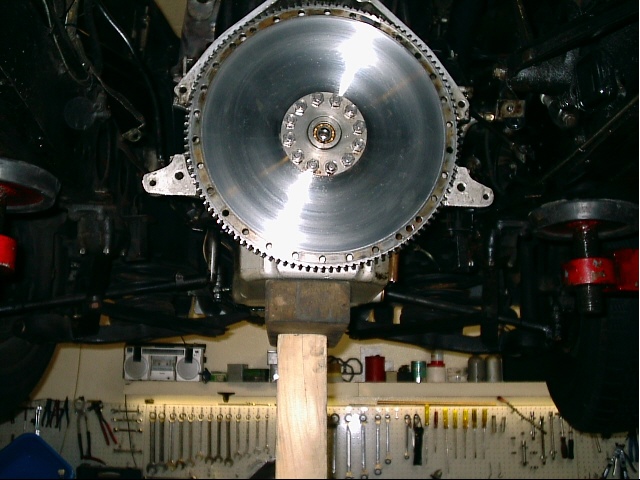  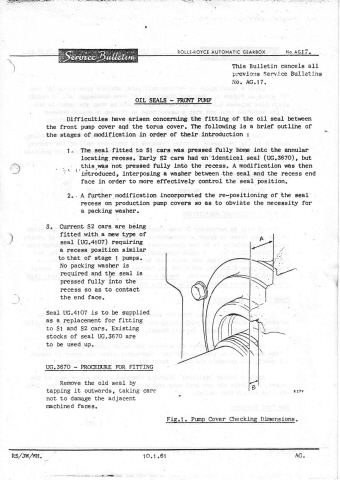  | ||
Peter Davidson New User Username: pedrotheswift Post Number: 4 Registered: 7-2004 |
Thank you for the info. Have a large trolley jack,ramps and a pit so will see how i go.Have down loaded info from tech sight.Will let you now how i get on,Peter | ||
Norman Geeson Unregistered guest Posted From: pete-cache-4.server.ntli.net |
Peter Richard has stated the transmission can be removed without disturbing the interior, that is correct. For the record your car B 96 XF is listed as having transmission no C424E which is fully Crewe built with the alloy sump pan. A few points, which may help. It is possible to remove the transmission on the floor, but you need 32 inch (812mm)clearance between floor and underside of chassis to slide the transmission from under the car. Do not forget to detach the two exhaust flanges from the manifold or the manifolds will get damaged. Also detach the firewall throttle to carburettor rods and remove the washer jar. You will find that it helps to insert a small but long block of wood between the firewall and the rear of the engine, this takes the weight off engine alloy sump and yet does not crease the firewall. As Richard has pointed out there are two different flywheels and even the torus cover to flywheel bolt length is different depending on the type of flywheel. The flywheel with the threads is UE 1399 whilst the flywheel with no threads is UE 1406. In the latter case the threads are in the Inertia ring. Ignore references to Inertia rings only being fitted to cars after W series. The top two bell housing bolts can be accessed by removing the small panel holding the floor dip switch. You will see the panel is shaped for this purpose. Ensure you detach the battery earth lead. There is no need to detach the dip switch wires. (Message approved by david_gore) | ||
Richard Treacy Grand Master Username: richard_treacy Post Number: 1149 Registered: 4-2003 |
Norman quite correctly states "The top two bell housing bolts can be accessed by removing the small panel holding the floor dip switch.". Sorry, I had forgotten that important point. It certainly saves effort if you fold the carpet back, undo the screws, lift the panel aside and remove those two main bolts before hoisting the vehicle. RT. |