| Author | Message | |||
Harry Brash Yet to post message Username: harryed Post Number: 1 Registered: 04-2023 |
This is my first post on this forum but I have to admit that I�ve been using very useful information from this forum and website for years. Thank you all for your past help. With my friend Robin, I have owned a MkVI Bentley (1948 4.25 litre chassis number B67CD genuine mileage about 97,000) since 1969. When we bought it at a local (Edinburgh, Scotland) auction it was running but had lots of cosmetic and mechanical faults which we ironed out over the years. The car now looks very good, externally and internally, but, about two months ago as I was reversing it out of the garage, something changed. The engine sounded different and I realised that it had lost almost all its power. I had difficulty getting the car back into the garage. Before that we had only one occasion when we needed road side assistance and that was due to a double fuel pump failure. About two years ago the cylinder head gasket blew at cylinder 6. As part of the related work we removed lots of junk from the water jacket and freed the drain tap at the rear of the engine which had been blocked for some time. It is possible that the collection of deposits in the water jacket caused the cylinder head gasket failure. The car ran well after we replaced the head gasket � until two months ago. The current symptoms/behaviour of our Bentley engine (all standard components � no extra electronics) are that it will almost always start first time with full choke which we normally turn off almost immediately. Now, pressing and holding the accelerator down will often cause the running engine to die completely. Pressing the accelerator gently and waiting for the engine to speed up you can get it up to a higher speed but it then it sounds rough and occasionally backfires through the carbs. Over the last two months we have replaced most ignition components, specifically, distributor cap, plug leads, plugs, condenser, rotor arm and points. Static timing is set correctly on cylinders 1 and 6. We have also reconditioned the SU carbs (new seals/gaskets/jets) and adjusted them as recommended. To rule out dirt problems from the fuel tank we are currently feeding the pumps from a petrol can in the boot. Unfortunately, the behaviour of the engine is unchanged. It starts and ticks over a bit unevenly but dies when you press the accelerator. The car is not drivable as it seems to have no power in the engine. We would really appreciate any suggestions as to what is happening and how to fix it? , | |||
David Hughes Experienced User Username: wedcar Post Number: 147 Registered: 07-2004 |
Harry Welcome to this Forum, happy that the Forum has been of assistance to you. You have also done well with the car for the last 50 odd years. To the present issues, firstly, when the engine dies when you open the throttle would normally indicate fuel starvation or extremely lean mixture. To begin, warm the engine best you can and have both a compression and leakage test, to ascertain the condition of the engine. When those test are done, please revert back.} | |||
Jeff Martin Frequent User Username: jeff_r_1 Post Number: 483 Registered: 07-2018 |
I doubt it is a compression issue, I drove my engine for a number of years with only 60 PSI because all the top rings were in pieces. He may check it if he wants, but the problem is something else. | |||
Jim Walters Frequent User Username: jim_walters Post Number: 383 Registered: 01-2014 |
Your coil has failed, unless you have neglected to add it to the list of things you have done I can say with confidence that is your problem. Your symptoms are the exact classic signs of a bad coil. SRH8505 SRC18015 SRE22493 NAC-05370 www.bristolmotors.com | |||
Graham Watson Experienced User Username: graham508 Post Number: 95 Registered: 03-2016 |
I agree with Jim. Had the same type of issues with my MKVI, idled fine give it the beans and it became erratic, backfiring etc. turned out to be the coil. | |||
Geoff Wootton Grand Master Username: dounraey Post Number: 2323 Registered: 05-2012 |
It's also interesting that Harry does not include the coil in the list of ignition components he's replaced. Even if he has though, I've heard of brand new coils that have been faulty. | |||
Harry Brash New User Username: harryed Post Number: 2 Registered: 04-2023 |
Thanks for the comments. David and Jeff, the compression pressures measured since the problem arose are all around 100 psi (cold) but will check them again. I'm not familiar with the leakage test mentioned. Can you please send me a link describing what that test measures so we can set it up ? Jim, sorry for not mentioning the coil. We have several good coils including one which I think is original Bentley. We have swapped them around since this problem arose. The one connected at the moment is an almost brand new Lucas. I think I have another almost new one which I'll try and report back. | |||
David Hughes Experienced User Username: wedcar Post Number: 148 Registered: 07-2004 |
Harry Thankfully we have contributors to this Forum who are far more experienced and knowledgeable than I, thank you Jim. As Jim says, a faulty coil is a likely culprit, currently available condensors also fail. The suggestion of the simple tests was to get a good indication of the general condition of the engine. If needed, I have included a link for the leak test for your info'. Regards David
| |||
Jeff Martin Frequent User Username: jeff_r_1 Post Number: 484 Registered: 07-2018 |
Harry, 100psi is about right for an engine with almost 100,000 miles, it's doing very well. They're low compression engines, mine is at 115 psi after a complete engine rebuild with around 22,000 miles. Got rid of the chimney liners and it was sleeved back to 3.5 inch bore with updated short-skirt pistons with modern rings. Another guy whom I knew from the RR club is at 120 psi from all the plaining that had been done to the head and block. What ever coil is in there, be sure it's a known working coil that's at least 3 ohms across the primary windings. If you retained the original rotor with the spark suppressor built into the rotor, then you can't use resistor wires. | |||
Jeff Martin Frequent User Username: jeff_r_1 Post Number: 485 Registered: 07-2018 |
I think it was Jim who steered me to these coils ? https://ca.gsparkplug.com/ignition/ignition-coils?manufacturer=55389 https://www.gsparkplug.com/media/catalog/product/r/e/remax_coil_inside_1.pdf Distributor Dr. now has these Lucas coils that are made in India, but I would still be wary about them being made in India _ may have quality control issues. https://www.distributordoctor.com/ignition-coils.html Use condensers from Distributor Dr., if you condenser is the culprit, then the points may be burned enough where they won't allow proper saturation of the coil. What are the gaps on the new plugs, if they are resistor plugs, they shouldn't be if you have the rotor with the suppressor in it ? If using an updated rotor, get it from Distributor Dr. and use solid wires with resistor plugs, I prefer NGK, because they are wire wound and are at 5k ohms. The spike type coil doesn't take kindly to resistor wires, the spikes destroy the inside of the resistor filament. Are you using the correct distributor cap with the spikes, the other one with the push in leads is incorrect and the spark has to jump too far ? And another tid-bit: https://www.gsparkplug.com/media/catalog/product/c/o/coil_slip_remax_1.pdf . | |||
ChristopherCarnley Unregistered guest Posted From: 86.182.152.209 |
Have you examined the twin petrol pumps, on the inside of the chassis frame, just behind the drivers seat? They are in an exposed position and are troublesome. There is also a petrol filter just in front of the tank, drivers side. The horseshoe top strap is invariably rusted up, and the dimpled aluminium cap maybe perforated. The filter and pipes maybe bunged up. (Message approved by david_gore) | |||
Patrick Lockyer. Grand Master Username: pat_lockyer Post Number: 2563 Registered: 09-2004 |
I agree petrol related first as Chris states also one of the float jets may not be opening or partly obstructed. IMO faulty coils can cause hard starting but when running they start to fail as the coil heats up with misfires etc | |||
Jeff Martin Frequent User Username: jeff_r_1 Post Number: 486 Registered: 07-2018 |
Coils don't always have to heat up to fail and/or give intermittent problems, in fact, from my own personal experience, it can happen at any time with a 70 year old coil. A Tom Mellor from Vancouver B.C. here on the West Coast in Canada, had a friend that the car started and drove well. It didn't seem to matter if it was driven around the block or any distance, but if it was shut off or parked for a few minutes to go have a cup of tea, it refused to start. With that said though, it does appear to be a fuel problem; at this point anyway given the fact that the coil was changed out. Feeding the pump with clean gas from the boot isn't going to tell a person much, if one assumes that the pump isn't putting out the volume it should. It bypasses the glass bowl water trap, so it does eliminate that, those can get clogged up to the point where the pump can't suck enough. If it is a fuel problem, it has to be the pump itself not putting out the volume, and/or a float/needle valve problem. If it was my car, I would start with the float/needle valves, that's the easiest thing to start with _ where did the parts come from that were replaced, were they from Burlen or some after-market stuff that has failed already, eg. a stuck needle valve ? I tried some Grose Jets once and they were a disaster, they either stuck shut or open, Viton Jets from Burlen is what's needed, there are many bad substitutes that are wrong where they swell up and stick, or flood the car. The old style brass ones are OK if they're new. Is there a filter somewhere that's been added that is now blocked, is the internal filter inside the pump clean, the small screen filters right at the banjo bolts to the top of the floats ? Given the fact that it was running and now seems to be starved for fuel, I would suspect a filter or filters are cocked up with rust debris from the tank. I would also suspect a bad rebuild job of the pump _ something was overtightened and the pedestal(s) are broken/cracked. The points could have come loose, some of this may be unlikely, but if I didn't do the job myself, I would check it. Was it set-up properly to get the proper throw of the points _ could be marginal and it's now not pumping the volume it needs. Was the old condenser replaced, did the new part fail ? I never trusted these so-called experts to do things right, that's why I've learned to do it myself and learned from my own mistakes. . | |||
Martin Webster New User Username: martin_webster Post Number: 45 Registered: 09-2018 |
It was a good call from Chris Carnley regarding the fuel filter. It is probably one of the most neglected components on the chassis and it�s also probably unknown to most owners because of its inaccessibility being on the crossmember in front of the fuel tank under the boot floor. The aluminium domed cap is held in place by a cradle which is removed by loosening the thumb screw on top. The cradle can then be rotated and the cap removed. The twin brass concentric gauze filters inside are removed by turning the knurled screw on top of them. Fuel is sucked upwards through the filters to the fuel pump and any debris is on the underside of each gauze. Any blockage or debris either at the bottom of the filter case or on the gauze will restrict the fuel pressure to the pumps. It is equally important that there are no air leaks within the fuel filter otherwise the fuel entering the pumps will contain air bubbles. When you have checked and cleaned the filter replace the rubber gasket with a new one. 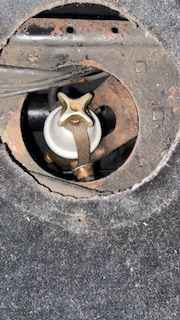 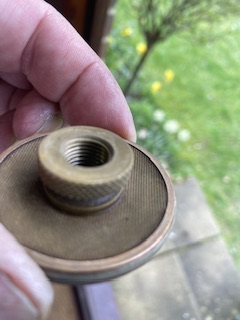 . | |||
Jeff Martin Frequent User Username: jeff_r_1 Post Number: 487 Registered: 07-2018 |
I thought he by-passed that when he placed a clean source of fuel in the boot ? Harry said "To rule out dirt problems from the fuel tank we are currently feeding the pumps from a petrol can in the boot". He doesn't say that he actually by-passed it; it would make sense if he did. Where did you run the line from the gas can to the pumps Harry ? | |||
Patrick Lockyer. Grand Master Username: pat_lockyer Post Number: 2564 Registered: 09-2004 |
(it can happen at any time with a 70 year old coil.) And more so with newer coils IMO! Never heard of this term - (Was it set-up properly to get the proper throw of the points). Never stop learning! A great deal of trial and error by some folk with the electrics etc! Best to scope it set dwell etc and check coil output etc. But only after the given symptoms of the problem i.e. IMO fuel starvation. . | |||
Jim Walters Frequent User Username: jim_walters Post Number: 384 Registered: 01-2014 |
If you pull the choke on and try to rev it does it make any difference? Loosen the distributor clamp screw and turn it one way then the other when engine first started and idling until turning the distributor raises the idle to its highest speed. If this make a difference set the timing with a timing light underneath on the flywheel, someone has made an error setting it statically. A dwell meter clipped onto the coil will tell you if the points are not set correctly without having to remove the cap and use feeler gauges. Use an LED test lamp on the coil negative terminal, it should flash very quickly at idle, note if the flashes are interrupted when you step on the accelerator. If so coil or condensor bad, or dirty points. If you get backfires out the exhaust it will absolutely be an ignition fault. If you get backfires out the carbs usually timing off or carbs way too lean or no oil in dashpots. If you really think poor fuel flow is an issue, remove an inlet pipe from one of the float bowls, stick a hose on the end and place in a can and turn on the ignition, note flow rate. I have had new coils dead right out of the box, even Lucas branded aftermarket. Not common, but it has happened. Always good to check to see if you have a duff rotor, remove distributor cap, remove coil lead from cap and hold it within an eighth of an inch from the centre of the rotor and have someone turn over the engine, if sparks jump to centre of rotor the rotor is junk. Cheap new aftermarket rotors are often dead shorted even right out of the box. Best is to buy a rotor from the Distributor Doctor. Measure resistance on each spark plug lead, there should be 10K to 20K ohms per foot of lead if you are using resistor wires. If above those figures or any are open circuit replace. I would be using solid copper core wires with zero resistance on that engine anyway. Does the coil get really hot after the engine idles for a couple minutes? If you lift the carb dashpot pistons with the lift pin when engine is idling what does it do to the idle speed? Those are the quick tests I would do in my shop to pinpoint the fault, pretty sure that I would figure it out within a half hour or so. SRH8505 SRC18015 SRE22493 NAC-05370 www.bristolmotors.com | |||
Harry Brash New User Username: harryed Post Number: 3 Registered: 04-2023 |
Thanks for the wide range of comments on our Bentley problem. We usually work on the car a couple of times a week for about 3 hours (minus coffee time!). Apologies if I�ve seemed a bit slow in responding to some of your queries. Some background info. Probably first thing to mention is that with very few exceptions (eg repair leather on front seats) we have carried out all repairs on the car. When we first bought the car in 1969 it was just drivable. It was pouring out blue smoke and the clutch was slipping seriously. During the first run we made, with my wife, two year old son and co-conspirator Robin, one of the back brake cones locked ON going down a very steep hill in South Queensferry. Interestingly, we had the original handbook but at that time we had no service manual (or internet access to your website not least because the internet didn�t exist). Fortunately we also had almost all the original tools including the jack. We also had a big hammer and managed to free the cone and continued down the hill in second gear and got back home with a light touch on the brakes. The car was parked outside in our drive and I opened up the floor, removed the gearbox to get access to the clutch and found a clutch plate with almost no linings and a flywheel that was blue with heat and cracked almost right across. We reckoned that the engine needed an overhaul, and I went to chat to the storeman/"spares executive" in an Edinburgh RR dealership. He was a fully trained Bentley mechanic and, best of all, he adopted us and guided us through renovating the engine which took some time. Surprisingly, the crankshaft and bores were fine and it just needed new bearing shells throughout. The small end bearings were replaced and line bored and new gudgeon pins were fitted along with new rings etc.. I don�t remember replacing any of the valves although they were certainly ground in. I showed the flywheel to our friendly storeman expecting him to say he couldn�t accept it as an �exchange� part but that wasn�t an issue. After I�d finished the engine I tried to start it which it did almost first time and then stopped with a huge backfire which brought our neighbour out very quickly. Timing was a mile out! The burning oil problem was due to largely missing inlet valve seals (the string and wax variety). In parallel with the mechanical work, we had found a joiner near Glasgow whose passion was collecting discarded Bentleys and RRs in his very large garden or �estate� as he preferred to call it. Our car had been badly repaired following a collision and the front right wing was about 4� above the left, the chrome grill was a mess and the car was fitted with Ford headlights. Our joiner friend sold us a near perfect grill and a reasonable right wing which is still on the car along with lots of other bits and pieces including an original radio which I repaired and is still working in the car. Finally we painted the car Citroen Peacock Blue (metallic) which it stayed as until about 2000 when we painted it as close as we could get to the original two tone grey. About 15 years ago we had serious fuel tank problems which started with lots of junk in the fuel showing up particularly in the original filter under the boot. The tank has been ok since we repaired it by a mixture of soldering and special epoxy coating on the inside. However, we removed the original filter under the boot from the circuit and fitted an off the shelf in line clear plastic filter so we could see if there was dirt in the petrol. There hasn�t been any noticeable dirt since our tank repair. Sorry about the above diversion but I thought it was important for you to know some of the car�s background. Back to our present problem. Chris asked about the petrol pumps. We haven�t taken them apart re the present problem as we can hear both pumps clicking and then stopping as normal before starting the car. We have disconnected the front petrol line and let it flow which it does freely although we haven�t measured the flow. Is there a flow figure available which we can check? The pumps are standard Bentley with no electronics. Is there a recommended pressure test for the pumps? Patrick, regarding the float chamber, when we remove the float covers after the car is running badly there is always the correct level in the float chamber. We have been using the same needle valves for a long time so it may be worth changing them. I think they have black needle tips so probably Viton? Jeff, I agree the needle valves, pumps and all filters should be suspect. The current petrol feed goes from the petrol can through the in-line clear plastic filter to the pumps and, as I said above, the pumps go then stop as normal at first switch on and we get a good flow of petrol if the front carb union is undone. You mention a condenser in connection to the pumps. Is that the suppressor on the supply line or something internal? Martin, as I mentioned, the original fuel filter in the boot is currently out of circuit. We were never 100% sure that it was doing its job. It�s still there and we have all the pipes if a new owner wanted to put it back in circuit but the transparent in-line filter is so effective and easy to check. Jim, we had tried putting on choke but made no difference. Also tried rotating the distributor a bit either way without noticeable effect. The tickover is fairly rough so hard to pick up small effects. We don�t have a dwell meter. We should get one. The static timing is set quite accurately. For some years we�ve been using a �Snake� (small camera on about 3mm flexible probe about 1m long) which we have mounted on a small piece of aluminium screwed in place of the timing hole cover on the bell housing. It is plugged into an old mobile phone and gives crystal clear picture of the timing pointer and the flywheel markings behind it. No more poking around with a mirror! I like your idea of the LED . Not clear where you are connecting it. Is the �coil negative� not the battery supply ? The �backfiring� is through the carbs and very noticeable as we have the inlet feed from the air cleaner removed. I�d never heard of your test for the rotor arm. We�ll try that tomorrow morning and check back. We have swapped two Bentley rotor arms with the resistors in them. I also now have a very basic �Chevette� rotor which we�ll also try tomorrow. Our leads are now all copper but they were resistive when this problem started. The coil doesn�t get really hot after a few minutes, just warm. Never found a lift pin on our carbs. Lifting a few mm with a screwdriver has no noticeable effect but we don�t have an RPM meter. Jim, thanks for your list of checks. We�ll do what we can tomorrow morning (Sunday) and report back. . | |||
Jeff Martin Frequent User Username: jeff_r_1 Post Number: 488 Registered: 07-2018 |
The condenser that I mentioned is inside the pumps (internal). It's not a suppressor, it keeps the points from arcing and burning out, like the one for the distributor. The 2 condensers on the fuel pump are not your problem. You also asked about fuel pressure; it's more about volume, not pressure and at this point, it sounds like that the float bowls have the proper amount of fuel in them. If the float needle valves were not working properly, the float chambers would be empty or low, or over filling the float chambers _ fuel would be pissing out everywhere. My car has no lift pins either _ I added them later. Putting the choke on, on a warmed up engine will make the engine run very rough _ black smoke; and it may even stall. One should have to put the throttle on to keep it from stalling, the idea with this test is to see if enrichening the mixture will solve your problem. If it does, it can point to many things as the cause, but will narrow it quite a bit. Jim may chime in on this. What brand of spark plugs are you running, are they the resistor type, if so, what is the resistance ? With the suppressor type rotor, they should be non-resistor type. You also mentioned that when you lifted the dash pot with the screwdriver, it made no difference, that indicates that it's lean. Is it lean enough to cause your symptoms, probably not, if so how did it get that way ? The adjusting nut at the bottom of each carb just doesn't fall out of adjustment to create your symptoms. What would be helpful is to see where the jets are in relation to the jet bridge when the choke is off. If you can post some pictures of both carbs showing that, they can't be more then 800 X 800 pixels square or the site will reject them. While you have the dash pots off and the pistons out, have a friend open the choke (off and on) and watch the jets, you should clearly see the jets lower and raise. They should lower and raise equally if they are adjusted properly, and when the choke is off, both jets should be the same distance from the jet bridge. At this point it sounds like you have an ignition problem, pending the photos I would like to see. For a car to be running fine one minute and not the other usually is caused by an ignition problem - carbs just don't fall out of adjustment that quick to suddenly cause your symptoms. I suppose a clevis pin could fall out if a cotter pin was not in place, but that's unlikely, but you can do a quick visual with a flash light just to check. Maybe the choke linkage is suspect, but in the end I don't think a faulty choke linkage would cause your symptoms. . | |||
Graham Watson Experienced User Username: graham508 Post Number: 96 Registered: 03-2016 |
Just throwing this out here but could the mechanical advance in the distributor be malfunctioning? | |||
Jeff Martin Frequent User Username: jeff_r_1 Post Number: 489 Registered: 07-2018 |
Easy enough to check the advanced weights. Also, there is a rubber vacuum line near the bulk head that connects to the intake manifold through a metal line. Temporarily disconnect that and block it off at the manifold end, it operates the windshield washer and that thing in itself can be a source of troubles, so I've read. Check that the metal line is still secure at the front end of the manifold nearest the fan. There's also a chance the rubber line has come off with age or is badly cracked and leaking. I don't know if this would cause enough of a vacuum leak to cause the problems though, but it would lean it out some. . | |||
Martin Webster New User Username: martin_webster Post Number: 46 Registered: 09-2018 |
Harry, just another thought have you taken the rocker cover off to check that the inlet valves are opening and closing correctly and you haven�t got one sticking slightly open ? The symptoms of this would be similar to the conditions you have already described. | |||
Jim Walters Frequent User Username: jim_walters Post Number: 385 Registered: 01-2014 |
Idling is rough: ignition fault. If it was lean it would idle smooth but be impossible to get it to idle down to a low rpm. Lifting dashpot piston 2mm: If no idle speed change mixture is correct. LED: Attached to coil terminal that goes to distributor, so if a negative ground car LED goes to neg coil terminal. Opposite for positive ground car. Other end of LED wire to chassis ground. Cannot use a regular light bulb for this test as it will interfere with points operation. It will flash very quickly at idle, so get the engine to idle as slow as possible, if any interruptions in flashes the coil is not being triggered by the points every time it should. This could be due to dirty points or bad condensor. If points triggering coil correctly but irregular flashes from timing light on coil lead then coil faulty. Another check is to use a timing light on every plug lead, each should show steady flashes, interruptions are misfires. Interruptions on cylinders next to each other in firing order are from cross firing due to poor plug lead condition or damaged distributor cap. The LED test tells you that the points are operating properly and triggering the coil to fire every time they should, but, if you get no corresponding flashes on each plug lead using timing light)that indicates the coil is not firing every time it should causing the misfires. Not the same number of flashes of course (coil will fire 6 times for every 1 plug lead fire) but in a steady stream with no interruptions. If these tests show the points are triggering the coil to fire every time they should and that the coil is actually firing every time it should (each plug is getting a spark from the coil every time it should) then I would be be thinking there may be a mechanical cause such as valve clearance has tightened up so some valves are not closing. Another thing to check, how does it idle with one plug lead at a time pulled off a plug and grounded out? Do this from #1 through to #6. Don't just pull the plug lead off the plug and leave it loose, stick a bolt into the end of the plug lead and clamp it to bare metal on the engine to ground it out. If you don't do this the spark tries to jump inside the cap and can damage it so always provide an easy path for the sparks to travel to ground. This test will determine if you have cylinder cross firing. The idle should smooth out if you remove from the equation a cylinder that is firing at the wrong time. Remove plug lead with engine off, insert bolt and clamp to ground, then start engine and note results. I still suspect you have a bad condenser, rotor, or coil but the tests above should pinpoint that. SRH8505 SRC18015 SRE22493 NAC-05370 www.bristolmotors.com | |||
Jim Walters Frequent User Username: jim_walters Post Number: 386 Registered: 01-2014 |
I just noticed what Martin said above about sticking inlet valves, he is right in thinking that could be a cause. You may hear a loud ticking when the rocker arm takes up the slack, but if it is stuck wide open then you would likely not hear anything. Removing and grounding out the plug lead from the offending cylinder would stop the backfiring out the carb from occurring, it would spit back a bit but without a spark there should not be a violent backfire. SRH8505 SRC18015 SRE22493 NAC-05370 www.bristolmotors.com | |||
ChristopherCarnley Unregistered guest Posted From: 217.39.245.111 |
Martin's pictures of his fuel filter shows how good the condition is of his car, as these parts are usually rusted and damaged, by careless botchers. The only top seal to use is a compressed fibre one. I am wondering, now, how much of Harry's engine was dismantled as one tooth out when replacing the cam wheel can cause serious timing and misfire problems. The helical gears have a two tooth lead when replacing. Similarly, the combined oil pump and distributor drive, has to be installed in the correct position. (Message approved by david_gore) | |||
Harry Brash New User Username: harryed Post Number: 4 Registered: 04-2023 |
Success! Car is going again. The problem was the condenser. When the problem arose about 2 months ago, we first tried swapping several components for known working or new equivalent parts. The condenser we swapped in at that time is an almost new ignition condenser for a more modern vehicle which has a very similar ignition system and which I had used successfully. Replacing the Bentley condenser with that one made no difference to the engine behaviour so we assumed the existing condenser was OK. After contacting the forum, and seeing all the detailed issues which you raised, I looked for any ignition components which we hadn�t actually replaced with new parts since this problem started. I could see only two, the rotor arm and the condenser. Last week I purchased a rotor arm for a Vauxhall Chevette and an Intermotor 33070 Condenser for a wide range of makes both from Ebay and very cheap (�7.68 total including p&p). First thing we did with the car today was to fit both, with little hope it would change anything. What a lovely surprise! We used Jim�s technique ( HT lead shouldn�t spark to the rotor arm) to test all our rotor arms and they all passed. The spark plugs we fitted recently are NGK B6ES which are non resistive. Jeff, interesting that some carbs have lift pins and some don�t. Is there a link to how to add lift pins? With the choke off and the carb adjustment at leanest, both jets are less than 1mm below the bridge. We recently replaced the jets as the plugs were always very black. The needles are original I think and don�t look worn at all. We�ll change them if the new jets don�t solve the problem. Re the vacuum line, we blocked that off at the manifold a long time ago and fitted the electric windscreen washer bottle out of my long dead Rover 2000. Graham, we had checked the advance weights. They looked like new with a light coating of oil! My first active use of this forum has been a very positive experience. I feel a bit embarrassed that the cause of the problem was so basic. On the other hand it was the detailed points you all raised which made me realise that we had to renew everything that we reasonably could. Otherwise we would still be using the duff condenser. We haven�t road tested the car but just moved it out of the garage a bit downhill then easily drove it back into the garage. It felt great. One interesting point is that we both feel it is ticking over much quieter than before this problem arose and it seems to be slightly better with the Chevette rotor arm than the Bentley one. I�ll report back once we�ve done a proper road test. | |||
Harry Brash New User Username: harryed Post Number: 5 Registered: 04-2023 |
I put my last post about �Success� up yesterday (Sunday UK) but must have got something wrong as it failed. I put it up again this morning (Monday UK) and it appears to be there OK. I probably got the password wrong and didn�t notice the warning. Martin, we checked the valve sequence early on, checking mostly for which rocker arms were just loose when and it was OK, thanks. Jim, I made up a LED light taking about 20mA (510 ohm series resistor) which shouldn�t cause any problems. It is very useful � almost worth installing permanently! Also noted your check removing leads one at a time. We�ve used that in the past but didn�t ground the floating lead. Will do in future, thanks. Chris, the last engine dismantling was a couple of years ago after the head gasket blew but we managed to get the engine back together and working OK, thanks. We�re hoping to go for a run on Thursday and will report back after that. Thanks again to everyone for their helpful comments. If there�s a �next time� I�ll be on the forum much sooner! . | |||
Martin Webster New User Username: martin_webster Post Number: 47 Registered: 09-2018 |
Well done Harry and I�m glad it wasn�t a major issue after all. Let us know how the road test goes, Martin. | |||
Graham Watson Experienced User Username: graham508 Post Number: 97 Registered: 03-2016 |
Congratulations on tracking it down! This has been a great exercise and I have added much to my store of knowledge reading through various possibilities. | |||
Jim Walters Frequent User Username: jim_walters Post Number: 387 Registered: 01-2014 |
This post is a good lesson on testing for a fault instead of just throwing parts at it. A check with an LED test light on the coil to distributor terminal would have shown intermittent flashes which would have immediately narrowed down the fault to the points or condensor not triggering the coil to fire when it should. Repair could have taken a half hour at most instead of two months. Future readers of this post take note! SRH8505 SRC18015 SRE22493 NAC-05370 www.bristolmotors.com | |||
Mark Aldridge Frequent User Username: mark_aldridge Post Number: 840 Registered: 10-2008 |
Jim, would the LED light work with electronic ignition eg pertronix or Lucas opus (as in the Shadow).Is the Led testlight a commercial item or workshop made. Mark | |||
Jeff Martin Frequent User Username: jeff_r_1 Post Number: 490 Registered: 07-2018 |
Harry, about the head gasket failure, read "Coolant Gallery Assemblies" that start on page 20, but read the entire article by Norman Geeson. From what I've learned 2 things happen for the head gasket to fail at the back of the engine, silt build up of course and the lack of coolant flow around that area, specifically where heat is the greatest at the last exhaust valve. As per the article, there is a long tube that runs the length of the block with holes in it, this is to evenly distribute the coolant coming directly from the pump to take away the heat around each exhaust valve. Even with this scheme in place, by the time the coolant reaches the back of the engine, it's already picked up much heat from the other exhaust valves, and there is always a hot spot at the back of the block. The tube that runs the block can become disconnected from the front of the block from corrosion, and when that happens the coolant no longer travels along itself to do its job. The back of the engine can reach very high temperatures causing head gasket failure where the gasket is crushed from the over expansion of the aluminum head. When the engine cools down, it leaks. The temp gauge can show a normal temperature in this case as it's only registering what the temp is at the front of the engine. https://kda132.com/wp-content/uploads/2018/04/Cylinder-Blocks.pdf . | |||
Jim Walters Frequent User Username: jim_walters Post Number: 388 Registered: 01-2014 |
Mark, yes it will work on the Shadow Opus system or any other electronic ignition system. That is where it really becomes useful identifying failing electronic ignition modules whose symptoms are intermittent. I have clipped on an LED test light to the coil to distributor terminal on Shadows many times and gone for a test drive until symptoms appeared and you can then tell immediately if the LED flashing stops which means the module (or points and/or condensor) are not triggering the coil. If the LED light continues to flash while the engine dies then you know right away that the module (or points and condensor) are OK and trying to trigger the coil to fire and you have a coil or fuel fault. I have a small made up harness with an LED, clips, and wire long enough to reach up under the bonnet so you can clip the LED on a wiper blade in front of you while driving to observe its action. I also have a regular commercially available LED test light with the traditional alligator clip on one end and a sharp probe with the LED on the other. SRH8505 SRC18015 SRE22493 NAC-05370 www.bristolmotors.com | |||
David Gore Moderator Username: david_gore Post Number: 4188 Registered: 04-2003 |
Wow - what an incredible thread and fantastic participation from all of the contributors. Outcomes like this make participation in the forum both rewarding and of great assistance to those doing their best to keep their vehicles on the road where they should be and to provide all the encouragement needed and the personal satisfaction to persevere to a successful outcome. One and all - congratulations for a great job well done - you are legends IMHO  . . . | |||
Mark Aldridge Frequent User Username: mark_aldridge Post Number: 841 Registered: 10-2008 |
Thanks Jim, led test light is on the making list ! Presumably a capless sidelight LED in a holder would suffice ? This site is a treasure for information. Mark | |||
Harry Brash New User Username: harryed Post Number: 6 Registered: 04-2023 |
We have now had a test run in the Bentley. Because of things we had changed while looking in the wrong places for the problem, the carburettors are not set up but are set at �leanest� ready to start new adjustments. However, car started first time and sounded great. Definitely quieter than before. After a few brief checks on brakes etc we went for a run of a couple of miles with a few minor hills and all was well. Sailed up the hills in top which is the Bentley we know and love. It shouldn�t take us long to adjust the carbs and I�ll report back again once they are adjusted and, hopefully, we have the correct colour on the spark plugs, which we haven�t had for a while. I�ll also answer a few points raised on the forum. Huge thanks to everyone who has contributed in any way to getting our car back on the road ! This is the first time I�ve posted on this forum and I had no idea what the response might be. I suppose the fact that we�re on the road again after little more than a week tells its own story but the main thing is both Robin and I quickly felt that we had support and that gave us confidence in a successful outcome. I�m still annoyed that the problem was the condenser which I thought we had eliminated early on. I also feel slightly guilty because the condenser which failed was an original Bentley component which I had �refurbished� with a �new� 0.25uF 450V paper capacitor many years ago. I�m going to try again with a 0.22uF 1000V brand new component. I�ve attached two pics which I�ve reduced to 800 x 800 or less to fit what I understand is the site requirement. One shows our Bentley with three Forth bridges in the background and the other shows the ignition coil which we are using mounted on the MKVI bulkhead. You may be interested in the ignition coil which might look like an original MkVI coil but is actually a modern coil in Bentley MkVI clothing. It�s probably been done many times. Modern coils are a few mm less in diameter and slightly shorter than their 1946 Bentley counterparts so they can easily be fitted inside the original Bentley ignition coil casing. The terminal end of the original casing is soft soldered to the main body of the coil and is easily removed. I used a copper ring clamped round the terminal end of the old coil to concentrate the heat from a gas torch. The terminal end separates quite easily once the solder melts and the old coil and potting compound (tar?) can be removed. For effect, I soldered a thin copper ring round the terminal end. The new coil was inserted wrapped in foil to give electrical and thermal connection to the new case and glued round the terminal end. As I remember it I used body filler as glue. I rethreaded the knurled bakelite Bentley terminals to 5mm to fit the new coil and it was ready to go. I�m going to modify another original Bentley coil shortly and will post some pics on the forum. Thanks again for your help and encouragement. And particular thanks to David Gore and others who keep this great forum and website running. It is a fantastic service and resource !  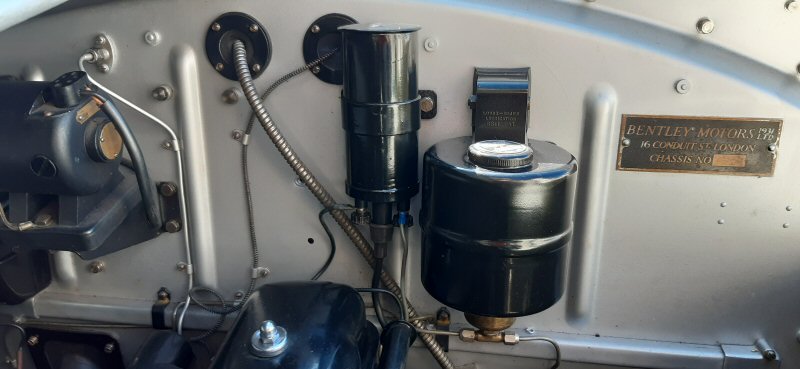 | |||
David Gore Moderator Username: david_gore Post Number: 4189 Registered: 04-2003 |
Harry, This forum could not exist without new members like yourself who need advice and help to restore, repair, maintain and service their vehicles. We always learn something new each time this occurs from our very helpful and obliging contributors from the world-wide Rolls-Royce and Bentley community who consistently and willingly take the time and make an awesome effort to provide the help and advice needed for a successful outcome. In my case, I am a "small cog" in a "mighty machine" who gains satisfaction from helping fellow custodians keep our classic vehicles functioning and providing enjoyment in the past, present and foreseeable future. | |||
Mark Aldridge Frequent User Username: mark_aldridge Post Number: 842 Registered: 10-2008 |
I notice the coil is mounted inverted , the same as my S1. Do modern coils like being run like this ? I have hade a flamethrower coil fail and currently have a Lucas sports coil mounted inverted. For reliability, is it worth turning the coil round? Any thoughts ? I use copper ignition leads with suppressed plug caps and an original type rotor arm with Pertronix ignition. Mark | |||
Harry Brash New User Username: harryed Post Number: 7 Registered: 04-2023 |
Mark Our coils have always been mounted with the terminals at the bottom. That is how they are shown in the owner's handbook. I'm not aware of anything in the coil which would be affected by orientation. If they were oil filled that might be an issue. Any old coils I've dismantled were filled with a very solid tar like substance. Our leads are now copper core, our plugs have no suppressors and the current rotor arm is for a vauxhall Chevette. Previous to our recent problem we had resistive leads, plugs with no suppressors and a Bentley rotor arm with a resistor in it. Harry | |||
Jeff Martin Frequent User Username: jeff_r_1 Post Number: 491 Registered: 07-2018 |
Harry, the lift pin. After having added them, I would say to leave things alone, it's a can of worms. You need a drill press of course, and a way of securely clamping the carb down on the bed with out damaging the fragile casting. This involves removing and disassembling both carbs as they have to be drilled from the bottom and top side. The underside has to be countersunk to accept the lift pin, great care has to be taken as not to drill all the way through _ a STOP on the drill press must be present or you have to use a block of wood to keep the bit from going too far. The place to drill is in the casting already, so that part is easy, I used my set of number bits here as their decimal increments are very fine compared to fractional sizes. It's do-able, but it can't be done in situ, you will have to centre the main jet again if you go ahead and adjust the mixture as that will be disturbed as well. As far as a link, I don't think there is one, if you want to go ahead, I can give you specific instructions and show you my own carbs as well; they're not on the car now. | |||
ChristopherCarnley Unregistered guest Posted From: 109.159.182.249 |
The original intention was to prevent condensation forming a pool in the connection. Modern coils are fine, when inverted. I had a friend who had a nice Silver Dawn but he mounted his coil with the HT connection upwards, as his belief was that the oil filling may run out. Trained as he was by R-R in Avon gas turbine alternator sets. People have funny ideas. (Message approved by david_gore) | |||
Jeff Martin Frequent User Username: jeff_r_1 Post Number: 492 Registered: 07-2018 |
I'll disagree here Chris when it comes to oil filled coils, even modern ones; I have a Bosch coil that's filled with oil, and when mounted up-side-down, it does leak. I've even had the tarry substance in the original coils warm up enough where it leaves a mess on the thumb screws and in the centre high voltage wire. This is from the Pertronix web site in there FAQ section. "Flame-Thrower coils are made with two different internal materials, oil and epoxy. Epoxy filled coils have a cured resin which supports the coil internal winding's and they can be mounted in any direction. Oil filled coils should always mounted upright to prevent a potential leak of critical fluid as the coil heats up and cools down". Perhaps some are sealed better then others. | |||
Harry Brash New User Username: harryed Post Number: 8 Registered: 04-2023 |
Jeff Thanks for your comments re the lift pins. We won�t be fitting lift pins. At the moment, to adjust the mixture settings, we have to remove the air intake manifold from the air cleaner to the carbs and that is a hassle. We�re working on a way of lifting the carb pistons from above which will do the same as the lift pins. As for centring the jets, we made a simple tool similar to that available commercially (a bit of brass or whatever turned to two different diameters) and that makes centring the jets very straightforward and quick. It works every time and is worth getting or making. | |||
Jeff Martin Frequent User Username: jeff_r_1 Post Number: 493 Registered: 07-2018 |
To lift the pistons with out lift pins, unscrew the damper caps, lift the damper pin above the carb about the width of your thumb and gently bind it sideways enough so you are able to lift the pistons. I don't know if this is a standard practice, but it works well enough. I never had to remove the intake manifold to change the mixture, I have long arms and fingers, maybe that makes a difference. Granted, it was awkward, but doable _ I used an open end wrench with the sides considerably ground down to make the job a little easier. A bright light is needed _ I can't remember if I used a mirror. At any rate, I changed out the original carbs from a Jaguar, the mixture screw is now accessed from the top _ much easier to balance now too. That was a huge job doing that, it opened up several cans of worms. The biggest problem is the butterfly valve moves in the opposite direction _ this took a lot of modifying of the linkage to get the whole thing to work. I'll never do it again. Thanks about centering the jets. One other thing, did you replate your firewall (bulk head), I've never seen one so clean ? | |||
Alan Dibley Frequent User Username: alsdibley Post Number: 376 Registered: 10-2009 |
Would a magnet on a stick, poked down the damper hole, be a substitute for lift pins? I will try it and report back if someone else doesn't do it first. Alan D. | |||
David Hughes Experienced User Username: wedcar Post Number: 149 Registered: 07-2004 |
Alan Sounds like a good idea. How about this tool, attached. Regards David
| |||
Alan Dibley Frequent User Username: alsdibley Post Number: 377 Registered: 10-2009 |
David, that's even better - saves guessing/estimating. I might suggest 1/16" or 1/8", but what do the experts say? Alan D. | |||
David Hughes Experienced User Username: wedcar Post Number: 150 Registered: 07-2004 |
In the above attached sketch, I wrote the piston was on the jet bridge, this is not correct, with the engine running the piston will be slightly above the the jet bridge, any such tool would need to be adjustable. David | |||
Harry Brash New User Username: harryed Post Number: 9 Registered: 04-2023 |
Jeff Regarding the fire wall the plating had mostly gone and there was some surface rust. We removed most of the bits and pieces including the junction boxes, lubrication pump and wiper motor and rubbed it down. We had investigated various paints and settled on a flat Hammerite which has worked well. We did it some years ago and it still looks good. We used a mix of spraying diluted paint and brushing the inaccessible parts. If we get it dirty it usually cleans up ok with petrol. Harry | |||
Jeff Martin Frequent User Username: jeff_r_1 Post Number: 494 Registered: 07-2018 |
That would explain why it looks so nice, thanks Harry. I stripped all things off the bulk head and removed it _ that was a big job and it was lucky I did as the big rubber grommet where all the main harness goes through had perished. The wires were beginning to chafe on the sharp steel. I had mine replated, but they were having an impossible time getting the old stuff off _ it was taking too much time, so they just plated over top of what was done and I was told not to get it wet.  I ended up grinding all that mess off and had it powder coated in a close colour that was used on the later cars. . | |||
Harry Brash New User Username: harryed Post Number: 10 Registered: 04-2023 |
Update and looking for more help please. Our Bentley is now idling very sweetly with its new condenser and we have been trying to set up the carbs. To balance the air flow we measure the movement of the pistons and adjust the throttle linkages to give the same movement on each piston. We have two straight wires which are bottomed in each damper cylinder. The wires move up and down with the pistons and we can read the displacements of both wires against mm graph paper mounted above each carb. We use the carb piston movements as mass flow meters. It seems to work and carbs are balanced. This time we have generally been following the �SU Idiot Guide� available on the internet but there are many similar articles available. To adjust the fuel /air mixture it recommends moving both mixture nuts up until the top of the jet is level with the bridge but, with the adjustment hard up to the lean position, our jets are about 0.5mm below the bridge. We have taken that as the starting point.The idiot�s guide suggests winding the adjustment nuts down (towards rich mixture) 12 flats (2 complete turns) and taking that as the adjustment starting point. The guide assumes that position will be too rich. The fuel/air mixture tests suggest the use of the lift pins which are not fitted to our 1948 car. We had built a simple device to grip the piston from above to allowing it to be lifted. It uses a rubber sleeve which expands when it is squashed to grip the inside of the piston cylinder. It works great but so does the magnet suggested by Alan Dibley . We have tested the magnet approach with a 10mm diameter 4mm thick neodymium magnet on the end of a �� steel bolt and it lifts the piston easily. If we were starting again we would use the magnet approach. Can someone please tell us how far the lift pins (when fitted) lift the pistons ? I have seen several values suggested. We have been using about 2mm, Our first test was with the mixture adjusting nuts wound down 12 flats (2 turns). Lifting the pistons had very little effect on our rear carb but had a noticeable effect on the front one. The engine slowed down and was about to stop. We have a Gunson Colortune and we looked at cylinders 2 and 5. 2 (front carb) looked quite lean (blue) and 5 (rear carb) looked quite rich (yellow). At this point we decided to go back to the start. We returned both carbs to the starting point (jets about 0.5mm below the bridges). Lifting the rear piston gave a response which seemed to be the the correct adjustment according to the idiot�s guide (engine goes faster then returns to idling speed). Lifting the front piston slowed the engine down immediately. The Gunson still showed lean at the front and rich at the rear. We realised that there was a difference between the two carbs, We had replaced all seals and renewed the jets but hadn�t renewed the needles. To check the needles we swapped the front and back needles. After swapping they both sounded centred and we repeated the tests. The results were the same � lean at the front and rich at the rear. We reckoned this showed that the needles were not the problem. We thought that the float chambers might be a problem so we swapped the front and back float chamber covers with their forks etc which had no effect. We didn�t swap the floats but when we opened up the float chambers they looked the same in terms of fuel level etc. We had previously adjusted the forks as recommended in the Bentley service manual using a 7/16� diameter rod. Any suggestions would be welcome. . | |||
Alan Dibley Frequent User Username: alsdibley Post Number: 381 Registered: 10-2009 |
Air leak somewhere in the manifold system. Try using a stethoscope to listen for the hiss, or squirt something flammable from an aerosol (carb cleaner, brake cleaner, anything that smells as it burns) around the area. There's a lot of real estate to cover. Or if you find a pipe without a tube on it you have just fixed it. Alan D. | |||
Jeff Martin Frequent User Username: jeff_r_1 Post Number: 495 Registered: 07-2018 |
Have you disconnected the choke linkage between the two carbs so they can be adjusted individually ? If there is not enough slack in the linkage, you won't be able to set the mixture on each carb - one setting may effect the other. I remove the linkage, set the mixture and then adjust the choke linkage for slack so the choke linkage pins slip in easily. I believe the rear jet is spring loaded (if memory serves), and that spring holds the main jet hard up to the mixture adjusting nut. The front jet is controlled by the choke lever on the steering wheel, and you want the lever fully home so its jet is hard up against the adjusting nut. When adjusting the mixture on the front carb, taking the tension off jet with the steering wheel lever makes the job easier, on completion of the adjustment, snug up the jet to the adjusting nut with the steering wheel lever. . | |||
Harry Brash New User Username: harryed Post Number: 11 Registered: 04-2023 |
Alan and Jeff Thanks for your comments. We have looked for air leaks but nothing found so far. Regarding the choke linkages, they were all disconnected before trying to tune the carbs. The car now runs but still doesn't tune up correctly regarding the mixture. What we're going to do is set the mixture towards the lean end - maybe 6 flats down from fully up - and give the car a few good runs. After that we'll try again to adjust the mixture. | |||
Martin Webster New User Username: martin_webster Post Number: 48 Registered: 09-2018 |
Harry, have you checked the joints between each carburettor and the plenum chamber ? Each one should have a paper gasket and I found that I had a slight air leak via one of these joints which were both dry. I applied an extremely thin layer of Wellseal to each side of the gaskets and it cured the problem. It�s quite possible that each surface is not entirely true due to age or some other reason. | |||
NormanGeeson Unregistered guest Posted From: 81.99.74.184 |
Harry �The car now runs but still doesn't tune up correctly regarding the mixture� You have described a fault that could be attributed to any one of the following three points, I have seen all of them, and many times. In any event I would suggest you adopt all three points before attempting any tuning. 1. The car is probably suffering from a blocked exhaust as no mention is made regarding any silencer change. In the very worst cases the engine will die after about five to ten minutes of idling. You will be going around in circles if you attempt any tuning in this condition. I have experienced this problem twice on my old car and seen possibly a dozen or more in the field. 2.The chassis number B67CD dictates that it was fitted with SU H4 carburettors originally and may have been converted at some stage to the later SU H6 type with larger choke Idle. Identification is easy as the H4 has a two-bolt fixing while the H6 has a four bolt fixing. It is important that the main needle is checked for the correct type, If the original SUH4 carburettors are still fitted they must have SC needles, many of these cars have been fitted wrongly with SP needles destined for the later SUH6 carbs. If that happens the engine can idle but dies off when heavy throttle loading occurs. 3. You can almost bet that the assembly of fibre and alloy washers at the top of each float chamber is not correct. It is important that TWO of the serrated fibre washers R-R part number RE 7297, SU part no. 1928 are fitted to EACH carburettor and they are not over compressed. It is doubtful if you will find any author, specialist or article mentioning this important point, but it is necessary to ensure full breathing through the float chamber. Make sure that these washers are not unduly compressed or the compressed stack will cause vacuuming in the float chamber, mechanics just love to check the tightness of these top bolts when the bonnet is opened!! Trying to achieve even running with chamber vacuum is a complete none starter. Some of these carburettors made up until around 1961/1962 had rather restrictive slots in the chamber lids communicating with the 1928 washers, SU suggested these slots need filing out to improve the breathing. The S.U Carburettors appear rather simple devices but there are several modifications none of which were openly published and very few appeared as bulletins including the one mentioned here. Back in the 50�s R/R issued drawings for a synchronization tool, now everyone seems to be reinventing them. I must smile because the tool that SU tuners used on their clients rally engines consisted of two pencils, one in the top of each dashpot to measure dashpot piston lift. A very portable tool!! (Message approved by david_gore) | |||
HarryBrash Unregistered guest Posted From: 77.99.77.134 |
Norman Sorry for the delay in replying. I posted the reply below just after your post but must have put in the wrong password and I just realised it hasn�t appeared on the forum. Thanks for your comments. There is no evidence that the exhaust is blocked. The carbs are H4 with two bolt mountings and the float chamber washers are alloy on the top and fibre on the bottom. The SU site shows it the other way round. I don�t see any reason to fit fibre washers on the top as there are no slots on the top. I think we had a problem with the rear carb in that the large nut fixing the centering of the jet was not tight enough and the mixture adjustment was not working. The combination of jet and holder was rotating as one unit. That has now been fixed. The good thing is that the engine sounds better now than for a long time. I liked your two pencils technique for tuning the carbs. We use much the same technique although no pencils are involved. The moving pistons on the SU are mass flow meters in all but name and are much more precise indicators than stethoscopes and ears. Thanks again for your comments. Harry Chassis number B67CD (Message approved by david_gore) |