| Author | Message | ||
Edward Shoesmith New User Username: younghenri Post Number: 32 Registered: 10-2022 |
This is a continuation of a discussing and assistance given so far from another topic regarding my engine cooling issues. That was getting off topic so I have decided to create a new post for this issue alone. If Im duplicating my apologises  Here is a video for anyone else that may need some guidance on carburetors and engine tuning for postwar 6 cylinders and V8's it an old video converted - I found it useful and also easy to follow the steps. https://www.youtube.com/watch?v=WaMCmsfuZoU | ||
Edward Shoesmith New User Username: younghenri Post Number: 33 Registered: 10-2022 |
Ok back to this issue. Jeff and Mark So today as I mentioned in the previous post I went and got 2 x Needle & Seat .096" Bore Viton Tipped H-HS-HD 2 x SU CARB T2 STAYUP FLOAT H2 H4 H6 HD4 HD6 HD8 1-7/8" DIA 2 x NEEDLE (SF) 1 x Su tool kit However the float I was given was not the same diameter as the one I subsequently found in the float chamber - so I did not change it. The one supplied was smaller and I did not know if it makes any difference regarding what diameter float is in the chamber? so I left the old ones in as they seem to bob up and down with out resistance. The ones in the float are the old brass types I bought the ethanol resistant ones today I spent about 4 hours today working on the car, regrettably things did not improve I will now explain. Now to start I should have probably ordered 2 new rebuild kits but I thought as the issue was previously with the front carbie and the mechanic said he had put the parts on I got for him last week I had presumed the issue was with that carbie may have been limited to the float and needles as I dont think he changed or adjusted them. I suspect there is still an issue, but the rear carbie is a bigger issue now. 1. Could someone clarify for me if the brass nut at the bottom of the jet is supposed to be wet or dry. Every time I felt it today and yesterday it was like there was a small amount of fuel on it. I had thought the mechanic fixed the leaks last week, so i dont know if this is normal. I also checked the rear one after that and it was the same - wet. For the benefit of everyone I have taken a picture of my carbie configuration as mounted on the engine. because im in Australia my car has the oil bath filter system so I have used the SF needles for the Jets as per workshop manual see 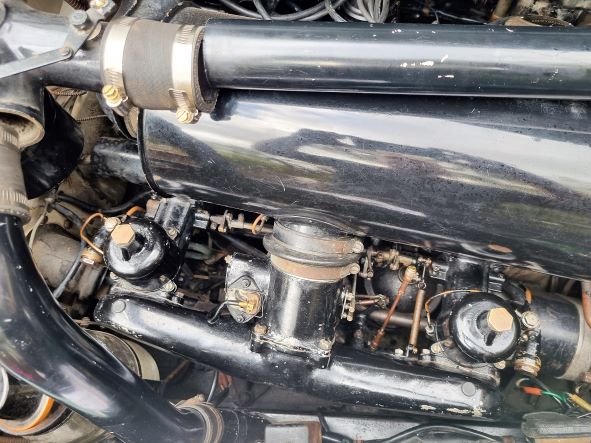 I first removed the front jet and then the float chamber lid and proceeded to clean everything with carbie cleaner. I was able to dismantle and put it back together and I adjusted the float chamber level using a 3/8 drill as described in the video above - I note Jeff has since suggested not so good tho.... However I did not know that there was supposed to be a filter in the bolt inlet for the float chamber mine did not have one for the front. Also I note these are not included in the rebuild kits? Also When i removed the needle and seat from the float chamber the front carbie did not have a needle! Also when I was put the chamber lid back on one of the cerated washers broke. I replaced the Jet needle and carefully refitted that also. When I started the fuel pump there was no visible leaking of fuel from the front carbie other than a small amount of residue at the bottom of the brass nut on the Jet as mentioned before. I then proceeded to remove, clean and replavce the parts for the rear carbie. Thats when I discovered it had a filter inside the chamber float inlet. I replaced the jet needle etc and also adjusted the float chamber leaver as wth the front and then put commenced to put it all back on. After putting it back on fuel was coming from everywhere After reviewing the drawing Jeff provided earlier I note that the float inlet chamber is supposed to have 2 fibre washers. Neither of my float chambers had fibre washers at all they instead had 1 brass one and the front chamber had a cerated one only on the front screw inlet. The rear chamber only had a brass washer it did not have any felt washers. here is a video of what happened when i turned the ignition on https://youtube.com/shorts/iwNUpHplLY8?feature=share So my question is will simply putting fibre washers on either side of the chamber inlet screw fix the leaking fuel or am I looking at rebuilding the whole carbies to fix this problem? Thanks in advance for any assistance | ||
Jeff Martin Frequent User Username: jeff_r_1 Post Number: 458 Registered: 07-2018 |
I'll have to watch that video again, I don't think it was 3/8, that's too small, I believe 7/16 is the correct size, and I've used 1/2 inch on mine to set the fork on the needle float valves. The video is very helpful, it needs 2 new fibre washers on either side of the banjo fittings, it's quite clear it's severely leaking there. Put a small amount of grease on the male and female threads of that fitting, so as not to gall the threads, the soft aluminum is very susceptible to that. You can get away with re-using the fibre washers, if you use Loctite 515. I'm sure there are other products out there, but I like that one. I find the brass washers don't seal that well, they need to be snugged up beyond my comfort level of tightness on that soft aluminum, even when new. Usually copper is used, not brass, but I've never seen copper washers used here, nor brass, it's always been fibre. The slight fuel on the bottoms of each jet is an indication that the seal in that area is failing, eventually they will start to leak there, it's just a cork seal. The new seals are still cork, but they are impregnated with graphite and they do last longer then the old style. Replacing those seals is kind of involved, as it requires the removal of both carbs, centering the jet and adjusting the mixture, that is where the mixture is adjusted on these types of carbs. I take a depth gauge to note where the adjustment is, before disassembly, doing one at a time. And to answer your question, putting 2 new fibre washers on either side of each Banjo fitting will stop the leak, I work in a film of grease on each washer so they seat properly when snugged up. (do both sides of the washer with the grease) | ||
Edward Shoesmith New User Username: younghenri Post Number: 35 Registered: 10-2022 |
Hi Jeff Many thanks for the prompt reply - sorry my mistake you are correct I used a 7/16 or 11mm Also the washers could be copper I just thought they were brass and your right I had them so tight and was scared I would strip the thread if I kept going but they were very tight and the fuel still got out.... Ill see if I can get just the washers then and see if that fixes not sure If I can just by the washers from SU Midel What did you make of my comment about the float being smaller in diameter? Also what about the filter in the float chamber inlet - needed or not? Ill get some Loctite as suggested just in case. Will let you know what happens | ||
David Hughes Experienced User Username: wedcar Post Number: 145 Registered: 07-2004 |
Edward Congratulations on taking on this work, please keep us updated. It is very important that the fibre washers on the float bowl overflow pipe are the correct serrated ones, especially the one one between the pipe and the float bowl lid, if this is fitted with a full face washer, the carburettor will flood. The fine filters in the float bowl inlet prevent any small particles preventing the needle from sealing off the fuel, I would suggest they be fitted. Regards David | ||
Jeff Martin Frequent User Username: jeff_r_1 Post Number: 460 Registered: 07-2018 |
The new floats will work as long as there is enough surface area on them to support the needle valve forks. They also have to fit the centre rod where the float lid is fixed by the long nut. | ||
Edward Shoesmith New User Username: younghenri Post Number: 36 Registered: 10-2022 |
Hi David Many Thanks - I'm giving it my best shot - am having trouble locating the washers though... Thanks for the tip about no using standard washers  Jeff The float I ordered was a T2 (1 & 7/8") as flying spares website said that one was for my car It seems my float probably has the T4... Hmmm | ||
Jim Walters Frequent User Username: jim_walters Post Number: 378 Registered: 01-2014 |
Edward, all SU parts can be bought from the manufacturer Burlen Fuel systems at www.burlen.co.uk SRH8505 SRC18015 SRE22493 NAC-05370 www.bristolmotors.com | ||
Edward Shoesmith New User Username: younghenri Post Number: 37 Registered: 10-2022 |
Hi Jim Many Thanks for the tip. but there is SU Miduel here in Sydney Australia. I managed to get all the washers and gaskets this morning | ||
Edward Shoesmith New User Username: younghenri Post Number: 38 Registered: 10-2022 |
Hi Guys Well I went to SU Midel and managed to get the parts needed. I purchased 1. Banjo Bolt Fibre Washers x 2 for each float bowl = total of 4 2. Serrated Fibre Washer for the float bowl overflow pipe x1 each - Total 2 required 3. Carburetor float filter x 1 each = Total of 2 4. Gasket Float lid x 1 each = total of 2 5. 2 New Banjo Bots (Just in Case) So here is another video after I installed everything https://youtu.be/mCr_aDtKbvw As you can see there is no more furl spitting out everywhere Initially I got excited as for 20 mins whilst idling there wasn't a drop of fuel to be seen, but my excitement was soon dashed. Went for a 5KLM test drive and under load I could smell fuel once again, when I pulled over on road I could see a puddle of liquid say about 10cm in diameter in drop trail preceding it. I believe it is coming from the front carbie. My overflow tube runs just down almost level with the bottom of the engine block and I think as im driving the wind is blowing the excess fuel onto he chassis base plates that run off the fender area. I can see it is wet and there is a channel there where clearly the fuel is travelling and exiting on to the ground just slightly behind the front tyre and towards the centre of the engine bay. So when I picked up the new serrated washers as they do not appear on any of the the diagrams as to where to position it, so I assumed it must sit directly upon the float bowl top. Then I put the overflow pipe on that, then another washer, then the cooper tubing pipe that runs around the front carbie jet and another washer before bolting down the carbie float bolt that runs in the centre of the float bowl. What was unclear to me was there a special way to position the serrrated washer? I noted 2 notched on top of the float lid. I did try to keep those notches clear of the serrated washer, so unclear if that might have blocked the breathing of the float bowl whilst trying to position everything on to the float bowl lid. Also I did put a new needle and seat yesterday so I dont think thats the reason, I did adjust the float forks to the 7/16 dia as mentioned before, But I did not change the float itself???? So I am now going to undo the float bowl assembly and reposition the serrated washer just in case the breather is being blocked by the new washer and I will also try to change the float. I cannot see any leaks now from the carbie jets or the float, I am 99% confidant the float bowl is flooding and what is causing the issue. Id Welcome anyone thoughts and advice Thanks | ||
Edward Shoesmith New User Username: younghenri Post Number: 39 Registered: 10-2022 |
Ohh one more thing at the risk of appearing completely dense.... It occurred to this morning the position of the Float bowl Needle in the Seat is confusing. I have found two different explosions where they are contradictory. One shows the black tip inside the needle seat the other shows the black tip facing out of the needle seat I had the black tip of mine facing into the seat See pictures below.. 1. Tip facing out 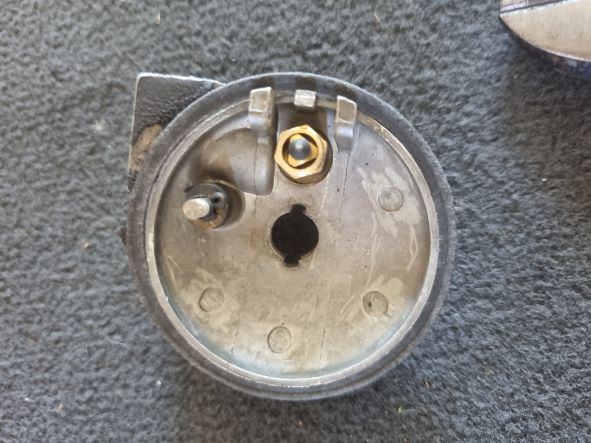 2. Tip facing into the seat 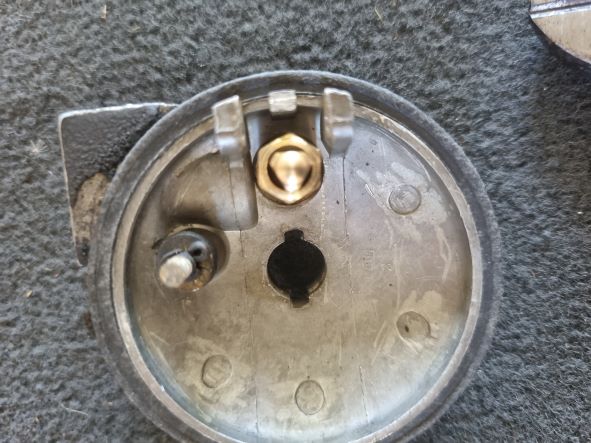 So which is the correct way? thanks | ||
Edward Shoesmith New User Username: younghenri Post Number: 40 Registered: 10-2022 |
Please ignore the post directly above this one - I figured out its the black tip into the seat NOT outwards. Anyhow I have redone the front carbie with no improvement. BUT There was quite a bit of fuel coming out under the car I only went 2 streets and came back. But this time I saw it coming down, it was coming down from the rear of the engine not the front and it was almost inline with the firewall and centre of the engine but of course it could be travelling from elsewhere??? - So am now wondering if I have a possible fuel line rupture issue?? As I cannot see any fuel exiting the overflow pipes either front or back when I rev the engine at high RPM using the throttle body but fuel is on the ground. Attempting to find a diagram of the fuel lines from the pump to the carbies atm.} BTW my car is RHD of course | ||
Jeff Martin Frequent User Username: jeff_r_1 Post Number: 461 Registered: 07-2018 |
It's not quite clear what's going on, so the banjo bolt is still leaking where it meets the float chamber lid and you have another leak elsewhere ? Did you install the new fibre washers there and it's still leaking there ? What else doesn't make sense; why now are the carbs leaking, at least the front one, was that one leaking when it was at the garage when the car was tested for overheating by the garage ? Anyways, on my Mark VI there is a flexible fuel line that goes from the frame to the side of the block, that becomes hard and no matter how tight the clamps are, it leaks at that union, both ends of the flexible line sometimes. This assumes that your R-Type is the same as my Mark VI. There were different fittings used later on. | ||
Jeff Martin Frequent User Username: jeff_r_1 Post Number: 462 Registered: 07-2018 |
EDIT: Missed the video, check the line from the block to the frame for leaks. I have some carbs that use the weakener device, and they need to be vented into the atmosphere through the breather pipe. I have to refresh my memory on how that goes together, you may need two serrated washers per carb so the weakener vent tube is also vented. I think I made my own with an aluminum washer. | ||
Edward Shoesmith New User Username: younghenri Post Number: 41 Registered: 10-2022 |
Hi Jeff Here is an update I spent a number hours yesterday trying to figure out what was happening, a friend of mine assisted and we worked out a way to get the old floats out of the float chamber. We discovered gunk in the bottom of the chamber so cleaned it, then replaced them with the new ethanol resistant ones. I also made some further adjustments to the float fork, put it all back together for both carbies and no fuel was coming from anywhere when we switched ignition on. I also removed the plates under the vehicle so I could hopefully get a clearer indication of where the fuel was actually coming from under the car. I then turned over the engine and again for 10 mins no fuel leaks. Then decided to test drive, fuel started coming out of the pipe under the rear carbie and near the firewall. I think its the one you noted above in your reply post. I believe it is part # HOSE, MAIN FUEL FEED TO CARBS, RIGHT HAND DRIVE (RF8054P). Here is a video link to see whats happening. If you expand the video you will see the fuel coming out of the hose rapidly. https://youtu.be/hUZZFwcwLfQ So I note you mention that tightening the hose will not resolve the issue. So I am trying to get a new one through Introcar - Just waiting for a reply. My concern is if the hose is leaking is that the reason why the carbies are now not flooding? Is the leak allowing less PSI to the carbies and therefore they are not showing any leaks presently either whilst idling or under load. But when I replace the hose will that then put me back to square one with chasing my tail with the carbies flooding... I also dont understand why when idling its not leaking but when under load (ie in gear or driving) it spews out fuel? Does the pump allow more fuel to flow when in gear? I also note that when the engine head etc was done (as per my previous posts) the mechanic who did that made comment that he had to check/fix/adjust the fuel pump - however the exact reason now alludes me as to the reasoning. Can you adjust the pressure of the pump? is this possible because the carbies were an issue after he had completed the head repairs and now there is too much PSI in the system? ___________ In to answer your other questions Banjo Bolts. I replaced both and also placed 2 new fibre washers on each and since then no further leaks have appeared at those junctions for either the front or rear carbie. yes you are correct it was the front carbie that was the issue when I took it to the mechanic last week. | ||
Jeff Martin Frequent User Username: jeff_r_1 Post Number: 463 Registered: 07-2018 |
The hose leaks when the torque of the engine changes its position on its mounts when you put it in gear and it opens up to what appears to be a crack in the fuel line (hose). If the carbs are not leaking, replacing the leaky hose will not bring the pressure up enough to cause them to leak _ they will either leak or they won't. The replacement form Introcar will most likely be a metal braded line rather then a rubber hose. Yours is a better arrangement then mine, mine uses just generic fuel line with clamps, yours has a fitting. Never heard of being able to adjust the pressure output of SU carbs, it's fixed by the strength of the return spring in the pump. The stronger the return spring on the diaphragm, the more pressure there is, it's not adjustable, other then to put in a stronger or weaker spring. | ||
Edward Shoesmith New User Username: younghenri Post Number: 42 Registered: 10-2022 |
Hi Jeff Many Thanks for clearing up the PSI doubts and leaking carbs etc- very much appreciated - I will try to get a new hose. Will let you know after I manage to get one - Might not be to the New Year now as its very close to Xmas | ||
Mark Aldridge Frequent User Username: mark_aldridge Post Number: 831 Registered: 10-2008 |
Ed, the hose may be available from FS or alternatively, as I did with my S1 ( similar hose) I purchase the end unions as hose tails (from ebay or your local hydraulic hose supplier ) and used a length of fuel hose with jubilee clips. | ||
Edward Shoesmith New User Username: younghenri Post Number: 43 Registered: 10-2022 |
Jeff and Mark Mark - I managed to get a bespoke hose made - Steel Braiding and correct end fittings from a supplier here. Took me about 90Mins to figure out how to get the old one off and about 60 mins to get the new one on. So about 5 hours including getting the hose made etc Ive just now come back from a 120KLM or 75 Miles highway/expressway dive. Did consistently 105kph (65 MPH) used 27.2 litres in total, I think that's rather High works out about 22 Litres per 100 KLM or thereabouts (So trip was 7 US Gallons which equates to about 9 US Gallons per 100 Miles) but their is still fuel slightly dripping from the brass nut on the bottom of the front Jet (as I mentioned before) Jeff said leave it alone so I have. I dont think its dripping a lot though Only issue is starting now is a little harder - accelerator flat to the floor for a few seconds then kicks over. Before it started up straight away cold or hot now takes a few goes - But engine torque has come back - was sluggish a few days ago - now zippy do dah! no worries I am also pretty certain my fuel sender float is not work that well - I have to tap the glass on the dial to get neddle to move, but everytime I put fuel in the car the amount to fill never equates to the needle - Like just now neddle sat at 3/4 but it took over 1/4 to refill the car. So I will do the fuel sender gauge after christmas I think. Any tips on how to do that appreciated!!! I thought I read somewhere I should be getting 14 litres per 100klm to a tank of 80 litres which should give me around 550KLM's, so Im getting a lot less - Mine is the 4.5 Litre engine BTW Be keen to hear what others are getting... FYI temp gauged sat at the 75-78 degree mark whole time, oil pressure was good and generator working... I have a few more things to sort tomorrow - like doing spark plugs and other minor stuff. Whilst under the car I found a few cables not attached to anything so I may need assistance to identify their purposes Jeff and Mark many many thanks for your guidance's and advice. THANK YOU! Im not celebrating yet TBH but i will keep testing the car over the next few weeks and advise outcomes. | ||
Mark Aldridge Frequent User Username: mark_aldridge Post Number: 832 Registered: 10-2008 |
I would not think the 4.5 litre engine would be much different to the S1 4.9 litre unit, they are essentially the same engine. On a trip like yours I would expect 19-20 mpg.(15 l per 100km) | ||
Edward Shoesmith New User Username: younghenri Post Number: 44 Registered: 10-2022 |
Hi Mark I see your in The UK so I would have consumed 6 Imperial gallons on that trip. So my car is doing only 12.5 MPG - thats terrible if your getting 19-20MPG.....thats like 40% more fuel consumption YIKES! Maybe the front carbie is leaking more than I had hoped  I think Im just going round in circles So Im guessing nothing has improved at all with my efforts, or of course the mix might be awful but I can only find one screw which increases or decreases the idle so not sure if thats mixture or ???? - There is only a very slight putt putt putt from the RHD exhaust - Left is ok - I also changed all the spark plugs today as well See image below - I cant find any other screw that looks like an adjustment - But i read online there should be 2 however cant find the other - its not obvious to me 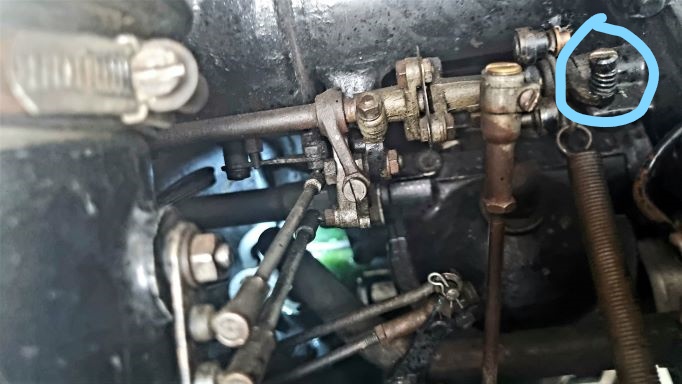 | ||
Mark Aldridge Frequent User Username: mark_aldridge Post Number: 833 Registered: 10-2008 |
Ed, the screw you highlight is idle speed, not mixture. These SU's are different to the S1, but I will ask my son at the weekend, he has some experience with post war Bentley, but his career is prewar Astons and now prewar Bentleys. What is the colour of the plugs you removed, are they all the same ? What is the chassis number of the car ? | ||
Richard Gray New User Username: mooney1el Post Number: 31 Registered: 08-2016 |
Edward - The carbs on my "new to me" Bentley R-Type are not configured the same as my Bentley Mk Vi nor like my Clouds. I found that my front carb was leaking from underneath not unlike my Mk Vi had done. However, since the R-type has a version of an automatic choke, the jet configuration is different. In order to set the mixture, you remove the lower cap and adjust the jet. I found that somewhere along the way, both of the lower caps were missing on my carbs. Please see assembly number 14 (the cap is part number 14K) in the diagram at: https://sucarb.co.uk/carbspec/carburettor/spares/id/536/ I ordered two WZX 997, Thermo Jet Bearing Kits from Burlen along with the rebuild kits and replaced all appropriate parts. In the jet kit are a couple of impregnated glands that must be soaked in oil for 24 hours prior to assembly. The centering of the jet on our carbs is very "touchy". I accomplished this by making an appropriate non tapered needle and thus centering the jet such that the needle had no resistance when operated throughout its travel. Per Norman Geeson's guidance, I initially set the jet at .037" below the bridge and that mixture setting was perfect for my car. | ||
Jeff Martin Frequent User Username: jeff_r_1 Post Number: 464 Registered: 07-2018 |
The mixture screw is down below on the bottom of each carburetor, where it's leaking. High-lighted in RED is the adjusting nut for the mixture, screw it in to make it lean, and out for rich, only adjust it one flat at a time. The cork sealing gland has to be replaced, that's where it's leaking, that should be addressed first before adjusting the mixture _ do both carbs. If it's dripping like you say it is, that will also effect your fuel economy. Here's that link again, please read through it, and understand it, but I will be honest with you here, although it's not complicated, I feel that understanding on how the carburetor works and the principal's behind their function may be beyond your scope of understanding. I have my old carbs from my Bentley which are essentially the same as yours, I'll try and make a video of the assembly, but all I have is a crumby hand held camera, so I don't know if it will be good enough. All carburetors work under the same principle, it doesn't matter what kind they are, SU, Rochester, Holley, Webber, etc. Once you understand that, this will all make sense. I'll post a picture on how the vent breather tube and weakener device should be assembled on top of the float lid, you may have that wrong, if it is wrong, then that will effect your fuel economy. You may have it assembled in such a way that the weakener device can't breath. Don't touch the mixture screw until that assembly is correct, assuming that it isn't. There are all sorts of videos on how carbs function and how they make use of the venturi, but they all assume that you know other things, like how a 4 cycle engine works, like in pretty much all cars, including our cars. I can tell you how to adjust the mixture, but I would like you to understand what you're actually doing when you do adjust it, but I don't think that can be done here on a forum. It would take much time to type all that out. What you need is to understand how a venturi works and how its principal applies specifically to your SU carbs. https://sucarb.co.uk/technical-h-type-carburetter-diagram 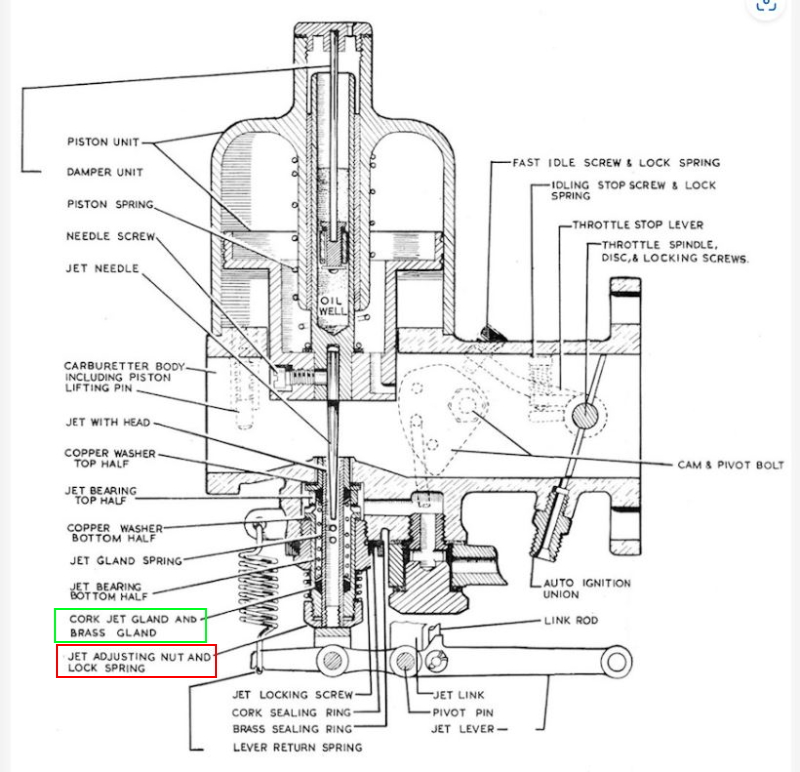 | ||
Richard Gray New User Username: mooney1el Post Number: 32 Registered: 08-2016 |
Respectively Jeff, your illustration and examples is for the carbs used on the Mk VI. Our R-types have an automatic choke and thus the lever assembly on the bottom of the carb is eliminated. While the mixture adjustment on the bottom of the carb is similar, it is different. The cap shown in the link I posted, part number 14K, must be removed and the adjusting "nut" screwed up or down to effect the mixture. If the gland sealing the jet is brittle or just old and worn, there will be leakage just as in the carb you show. The lower cap does have a thin gasket sealing the system to the centering adjustment "nut" which is also sealed using a cork gland. | ||
Jim Walters Frequent User Username: jim_walters Post Number: 379 Registered: 01-2014 |
Adjusting the mixture on these carbs is very simple. Using the dashpot piston lifting pin, raise the piston 1mm with the engine warmed up and idling. If the idle speed increases, turn the adjusting nut on the bottom UP one flat. Wait a few seconds and repeat. If the idle speed goes down instead of up, turn the adjusting DOWN one flat. When the idle speed blips up for a split second then returns back to before lifting the pin the mixture is correct. This is assuming the carbs are properly balanced. Mixture adjusting nut is under the cap on the bottom on automatic choke SU's as Richard says. SRH8505 SRC18015 SRE22493 NAC-05370 www.bristolmotors.com | ||
Patrick Lockyer. Grand Master Username: pat_lockyer Post Number: 2546 Registered: 09-2004 |
12.% MPG not good. I was taught many years ago that before any fiddling with carbs one had to carry out first the dwell and then the ignition timing. The air filter silencer can be overlooked, check the wire gauze and clean then lube with light oil. The carbs are factory set and unless they have been reconditioned etc they should not be toughed apart from the adjustment for the C/O making sure the mixture is balanced on each carb with the use of the damper piston air valve lift pin. If the engine still is not running to a satisfactory state then look into the balancing of the carbs with the air flow meter and then start over again. | ||
Edward Shoesmith New User Username: younghenri Post Number: 45 Registered: 10-2022 |
Hi Mark, Richard, Jeff, Jim and Patrick I very much appreciate all this feedback. Well after reading all that, Im going to say its past my depth TBH. I simply dont feel comfortable pulling the carbies apart etc, there are too many linkages etc and I just know I will just end up having the car in pieces with no understanding of how to get it back together. So I am not going to attempt any further repairs. The silencer itself is a maze and between them both I will just end up with a car sitting in the garage in bits and pieces and worse completely undrivable. I have paid 2 mechanic so far - both claim to be specialist in Carburetors and you would think with either I would not have to deal with this hey! I was told sometime ago by another person that the glans needed to be soaked for 24 hours as Richard G has mentioned and I suspect this is the reason that they are still leaking as I supplied the necessary kits to both mechanics to avoid this very issue and make sure they had everything needed. Although I did not mention this requirement to either mechanic as I feel when I do offer tips and tricks submitted by other owners I'm frowned upon as an idiot and or a know all customer. So I dont say anything anymore However you would also think if someone claims to be a specialist in SU Carburetors that they would know the gland needed to be soaked! Im sure its not unique to RR&B SU Carbies. The front carbie is still leaking I can see small amount of fuel on the ground this morning. Im just going to have to wait till after the Xmas New Year holidays and find someone else if I can to repair it But this scenario also goes to the heart of my argument regarding RR&B Classic/Vintage/Veteran Cars. If an everyday enthusiasts can not purchase a vehicle and have it maintained without having to become a pseudo mechanic themselves or end up with a bill that is seriously outrageous and the car is still in disarray, the consequences will be spiraling negative valuations and difficult resale channels regarding the marques and it will undoubtedly see valuations of the vehicles plummet to lows so that even those with such abilities will not want to continue or expand their investment in the brands as the economic viability of them becomes effectively worthless. I guess that explains why equivalent period everyday brand cars are fetching sometimes 3-4 the price of various RR&B models - eg ford capris, Datsun 240Z's and a plethora of muscle cars etc. But yet a silver shadow or cloud or Mark VI fetches between 18K USD to 65K USD only when an Australian Holden (Vauxhall) Torana apparently is now worth in excess of $110K USD - a car that was 10% of the purchase price of a silver shadow in its day- go figure. If you subscribe to the theory of capitalism, you have to admit then the demand vs supply dynamic is in full swing with the RR&B marques on that basis alone. Once I get the car sorted in the next 8 weeks - I'm getting rid of it, way to much stress for far too little return I'm afraid But many thanks for all your inputs and seasons greetings. | ||
Alan Dibley Frequent User Username: alsdibley Post Number: 364 Registered: 10-2009 |
Hi Edward. Quote: "Once I get the car sorted in the next 8 weeks - I'm getting rid of it, way too much stress for far too little return I'm afraid." I'm so sad to read of your experiences. Such a shame. If you could get the car to me in Cheddar in England it could be fixed in a couple of days for nothing. I suspect that similar feelings are found among lots of followers of this forum - several have been offering advice above. In my experience SU carbs are easier to deal with than many with lots of fixed jets, but that's just me I guess. SUs can be adjusted "just so", but minor twiddles on other carbs means guessing which of the many jets needs replacing, and by how much, to cope with fuel and engine differences etc. Perhaps one needs to have been brought up up on tatty pre-war British cars. Alan D. |