| Author | Message | ||
Edward Shoesmith New User Username: younghenri Post Number: 6 Registered: 10-2022 |
I have a late model 1954 R Type which had a head gasket issue which has finally and seemingly been resolved. Prior to collecting the vehicle the workshop stated they had rigorously tested the engine and stated "Have had the car running most of the afternoon engine runs smooth and on 6 cylinders, has plenty of power on the road, and there is no loss of coolant, I will need to retention cylinder head & adjust tappets in morning, once that is done I will go over the tune as appear to run rich." However after collecting the car within 5 Klm's of driving the temperature gauge indicated overheating, however would then move up and down for a bit then settle at 75 degrees for a period till i then stopped to fill the fuel tank. After filling the tank the gauge indicated normal operating temp but I was nervous about the car after seeing the gauge move up and down and thought Id pull into a side street and allow the car to idle for 30 minutes as it was peak hour traffic and didn't need the embarrassment of a potentially broken down car on busy roads. When I pulled over the temp gauge was indicating 75, so I just allowed the car to idle but it steadily started to climb and within 20 minutes had reached an unacceptable level on the gauge, so I shut the engine down and allowed it to cool. Then restarted it and drove for a bit again then temp was all over the place and eventually pulled into a different side street and then contacted the repair shop (most annoyed to say the least). There was no visible evidence of coolant loss from the thermostat housing or around the water pump location and the coolant level was at the cap and likewise indicated no loss of coolant. However I di notice some bubbling like air pockets coming up to the cap, which aroused my concerns that perhaps the head was still an issue. Anyhow the next day I was informed that testing had been completed on the head and no issues discovered - see below "I have performed leak down tests & pressure tests into cylinders , the reasoning for these tests is to determine if have combustions leaks into cooling system or coolant loss into cylinders , these tests are a good guide ,the results of the tests have been good , so from the tests I am not getting coolant leaks in cylinders or combustion leaks into cooling system, so I disconnected the top radiator hose and ran into a bucket and at the same time topping up radiator, I ran the engine at idle coolant flow was satisfactory, I then run the engine at speed say approx. 3000 rpm and the coolant flow is stalling and does not recover till switch off engine and then start , I need to do further investigating to see why this is happening" After a few hours i then received this- "I have set up a remote coolant tank & ran the engine and found the coolant flow to be stalling, , furthermore although the radiator appears to be new, I have spent some time pressure flushing the radiator. It has had some sort of stop leak in the system and it�s coming out like fine particles . firstly going forward, I need to remove water pump and inspect" The repairer suggests the engine should be overhauled as the cylinder bores are also worn, but that is an expense which is not in my budget for a while. Just getting the head sorted would have paid off a small 3rd world debt to be frank. I have read on this forum regarding Mark VI issues with similar coolant problems and corrosion blockage is noted as being of concern. Obviously there was evidence of corrosion when the head was removed and I further note mention of the corrosion residue being the likely culprit of creating blockages with the pump, I also note the need to "blast out corrosion from the block" and have forwarded that thread to the repairer for his consideration. So just wondering if anyone else has had a similar issue that at idle speed temp is operating correct but under load or at running RPM coolant flow stalls.... | ||
Jeff Martin Frequent User Username: jeff_r_1 Post Number: 428 Registered: 07-2018 |
I wouldn't suspect the pump, if it was, it would start to overheat right out of the gate _ leave it alone for now. What goes wrong with them are the bearings, and the water seal gland, the impeller can be pretty corroded, and it will still work, but if that was the problem, the temp would not fluctuate like it does, it would get hot and stay hot. About silting up, open the block petcock, and if there is no flow, then the block is silted, remove the petcock and its extension (if applicable) and dig the silt out _ the coolant will eventually flow. Remove the thermostat and run water with a garden hose in the thermostat housing to flush the block while continuing to loosen the silt with a pick and/or small screwdriver. It's a wet job best done on a hot summer day. About the thermostat, through your entire post, that was not mentioned anywhere. Behavior such as you described indicates a failing bellows type thermostat, or if you have a new wax type, those can fail too. The new wax pellet types are so much more reliable, then the old bellows type. Even the garages own test of the stalling coolant flow indicates that the thermostat isn't opening. Don't let them remove the water pump until the thermostat has been ruled out. Test with a pot of cold water on the stove and bring it up just before boiling, but do not let it boil. Use a pair of tongs and run it under cold water, it should collapse, return it to the stove and test as above. Better yet, just spend the money on a wax pellet type, the one with the proper by-pass. | ||
Edward Shoesmith New User Username: younghenri Post Number: 7 Registered: 10-2022 |
Hi Jeff The thermostat has been replaced with #RH9143 as part of the head fix and of course as were some of the hoses I believe - not sure which ones though - I dont know or unsure if that's the "Pellet" thermostat one you have mentioned?. Its genuine part not an aftermarket. Is it working - not sure I had assumed the repairers had checked that already before looking at the water pump - would seem logical - I would think be unlikely wouldn't it a band new one would failed out of the box? - For a thermostat its horrendously expensive, but then again a new pump is more costly, but I did shell out for quality parts - yes I supplied them myself from a very reputable supplier  Since posting this morning they have come back and said they had discovered an issue with the impellor and where attempting to repair it. I'm still waiting to hear at this stage, and do not know what exactly they discovered. | ||
Jeff Martin Frequent User Username: jeff_r_1 Post Number: 429 Registered: 07-2018 |
Genuine VS After Market, I guess the genuine one has been tested by RR, but they both look exactly the same ? The tested one justifies the cost, I don't know ? https://www.flyingspares.com/thermostat-78c-rh9143.html https://www.introcar.com/thermostat-rh9143 Yes, it is the wax pellet type _ very reliable, but not infallible, I always test them, even costly ones. I would be very curious to find out what the issue is with the impeller, did they rebuild the water pump ? The impeller is just pressed on to the shaft, if they replaced the gland seal and related parts, it has to come off the shaft. The old cast iron is very fragile _ maybe it cracked while they removed it or trying to press it back on. If the impellor was loose, that would cause your symptoms. A new brass impeller is quite expensive, a new pump would almost be worth it, it doesn't cost that much more then the impeller, plus the cost of all the other bits. IntroCar and Flying Spares supply a new one and reconditioned one respectively. Brass impeller: https://www.flyingspares.com/shop/rolls-royce-bentley-mkvi-r-type-dawn-wraith/cooling-system/water-pumps/rolls-bentley-mkvi-r-type-water-pump.htmlhttps://www.flyingspares.com/thermostat-78c-oem-rh9143p.html The new water pumps have a modern seal in them _ I guess that's better ??? | ||
Edward Shoesmith New User Username: younghenri Post Number: 8 Registered: 10-2022 |
Hi Jeff well when I hear back from the repairer will be sure to post the result and issues. Yes I can get a new water pump from introcar, and apart of me says should do that anyhow, but realistically the money is adding up way to quickly on this venture. But then again maybe I was somewhat unrealistic (optimistic) that it would all be good considering I bought the car from a deceased billionaires collection - Had assumed it would have been well cared for - seems not But will post outcome for everyone when known | ||
Jeff Martin Frequent User Username: jeff_r_1 Post Number: 430 Registered: 07-2018 |
If it was my water pump, I would be quite wary, there's nothing there to repair, if the impeller is damaged in any way, it needs to be replaced. Repairing cast iron is hit or miss, I don't care how skilled the welder is. If at all possible, you should see the pump when it's off the car. | ||
Edward Shoesmith New User Username: younghenri Post Number: 9 Registered: 10-2022 |
Latest reply from the workshop below.... Any other suggestions (Did suggest block might be full of crap but they dont seem convinced....) " I am still having problems with coolant flow, after perform the repair on the pump I fitted it and ran the engine at first it appeared to be working fine, I ran the engine at 3500 rpm after a minute or so I lost flow again, I then fitted a pressure gauge to hose and found I had no pull from the pump at speeds . I have removed the pump and inspected the repair which is fine. Considering the amount of sandy residue emitting from radiator i need to get the radiator flow tested , if I have a blockage in the radiator then at speeds and heat it may be causing air pockets in the cooling system which will stall the water pump flow. I am in the process of removing radiator and I will be sending it to Alexandria radiators for analysis in the morning . in normal circumstances I would remove the radiator and send away for service, but I got fooled by the external condition which appears to be new, considering the amount of corrosion and erosion that was in the cylinder head I now believe that some sort of stop leak has been used in this cooling system." | ||
Jeff Martin Frequent User Username: jeff_r_1 Post Number: 431 Registered: 07-2018 |
I'm going to mention these obvious things as it's not clear to me if these things were carried out. When it starts to over-heat at above 3000rpm, how much coolant is in the expansion tank in the radiator, it should be at least 1/4 to 1/3 full ? Because the system is not pressurized, you can remove the cap while the engine is running and check. I don't believe the R-Types were pressurized systems as with my MK VI, but check to make sure. Check the thermostat for proper function on the stove. When it starts to over heat, shut it off and look for cold spots on the rad face with the palm of your hand, be careful not to burn yourself. Was the block petcock ever opened up to check for coolant flow ? What exactly was the repair to the pump ? | ||
Edward Shoesmith New User Username: younghenri Post Number: 10 Registered: 10-2022 |
Hi Jeff Some of the questions you have asked Im not certain of TBH as I dont want to question the repair shop too much as I am concerned they will just abandon the repairs. Finding a decent mechanic is difficult enough with out me offending their abilities. I do assume that they did check the obvious regarding thermostat and coolant level etc. I don't know if the petcock has been removed for flow check all I do know is that they have "spent considerable time flushing the engine" - So Im going to assume the flow must be okay. Also as the flow seems ok at idle, I would gather then the flow is operating correctly.... Likewise I will assume any crap that was in the block has been dispersed or is now minimal The radiator has been sent for testing (and repairing if needed) as they believe it contains stop leak residue and say they will advise later today. My issue is if there is stop leak residue blocking the core then how come it doesn't happen at idle speed only at high rpm.... TBH im lost and bewildered I guess I need to let them do there job because after the radiator is all clear what else is there?? The head has been tested has no leaks The pump apparently operates correctly The thermostat is genuine new and I assumed tested correctly That only leaves the radiator as the possible culprit.... | ||
Jeff Martin Frequent User Username: jeff_r_1 Post Number: 433 Registered: 07-2018 |
I was expecting you to carry out these things. For me it's not difficult, but maybe you're not comfortable doing these tasks. You should be able to talk to your mechanic and make suggestions, you're here after-all on the forum asking for help. Most mechanics would appreciate having others chime in to solve problems, this potentially would save them time, and you some money. With all these assumptions and not being able to discuss and make suggestions to your mechanic in fear that he will walk away, it has almost become an impossible situation. Simple things have to be taken out of the equation before jumping into the deep end and assuming it's the rad, but it sounds like that's been started anyway. If it still overheats after the rad checks out, then let the forum know. The petcock only has to be removed if there is no flow out of it. This is to enable a person to break up the silt where the petcock is. To break up the silt, the petcock has to be removed, if coolant flows freely, then it does not have to be removed You get a stubby crescent wrench to turn it, as it can be difficult to do it with your bare hands, but be careful not to put too much force on it, they can break. | ||
Edward Shoesmith New User Username: younghenri Post Number: 11 Registered: 10-2022 |
Hey Jeff Thanks for your replies - greatly appreciated. I suspect things might be a little different in your section of the world than my own unfortunately when it comes to workshops. I have previously made representations to the workshop as suggestions and assistance, but there is a thin line. Few mechanics are prepared to work on old cars as it is - seems to me if there's no OBDII output to tell modern mechanics whats wrong they simply arent interested, there are even fewer willing to take on an old RR / Bentley, and those that do well are arrogant to say the least. They behave as they are some mystical being with ancient and secret knowledge unbeknown and above the comprehension of us lesser mortals. There is less than a handful of mechanics in my locality maybe 3 or 4 at most who work on these vehicles and each of them is an aficionado of extortion frankly. The tales I could recount would set your hair ablaze - eg 5K to put new pads on a silver spirit and thats just the tip of the iceberg so over the years I have taught myself basic mechanics to do my own minor servicing and repairs and use sites like this to assist with the larger problem solving. Personally I would leave the car to rot before I ever consider given it to any of them. Each of them during the past 20 years has burnt their bridges with me either through price gouging or performing ineffective or even worse exorbitant unnecessary repairs. Those people are mentioned frequently on this site by others whom obviously are of the same position as myself. I previously have made comment to other club members and elsewhere regarding the gravity with respect to the lack of service workshops that if not addressed will see the demise and be to the detriment of new enthusiasts taking up the mantel of custodianship and preservation. When I joined the RR club in late 1990s I was the youngest member by some 20 years, things have not improved since. The vehicle is not near me and it would be inappropriate to wonder into a workshop and start wrenching myself. The vehicle was given to the repairer as the head had issues which I am not capable of rectifying myself. This recent issues are perhaps the causation of that head problem, but as the car is at a workshop and not drivable, I have no choice but to continue on. I will be sure to post the conclusion of this issue when the vehicle has finally been rectified. Once again thank you for invaluable knowledge and guidance. | ||
Edward Shoesmith New User Username: younghenri Post Number: 12 Registered: 10-2022 |
The report from the radiator service shop is as follows, have include a few pictures not all as supplied : 1. pick up Bentley Radiator from workshop requested for a report & clean, 2. Finding the unit appears to be in good condition carry out a quick pressure test for leaks results where negative 3. remove cap & notice stop leak chemical was in the system (not sure when or how) 4. attempt to strip radiator remove bands & bottom tank to inspected inside the radiator carry out a flow test and found radiator to be 30% internally blocked (will contribute in overheating to a degree) 5. tubes are blocked rock hard & in the process in cleaning them tomorrow further result will be issue tomorrow after cleaning & pass the pressure test More results to be posted when blockage is cleared and flow is correct and radiator reinstalled 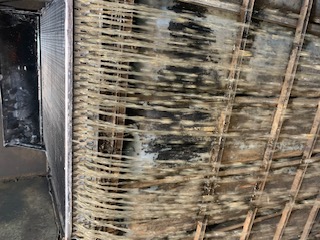 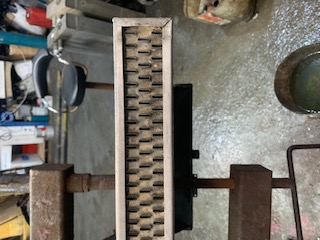 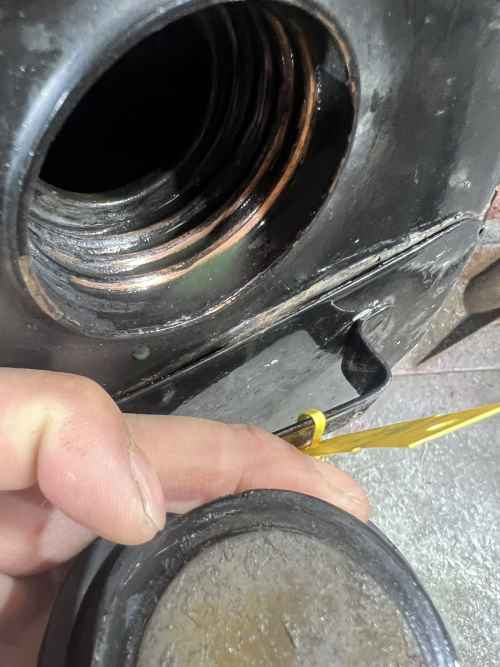 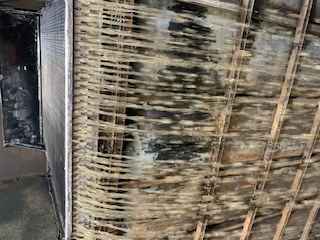  . | ||
Jeff Martin Frequent User Username: jeff_r_1 Post Number: 434 Registered: 07-2018 |
In a system that isn't pressurized, a 30% blockage would cause it to overheat under load. There are not many places that would go to the bother of flushing a rad, they would just re-core it. | ||
NormanGeeson Unregistered guest Posted From: 81.99.74.184 |
Edward I understand that you are not having particular success in curing your overheating problem. May I suggest that you read the article titled �Cylinder Blocks� on web site www.kda132.com, in particular from page 20 about water galleries. My comments below are only appropriate providing the radiator coolant flow is approximately correct and the water pump impeller and thermostat are working as designed. That includes the companies high speed fan and water pump pulley originally specified for **Australian and Swiss cars, if appropriate. Later this high speed fan / pulley arrangement was specified by R-R, in cases of overheating. **In the absence of a chassis number I cannot tell if the car was built to Australian spec. On these R-R �F �head engines the cooling of the exhaust valve seats is achieved by jetting coolant onto the area around the exhaust valve seat and the underside of the cylinder decking. This area is extremely hot and any breakdown in the supply of coolant to this area shows up as the engine RPM or load is increased, and gradually if the engine is at idle for an extensive period. You may well find that the front end of the water gallery has separated from the main gallery body, resulting in the water pump output being short circuited at the front end. The same problem will occur if the steel spacer is rusted out at the front of the water rail. Any of these two faults will leave all the exhaust valves rearwards of No 1 short of cooling and overheating will start to occur as the engine load increases. This incidentally is one cause of head gasket failure. Access to the water rail is obtained by removing the water pump, the spacer and plate, where upon you will see the front of the rail. Keep in mind that rail takes the entire water pump output and it must not have moved rearwards or coolant will short circuit. Of course, there are other possible causes of overheating but now is the time to check the water rail integrity while you have the radiator out. As an aside I would suggest you keep clear of running anywhere at, or, above 3000 rpm or you will soon be running into piston /liner issues, if not already. (Message approved by david_gore) | ||
Jeff Martin Frequent User Username: jeff_r_1 Post Number: 435 Registered: 07-2018 |
Normon, the link is dead "404 Not Found" | ||
Edward Shoesmith New User Username: younghenri Post Number: 13 Registered: 10-2022 |
Hi Norman Many thanks but as Jeff mentioned the link is not valid However the Radiator has now been rectified with 100% flow capacity and blocked tubing cleared as well - see image of testing - Pressure testing has been passed also. Further results will be posted for the benefit of others as results come to hand I will send your instruction to the workshop as a screen shot 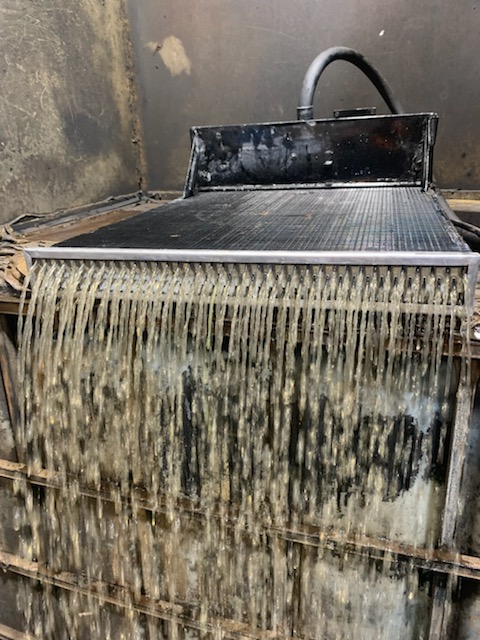 | ||
Jeff Martin Frequent User Username: jeff_r_1 Post Number: 436 Registered: 07-2018 |
Interesting how they changed that water gallery in the later engines, mine is brass with a tab that simply bends over on the one edge and is held in place when the water pump housing is installed. Yours is round and looks much smaller than my somewhat larger rectangular type. | ||
Edward Shoesmith New User Username: younghenri Post Number: 14 Registered: 10-2022 |
Hi Norman Just in anyone else is looking for the correct link its https://kda132.com/wp-content/uploads/2018/04/Cylinder-Blocks.pdf | ||
Jeff Martin Frequent User Username: jeff_r_1 Post Number: 437 Registered: 07-2018 |
https://kda132.com/wp-content/uploads/2018/04/Cylinder-Blocks.pdf | ||
David Gore Moderator Username: david_gore Post Number: 4129 Registered: 04-2003 |
Christopher Carnley has asked me to post the following information on his behalf: "The front blanking/securing disc RE16219 /UE524,is made of steel, and it and its 2 BA screw head rusts away. As the rusted in screw shank is not only difficult to locate it is hard to drill out. I cut a brass disc, slot it and soft solder it on.  . | ||
NormanGeeson Unregistered guest Posted From: 81.99.74.184 |
Gentlemen....thanks sincerely for your help with the link, computer operation is not one of my strong points. I hope the data just might help someone in the future. There are in fact even more water rail types than discussed in this article, but the critical slot / valve positions remain. The separation of the water rail and rusting of the front rail retainer are very common occurrences leading to variable engine speed overheating. Cloud 1 / S1 owners need to be aware because those engines use a nearly identical UE 524 steel water rail end plate that only varies in thickness and material from the earlier RE16219 item. Most of these later front end plates are now contributing to overheating troubles. (Message approved by david_gore) | ||
Edward Shoesmith New User Username: younghenri Post Number: 15 Registered: 10-2022 |
Hi Norman Thanks very much for the information. Presently the workshop is using your instructions and I have asked them to likewise take photos where ever possible so I may post them as well for the benefit and reference of all. The workshop has already advised that the water rail was indeed block at about cylinder 5 position. The plates are currently being removed at the moment to clear those as well. I will advise the outcome soon, the workshop should have completed the process either later today or Monday our time the latest. | ||
Edward Shoesmith New User Username: younghenri Post Number: 16 Registered: 10-2022 |
Latest from the repair shop is they discovered that the entry ways to the water galleries was block at the front of the block. The bad news is that the water pump adapter is fused to the block and refuses to budge. So as they cant get it off they can not clear the water galleries I upload a video to YouTube as provided by the workshop, it shows the level of muck causing the blockage. (see below) https://youtube.com/shorts/kgQxUXvH-jk?feature=share Now we are an a further impasse as the workshop doesn't know how to get the adapter (RE7848) off the block without forcibly removing it - Oddly they commented that they thought the water channels were not blocked but the blockage was at the front of the block... (I am unsure how they concluded this) Any thoughts suggestions greatly appreciated | ||
Jeff Martin Frequent User Username: jeff_r_1 Post Number: 438 Registered: 07-2018 |
That gunk in there does not necessarily reflect what's in the rest of the block, they did after-all have the head off and saw what's down there. It is rather disturbing that it was not cleaned out, but if I remember correctly, there is no water flow there anyway, it's a dead space with a block plug in that area. All the coolant flows down the oval hole to the right. Once the water pump adapter is removed, the water gallery tube can be seen. In fact, even with the water pump housing on, take a very bright pencil light and shine it in the oval hole, you should be able to see the opening of the water gallery tube that runs the block. If you have a 1/8 rod that's the length of the block, it should insert easily into the water gallery, take care here, and feed it in gently. You can get an inexpensive Borescopes now that may be small enough to fit down the water gallery tube. The water pump adapter doesn't need to come off really, get in there with water, compressed air and even a shop-vac, and clean it out. A good set of picks, or some skinny screwdrivers are helpful. I'm pretty sure there is no water flow here. At any rate, the water gallery tube has to be checked, when I had my engine done, I remember seeing the water gallery tube once the head was off. To get the adapter off requires time and patients, at the time I did not have an oxy/acetylene tourch, so I used a hardware store MPS one. Worked well enough, but it took a very long time. I heated the studs up, one at a time, spraying with WD40, and using a plastic shot-put hammer on the housing. I want from one stud to another. Breaking up oxidized aluminum and rust is very difficult, if you had an oxy/acetylene torch, you can very gently heat up the aluminum housing, but you must keep the tourch moving _ and not too close. If held in one spot for even a second or two, it will melt, hold the flame about 4 inches away at all times. You want to get the housing hot enough where the WD40 sizzles off the surface. When it's that hot, spray WD40 down the stud holes in the housing and tap away with your shot-put hammer. Let it cool down where it can be touched, and tap some more _ repeat the whole thing _ it will eventually come. If it breaks, used ones from Flying Spares are available, but if you take your time and be patient, it will come off. Will the garage let you work on it, it could take many hours to get it off ? They should have an oxy/acetylene tourch. Hopefully liability won't be a problem. I know you said earlier that it would be inappropriate to work on it yourself in their shop, but I don't know what else to suggest, the cost of having them remove it will add up quick, plus they may get impatient and break it. In fact, they may not even go there, because if they did break it, they wouldn't want to foot the bill for a used one. | ||
ChristopherCarnley Unregistered guest Posted From: 109.159.182.131 |
Have them carefully warm it up with a propane blow lamp all way round to expand it off the close fitting studs, then tap it with a plastic faced mallet. (Message approved by david_gore) | ||
Edward Shoesmith New User Username: younghenri Post Number: 17 Registered: 10-2022 |
Ok I think its time for me to admit defeat.... So apparently the overheating issue has now been rectified and overcome due to clearing of the water galleries etc. - So my sincere thanks to Norman Glesson, Chris Carnley and Jeff Martin in particular. Oh not to forget my old friend Richard Treacey for his support and guidance. However, as a side note / footnote on rust in the block I would be interested to hear peoples viewpoint on this product called "Thermocure" I have seen a number of reviews and they do seem very positive and I do like the fact that its non acidic treatment.. see this youtube video https://www.youtube.com/watch?v=mzmgPYqjXd8 But I digress Im getting off this issue. I have yet to drive the car myself, because on my way to pick it up earlier today the workshop took the car on its final test run prior to handing over the car to me. They decided to test it this time on the express way close to them as they had previously been testing in local areas at normal speeds without issue over 3 days. The consequence now is though the generator has now burnt out it brushes - seriously I literally have no luck with this car  So was wondering if anyone might have a hypothesis as to why the brushes would burn out... I read somewhere about belt tensioning being an issue but I have zero understanding of electrics period. Im hoping that there electrical guy whom did his apprenticeship on generators many moons ago and will be able to rebuild it - will know more tomorrow. -Or alternative is this an opportunity to upgrade to alternator....? I dunno So any pointers greatly appreciated which will either negate this problem again. This stuff reminds of my my S Class Mercedes Benz - Fix one problem and another pops up - infuriating - Could I just have 1 day to drive it???? | ||
David Gore Moderator Username: david_gore Post Number: 4131 Registered: 04-2003 |
Edward, Remember Murphy's Laws always apply to classic vehicles: 1. If anything can go wrong, it will be at the most inconvenient and embarassing time and place. 2. If things work right the first time after making a repair, it will never work right again. 3. Nothing is as easy as it looks. 4. Everything always takes longer and always costs more than you think it should. You have experienced all of these so your luck will surely change in the near future and Murphy will be looking for a new target to inflict misery on having finished with you. BTW Murphy has looked over my shoulder many times over the years and we have reached an understanding that enough is enough and I should be left in peace. | ||
Mark Aldridge Frequent User Username: mark_aldridge Post Number: 827 Registered: 10-2008 |
Edward, I have converted my S1 to an alternator. The downside is that at slow speeds , due to the pulley sizing, output is low or zero. Above 30mph in top gear , full output is available. Even with the electric fan running and halogen headlights I have not found this a problem. I used a Lucas 16ACR alternator with spacers on the standard brackets and a pulley supplied by the local engineering factors which required a small amount of machining on the boss to fit the alternator. Mark | ||
Edward Shoesmith New User Username: younghenri Post Number: 18 Registered: 10-2022 |
David - I appreciate the levity with respect to this my current misery and is received with the well intention ebullience offered - I too will be having serious words with Mr Murphy at pains and threats of his imminent demise no less should he foolishly decline to depart forthwith! - Thank you. I note your observation regarding classic cars, and remind myself I have lived this nightmare previously when I previously disposed of that collection for these very reasons - the stress and anxiety was too great - but perhaps "the end is nye" and this might be the final issue for a while for if not she will be returning to her slumber in the comfort of my garage till I can once again look at her without disdain and the horror at the price of her upkeep, no matter how seductive and pretty she maybe as not all us enthusiasts have the resources of the US treasury.  Mark - interesting thank you I will discuss with the auto electrician. Have you found with the conversion despite its inherent output restriction the alternator to be a better option?? I can see why you have done so just on cost alone a mere 72 pounds excluding the pulley, but is the 32amp compatible with the requirement of the vehicle. I note that Flying spares offer a 50 and 65 amp version (albeit it at almost 10x your suggested solution) - I submit that and any of these commentary on the full acknowledgement with respect to my complete ignorance as to auto electrical matters  However I am still left struggling to understand the nuance of why the brushes apparently decided to burn out on the generator. Do they degrade through non use? given I do not know how long the car was left sitting before my custodianship it eludes me as to why they have failed at this point... Is this simply confirmation of the old adage that cars should be driven regularly to avoid these issues? A philosophy I do subscribe to I must confess. I had a SCIII previously it was my daily driver and rarely if ever gave me grief | ||
Mark Aldridge Frequent User Username: mark_aldridge Post Number: 828 Registered: 10-2008 |
Edward I use my S1 mainly at night , to and from my holiday home. The electric fan cuts in or I manually switch it in in traffic jams and most of my driving is on headlights and with the radio on. I have had no battery issues and the ammeter quickly falls back to a trickle charge rate. The output max is 45 amps ( according to the test sheet with the alternator ) which is far greater than the original dynamo. My reason for the conversion was regulator problems and inadequate output from the dynamo. | ||
Jeff Martin Frequent User Username: jeff_r_1 Post Number: 439 Registered: 07-2018 |
Brushes probably didn't burn out, just worn out, assuming they've been in there a very long time. The generator works well enough, take it someplace and have it serviced. They will tell you what is wrong exactly. Commonly if the brushes are worn down there would be some arcing on the commutator and that will need cleaning up on the lathe. They'll also check the field windings on the armature and the field. It also could be that the generator is fine and the regulator is faulty. Easy enough to pull the generator and inspect the brushes. Other things that will need attention, if it hasn't already seen some, fuel pump points and condenser, and brakes. Hygroscopic brake fluid that has been sitting for a very long time attracts water and the front cylinders and master cylinder may need sleeving. Rear mechanical brakes have a tendency to seize. Brake servo gets contaminated with oil and slips. The car is 70 years old, it may need majour work on many systems. | ||
David Gore Moderator Username: david_gore Post Number: 4145 Registered: 04-2003 |
Christopher Carnley has asked me to post the following on his behalf: "This is about 20 % of the sludge from the bottom of the cylinder jacket of an R Type engine rebuilt by me early in 2022. It has to be chopped /scraped out and may be accompanied by original moulding sand stuck to the cylinder barrels. The chemical preparations are of little use/effect." 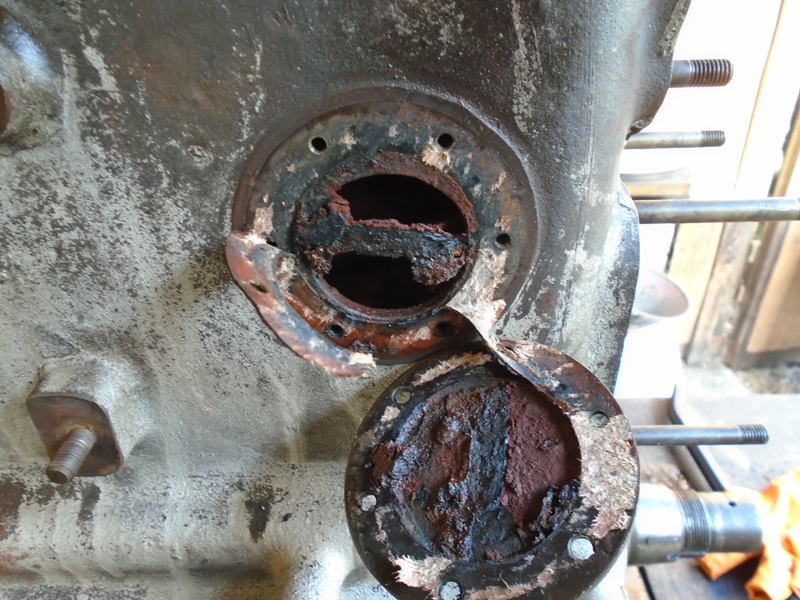 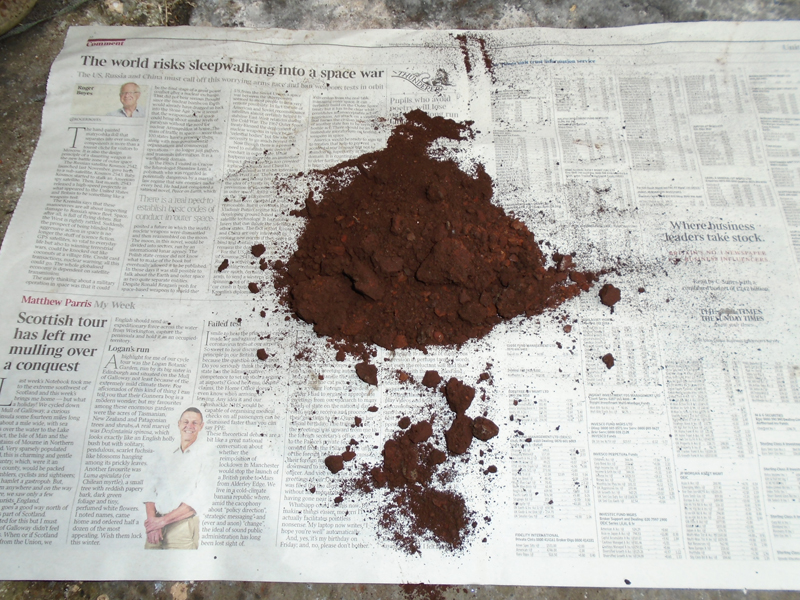 | ||
Jeff Martin Frequent User Username: jeff_r_1 Post Number: 442 Registered: 07-2018 |
Edward, may I assume that they got the aluminum housing off as well as the water gallery that runs the length of the block ? | ||
Edward Shoesmith New User Username: younghenri Post Number: 19 Registered: 10-2022 |
@jeff_r_1 Jeff Yes that is my understanding. Ed | ||
Edward Shoesmith New User Username: younghenri Post Number: 29 Registered: 10-2022 |
As its been 6 weeks since I last posted thought it time to offer an update to this issue. So after I finally collected the vehicle from the repairer, I decided 2 days later to take it on the expressway and test it out. Everything was fine for the first 50klms but then the temp gauge went almost to the top with in a few moments and the next thing there was steam emitting from the radiator overflow hose near the horn at the front of the vehicle. (BTW Horn no longer works consequently) I allowed the car to cool for a few hours and limped home. To my disgust and amazement the vehicle did not overheat again for the duration to home, although I hasten to add that my return trip was on normal roads and not on the express way. Of course I promptly made contact with the repairer and to state that he was profusely panicked to say the least as clearly I was not in a good mood, after just having paid a kings ransom to have the vehicle fixed and be made to wait for nearly 8 months! However the next day I had calmed somewhat and decided to take the car out once more, and to my absolute surprise the temp gauge stayed at the 75 degree mark and simply did not budge... I then began to wonder if it was at all possible that the engine had an air pocket after its rebuild and perhaps my enthusiastic driving of 80MPH might have merely had the car "burp it out"? So even up and until today I have had no issue with the temp again - "TOUCH WOOD". So early today I was reviewing a separate issue with my front carburetor which was previously diagnosed as leaking and which I paid to have repaired earlier this week with a different repairer, but alas the carbie fix is not fixed at all on my way home from that repair shop I noticed considerable degradation of torque upon acceleration and the smell of fuel was over whelming. Neither was an issue prior to having the carbie leak "repaired" I suspect the carbie is now flooding due to a stuck needle as there is copious amounts of fuel running onto the roadway so I assume it is coming out of the overflow pipe??? but have no idea really. So during the course of gazing at my carburetors this morning whilst simultaneously reminding myself I still have not a clue about them despite having watched multiple YouTube videos etc, as I thought perhaps I shouldbe brave enough to tackle the issue myself (silly me) only to discover these Bentley R type carbie setups lack any resemblance to any other H6 SU carbies that I had watched. So whilst reviewing the carbies I inadvertently shone my torch just rear of the oil filter housing only to discover green coolant fluid on the engine block - see picture below To say that my heart sank would be understatement, indeed had to hold back the tears. I was saying to myself how can this be? only negligible coolant loss in the radiator and no coolant on the ground for the past 6 weeks - WTH!! So I then went on another test run to see what would happen. Well to my astonishment once again the temp gauge remained constant at it 75 degrees for 50 KLMS, my carburetors on the other hand not so good they disposed on 40 litres of fuel on a 50klm run. Upon my return home I check the engine block again to discover there was now no green coolant showing so I presume it was likely burnt off during the run. Upon my return home I then discovered Norman Geeson's article regarding overflow pipes on Mark VI's and R Types (see below)and his witness to multiple cars going up in flames and I must confess there is large part of me that would not have objected if mine did! So, I have now decided to put the car in permanent storage and shut the door on this chapter regarding this vehicle for un specified period - certainly not for the next 2 years that I am certain. This experience has been extremely stressful and way to costly and to suggest I'm over it would be a gross misrepresentation. Eventually I will find the motivation to put her right but when that occurs I will be exiting my custodianship immediately and shall not again buy a classic/veteran RR&B. Its almost impossible to find tradesmen to work on these cars and when they do its nothing short of unprofessional and sloppy workmanship at outrageous prices. I guess with the shortage of skilled mechanics generally and the absence of ODBC readers on classic and vintage cars to tell modern mechanics what's wrong with the vehicle, seems to me the only hope for these vehicles moving forward will only be with skilled mechanical owners, regrettably I am neither and I suspect this will be the ultimate death and demise of the brands as us non mechanical marque enthusiasts simply give up. Many thanks to all those that assist over these months and the very best wishes for the season. https://kda132.com/wp-content/uploads/2018/04/Carburettor-overflow-pipes.pdf} 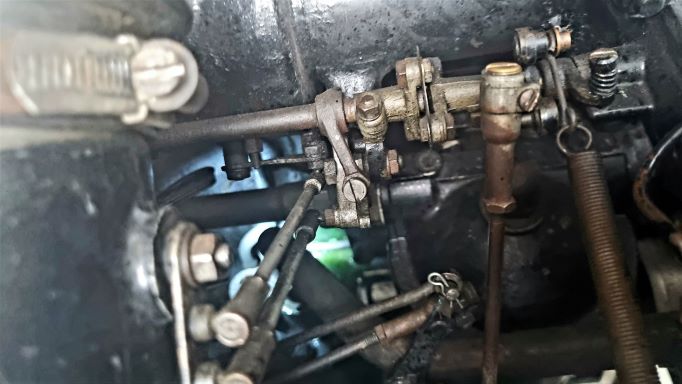 | ||
Larry Kavanagh Frequent User Username: shadow_11 Post Number: 830 Registered: 05-2016 |
Don't lose heart Edward. The cooling system would appear to have solved itself and now it's a matter of finding and solving the cause of the fuel leak. This is possibly something you could tackle yourself when the anger subsides.You may find Burlens The SU Carburettor Company helpful in diagnosing the underlying cause of the fuel leak and it would probably and hopefully be a relatively inexpensive fix. | ||
Jeff Martin Frequent User Username: jeff_r_1 Post Number: 456 Registered: 07-2018 |
I know you're very pissed off with the car and the mechanics right now, but what's going on is pretty simple. Take a flashlight (tourch ?) and shine it in the tank at the top of the rad, and always make sure there is at least an inch of coolant in there, if the level drops enough due to air being worked out, it can and does drop below the thermostat and it will close. This causes it to overheat of course and cause the very thing that just happened. I was working on my heater matrix and all the coolant was drained, mine did the same thing just puttering around town. I know this was going to happen, and I brought a jug of 50/50 coolant with me to top up the header tank, and it was fine. My tank was empty of course, it took a fair amount of coolant to get it back to an inch in the tank. Don't be tempted to over fill the tank, as it's also an expansion tank _ keep it at an inch, and keep an eye on it for the first few runs. I always check mine before I go anywhere, mainly just due to paranoia. Carbs. Two things that cause the float bowls to overflow, the floats have a pin hole in them and they don't float anymore, they are filled with fuel. The other things are faulty needle valves that don't seat properly when the float shuts them off. Both situations can occur, so check the floats, if it has fuel in it, then replace it, don't try to repair it, you'll just frustrate yourself. Replace both needle valves with Burlen's Viton tipped valves. Be sure and adjust the float levels with some round 7/16th stock. Read this, it even mentions the weakener device, but not all apply, like the starting carburetor off the side, or "automatic enrichening device", the link between the carbs is not the same either, RR developed their own to balance the carbs. Pay attention to the diagram after the weakener device. https://sucarb.co.uk/technical-h-type-carburetter-diagram When you store the car, make sure the coolant is new, which I'm sure it is, or the same corrosion that caused all this will occur again. Heat the storage facility if you can for the sake of the hygroscopic brake fluid, if it has not been changed for a while, change it. Change your oil too and run the car with the fresh oil, you don't want dirty oil sitting on the white metal bearing shells when it's time to start it up after 2 years. | ||
Mark Aldridge Frequent User Username: mark_aldridge Post Number: 830 Registered: 10-2008 |
Edward don't give up ! We have all been through the doom and despair many times. Even in the UK you are largely reliant on specialists and you must avoid the local mechanic who knows everything about Rolls and Bentley despite having been no closer to one than 50 metres !! I have heard so much rubbish from these merchants over the years that I have had classics, they should appear as a one man show at the local theatre. Your best bet is to learn about these cars and do as much work as you can yourself. There is plenty of experience on this site, T1 topics and the RROC America Forum which are only too happy to help and advise you. Jeff is quite correct with his advice on carbs,but remove the needle valve and checkfor dirt on the seat. We have had this several tikes on differnt cars. A good spray with carb cleaner usually cures. Mark | ||
Edward Shoesmith New User Username: younghenri Post Number: 31 Registered: 10-2022 |
Jeff and Mark many thanks for the advice! Again having thought about it Im going to attempt to resolve some of these issues myself, because as Mark Aldridge states - I am "pissed off with mechanics" who don't or cant do their jobs. First issue Im going to tackle is the SU flooding. as this seems to me to be dangerous if left unattended further. I last night found the following youtube video by the RROC which is an historical video on 6 & 8 Cylinder tune ups. (see link below) - for once I had that ahuh moment seeing the instructions. Even though that video is slightly different to my vehicle. I have an auto choke on my car and also the carbie configuration does not appear as in the video. eg I cannot locate 2 independent Mixture or Idle speed screws - only 1 which seem to control both carbies? - Regardless I'm going to give a go - what's the worse that can happen that the car does not run - well it aint running now so what the heck hey! So I am just ordering now the parts I will need - some just in case - as it Xmas and no one will be open for weeks in a few days. 2 x Needle & Seat .096" Bore Viton Tipped H-HS-HD 2 x SU CARB T2 STAYUP FLOAT H2 H4 H6 HD4 HD6 HD8 1-7/8" DIA 2 x NEEDLE (SN) 1 x Su tool kit Im not ordering a rebuild kit as the leak that was at the bottom of the front Carb was rectified last week and it is not currently leaking from there - well not that I can see. I am presuming the leaks now are as a direct consequence of the floats being an issue. And the fuel is likely from the over flow pipe onto the floor well below as mentioned in Norman Geesons notes. I bought 2 sets as may as well do both carbies because then I know there both done. Wish me luck! Back to the original issue of overheating after collection 6 weeks ago. What I did not mention is that when I initially pulled over when steam was pouring from the front. I immediately checked the following. 1. Coolant level - oddly there was no coolant loss at all the level was as when I collected from teh workshop 2. Oildip stick level was full and showed no chocalote milk substance. 3. Oil filler cap also showed no residue of chocaltae milk either HOWEVER! When I arrived home I check all three again and discovered oil was ok as mentioned, but the coolant level in the expansion tank level had dropped. When talking to the workshop they asked me to use ordinary water an measure how much had been lost - It was 3 litres BTW. Also on my way back traffic was heavy and no one mention smoke of any kind from the exhaust nor did I notice any in the review mirror. So I assume the loss must have occurred from via the steam issue.... However since then I check the expansion tank regularly and also nervously watch the temp gauge whilst driving. See picture from yesterday as an example. (See Below) There has been only minimal coolant loss in the expansion tank since topping it up with 3 litres of water nor has the temp gauge fluctuated 1 degree - constantly remains at 75 degrees. I did originally fill it to the very top so perhaps that wasn't so wise after Jeff's comments It wasn't until yesterday that I noticed any external leaks as mention in previous post. I have no chance now to have the visual leak I witnessed looked at or rectified for at least the next 6 weeks and I suspect longer. I did email the repair shop for the head yesterday but as usual its crickets from them this morning. Am I surprised nope! here is the youtube link for anyone else that needs it https://www.youtube.com/watch?v=WaMCmsfuZoU 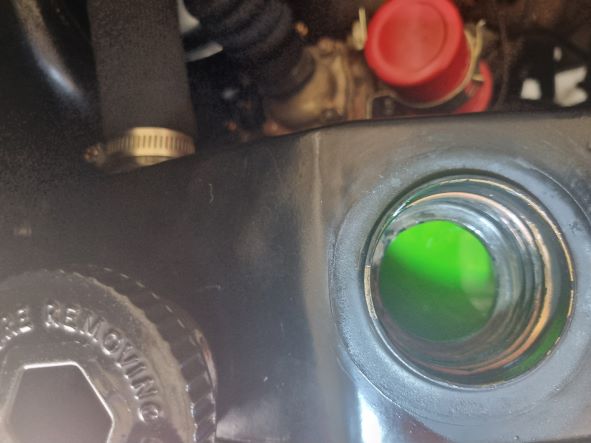 | ||
Philip Sproston New User Username: phil2025 Post Number: 43 Registered: 07-2006 |
yes do not order SU parts ring first phil 0418266631 | ||
Jeff Martin Frequent User Username: jeff_r_1 Post Number: 457 Registered: 07-2018 |
The carbs in the video are quite a bit newer, they are HD8's, but the procedure for setting the float height and replacing the needle valve(s) (not to be confused with the needles in the main jet) are the same. He's using a 7/16 drill bit, not the most accurate thing as the bit can rest on the hollow part of the "flutes" _ this creates an unparallel measuring device. In all honesty it's not that critical, a larger space is more desirable that a narrow one when setting the forks clearance. This is beneficial in the summer time when the fuel has a tendency to expand. Yes, the mixture and balancing of the carbs differ form the H6 to the HD8, don't concern yourself with that, just the floats and needle valves. Leave the balancing and mixture adjustments alone. Do not replace the needles either, that's not causing the problem of the fuel leak. OVER HEATING: Yes, it just had an air lock right in the thermostat housing, odd that it happened though as there should be a "tickler" valve in the thermostat to release the air as the system is filled _ maybe yours doesn't. What I do, is fill the system when cold, I start the engine and let it warm up to operating temperature while keeping an eye on the level in the header tank _ keeping it at least an inch full as the level drops. The heater petcock needs to be wide open when filling the system. In some cases I have filled the system in the thermostat housing with the thermostat removed. One has to be carful when doing this, as the level will suddenly come up very fast and puke coolant out everywhere, but if done carefully, you can be sure that there is coolant coming in contact with the underside of the thermostat and the ball of wax pellets. Replace the thermostat and cover and continue to fill from the header tank. 3 litres is a lot of coolant, there must have been air trapped in many places, and it eventually reached the thermostat housing causing the temporary over heating problem. Initially filling it right to the top was OK on the first run. As the air made its way out, it would cause rapid coolant loss in the system as the air was replaced by coolant, but 3 litres, that's quite a bit, but the system was pretty much empty, even the block, so understandable. | ||
Edward Shoesmith New User Username: younghenri Post Number: 34 Registered: 10-2022 |
Jeff and Mark I have moved my issue regarding the carbies to a new post Australian RR Forums � Early Post-War � SU Carburetors Leaking fuel We can continue on that thread for the carbies\ | ||
Jeff Martin Frequent User Username: jeff_r_1 Post Number: 459 Registered: 07-2018 |
http://au.rrforums.net/forum/messages/16999/43679.html?1671440494 Your link doesn't work, the site doesn't seem to like the copy link function if one uses the right click function. It must be copied and pasted from the address bar itself. |