| Author | Message | ||
Graham Watson Experienced User Username: graham508 Post Number: 91 Registered: 03-2016 |
Has anyone replaced the torque arm rubber spheres? I cannot find and reference in the workshop manual or in any old threads in this forum. Thanks | ||
David Hughes Experienced User Username: wedcar Post Number: 139 Registered: 07-2004 |
Graham I'm not sure if this is what you are referencing others will be more familiar and helpful with the procedure than I. Regards David 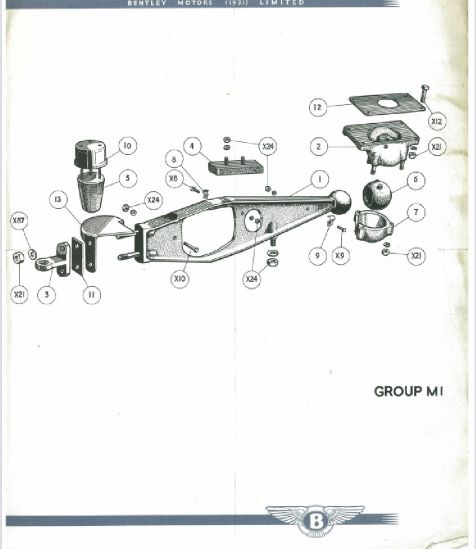 | ||
Graham Watson Experienced User Username: graham508 Post Number: 92 Registered: 03-2016 |
thanks! It's #6 in the drawing. | ||
Jeff Martin Frequent User Username: jeff_r_1 Post Number: 410 Registered: 07-2018 |
I plan on cleaning up front suspension and painting things this winter _ I have the rubber spheres in hand, and from what makes sense to me is that they are keyed in their aluminum housing, so that means the torque arm moves with in the sphere. The sphere has to stretch over the torque arm ball, this means heating it up in hot water so it will stretch over. It will have to be dry when it goes on with some sort of lubrication. Have to find the correct lubrication. The car would have to be on level ground sitting statically before the aluminum cover goes on, not when the torque arm is hanging down while the car is jacked up. This prevents overloading the rubber sphere in one direction. Obvious things like making sure the ball on the torque arm is smooth, clean and without rust, it should be round too. The spring is pushing on the arm, I would remove the cover while the car is static, and carefully jack it up on that side doing one side at a time. I plan on placing the jack just before the mount, and with the cover removed, jacking it up should allow the arm to leave its socket, so one can access the torque arm ball. Don't let the arm down too far as you will be working against the front mounts under the front skid plate, also consider the health of the rubber mounts under the centre skid plate _ I will be replacing those too. This is my plan, I'm sure someone will post who has actually done it. | ||
Graham Watson Experienced User Username: graham508 Post Number: 93 Registered: 03-2016 |
Wow thanks (again) Jeff! I have ordered the spheres and also the front sway bar rubber bits as everything is very tired looking. When I did bushings on my BMW I just used dish soap to help get the bushing on also had to use a hydraulic press for that job. | ||
David Hughes Experienced User Username: wedcar Post Number: 140 Registered: 07-2004 |
Graham This is the link to the workshop manual, H29 is the page you require. https://rrtechnical.info/mkvi/wshoplate.html Regards David | ||
Jeff Martin Frequent User Username: jeff_r_1 Post Number: 411 Registered: 07-2018 |
That's interesting, it tells you to bounce the car up and down to settle things and then tighten up the cap nuts. I would not have gone that far to seat the spheres in _ thanks for this David. My spheres are all rotten on the outside from oil leaks over many decades of neglect, but the control arms are not sloppy, but I still plan on replacing them anyway. | ||
Graham Watson Experienced User Username: graham508 Post Number: 94 Registered: 03-2016 |
Thanks David! My workshop manual does not have this information in it. | ||
David Hughes Experienced User Username: wedcar Post Number: 141 Registered: 07-2004 |
Thanks go to Richard Treacy, Bill Coburn and others for their efforts in putting all this technical information on our website. Regards David | ||
ChristopherCarnley Unregistered guest Posted From: 217.39.245.81 |
It is possible to use a stout lever to press down the arm and fit the new rubbers that way. Also release the two nuts X21 that hold the arm, a little. Washing up liquid or silicone grease are both effective. Keep the silicone grease off of the paintwork, it sticks like dung to a blanket Best to read all of the item H29 in the Service Handbook (Message approved by david_gore) |