| Author | Message | ||
Christian S. Hansen Grand Master Username: enquiring_mind Post Number: 856 Registered: 4-2015 |
1955 Silver Dawn SUJ128 While under the Dawn today changing oil I noticed that one of the front suspension coil springs is snapped second coil from bottom. Any advice here as to supplier? I've PM'd Kelly Opfar about the special tools but if he does not make them, any ideas there as well? Anyone willing to rent to me for the duration? . | ||
Kelly Opfar Prolific User Username: kelly_opfar Post Number: 205 Registered: 7-2004 |
Christian, I make a compressor for Clouds - let me do some research and see how different they are. Watch this space. www.BritishToolWorks.com | ||
David Gore Moderator Username: david_gore Post Number: 2993 Registered: 4-2003 |
Christopher Carnley has forwarded the following message and photograph to me for posting on his behalf: "Kindly put this picture on Christians broken spring query. You need a compressor like this. The hook goes into the large hole on top of the frame. If the hole has rusted away, you are in the doo-doo! The bottom link goes onto the studs holding the torque arm. You will need an internally threaded bolt/nut combination to get the spring out. You will then need a big spring decompressor pot to get the bolt out. Then the new spring has to be compressed, the bolt shoved through it to retain it, then insert in the chassis. Some fools try to use a jack and threaded rods to do the job, most now have broken bones. See Workshop Manual for pictures and Bulletins for method. I redesigned the compressor and built my own, and use the smaller hydraulic press to recompress the springs. See following image." 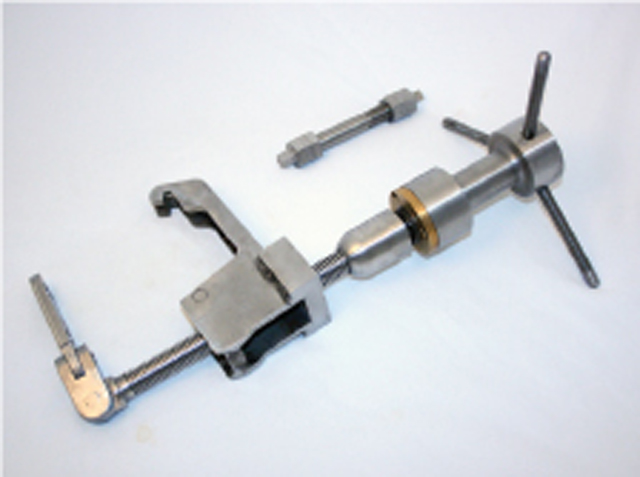 . | ||
Christian S. Hansen Grand Master Username: enquiring_mind Post Number: 857 Registered: 4-2015 |
Christopher... Thanks for the photo. Is the device (bolt?) above the compression tool the retaining bolt referenced in the service manual? There is also the "pot" referenced that I will need. I have reviewed the manual but if there are "bulletins" relevant, could you refer them to me? I would NEVER use anything but the proper tool for something as potentially dangerous as such an operation!! In terms of "rentals" the preferred scenario would be for them to be forwarded to Kelly for replication. That way these tools would become part of his repertoire. Can anyone help here? Thanks!! P.S. I presume that removal of the wing (fender) is necessary in order to get appropriate access to the work area? . | ||
Christian S. Hansen Grand Master Username: enquiring_mind Post Number: 858 Registered: 4-2015 |
Disregard my query regarding the wing (fender). Only a moment of reflection and it is obvious that the wing must be removed in order to place the compression tool over the chassis frame and hooked into the hole in the spring housing as shown in the manual. Cledarly this is not an operation that gets performed in the time frame before lunch! If all goes well, what would you think...10-15 hours shop time? Twice that for me on the first time learning curve? Steering rod end also needs to be removed/replaced/adjusted as well in order to gain access. . | ||
Christian S. Hansen Grand Master Username: enquiring_mind Post Number: 860 Registered: 4-2015 |
Christopher.... By chance I acquired a set of the Bentley Mk6 dealer service bulletins Vols I and II (TSD552)earlier this year and thanks to your reference, found the updated BB39 from 1952 which was much more detailed than the service manual regarding procedures and modifications. I now see that the tool in your photo conforms to the later type modification which certainly applies to my chassis. I continue to hope that someone will have these tools and be able to assist Kelly Opfar in recreating them. . | ||
David Gore Moderator Username: david_gore Post Number: 2994 Registered: 4-2003 |
Christopher Carnley has forwarded more information as below: "More for the Christian job. It is not necessary to remove the wing, but both sides should be re-sprung and a hard hat is essential, along with new knees. This is the prototype that I made and lent it to an established engineering firm who made the one in the previous email. They make me service tools to my drawings and patterns mostly with an 1/2" square ratchet hole. I have now found the tool at the back of shed No4, not used for some time as I refuse to service old wrecks, bought by old idiots, unseen from scrapyards, witness the rust hole (DOO DOO), I had a picture of the repair but it went in the XP collapse. When I have a bit of time I will clean it up, and dimension it, as Kelly wants to start making them, but I have a Lagonda V 12 race axle, and a G10 gearbox, to finish,and an LG45 axle to start on . RREC at HH [Hunt House] may have a drawing." 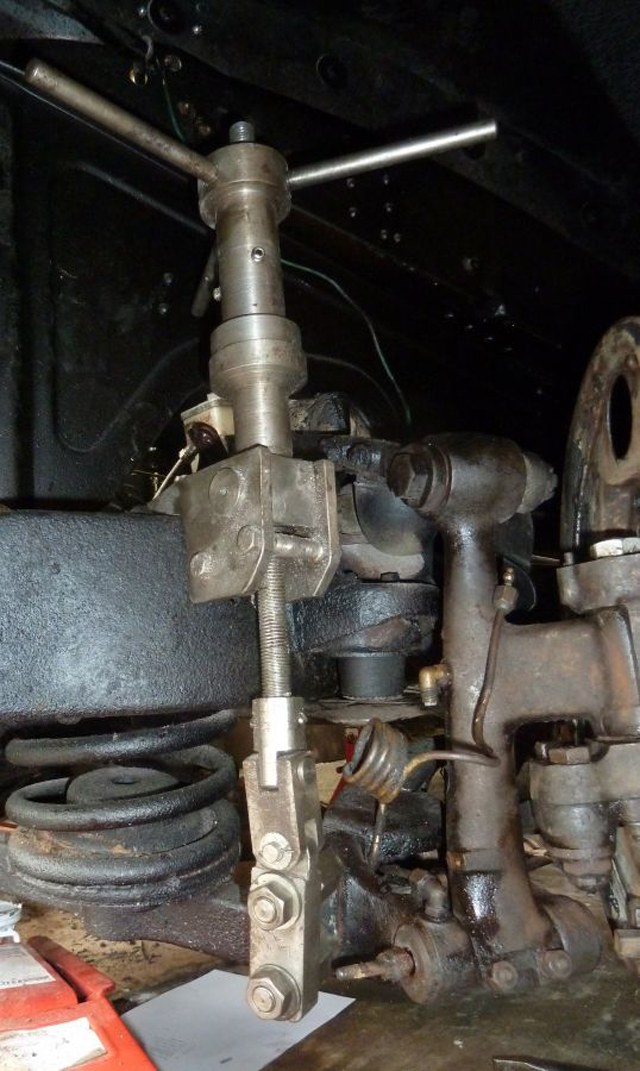 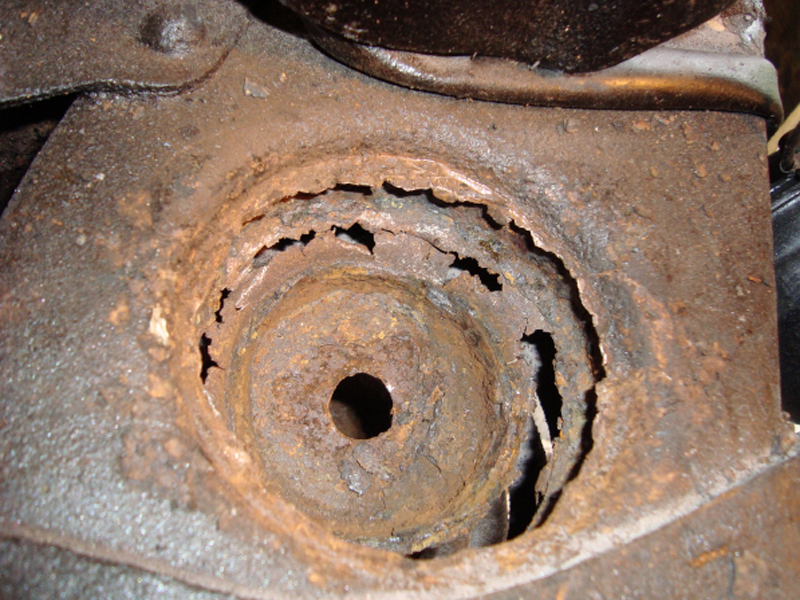 . | ||
David Gore Moderator Username: david_gore Post Number: 2995 Registered: 4-2003 |
Kelly, I replied to your PM before checking my emails to find Christopher had sent me this information while I was actually checking the Forum last night. I really appreciate the contributions Christopher and you are making to facilitate keeping our vehicles on the road in "proper" R-R/B standards. | ||
Christian S. Hansen Grand Master Username: enquiring_mind Post Number: 861 Registered: 4-2015 |
"Beggars cannot be choosers" hence any assistance with the recreation of these tools is gratefully appreciated irrespective of any time frame necessary. I have not acquired a chassis card so am unaware of origin of SUJ128 but it seems to be a relatively rust free example. A spray or two of penetrating oil and most connections encountered in maintenance have come apart without objection. . | ||
Christian S. Hansen Grand Master Username: enquiring_mind Post Number: 864 Registered: 4-2015 |
Here is a page with illustrations of the three tools we desire to source and replicate. Thank you. 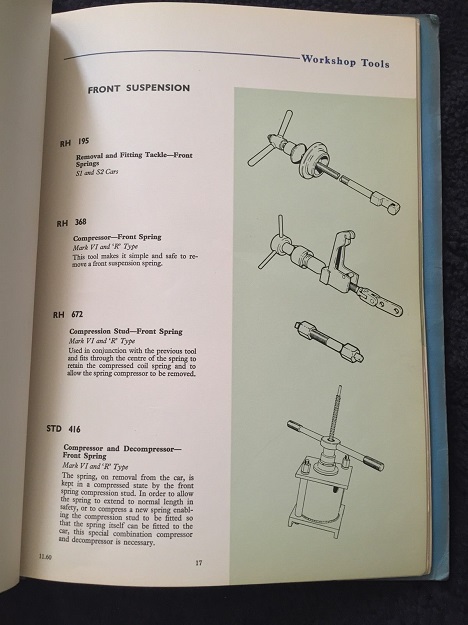 . | ||
Kelly Opfar Prolific User Username: kelly_opfar Post Number: 206 Registered: 7-2004 |
Christian, it turns out that Hunt House has drawings of almost everything for a small fee. I've acquired drawings for RH368 and RH672. Hunt House does not have a drawing of STD416. It looks fairly simple but since I don't have a Dawn, I'm not sure what the purpose is. I'll keep looking. Kelly http://BritishToolWorks.com | ||
Christian S. Hansen Grand Master Username: enquiring_mind Post Number: 865 Registered: 4-2015 |
Kelly... STD416 is the "pot" that is used to compress and release compression on the spring simply so that the retention bolt RH672 can be inserted in order to hold the spring in the compressed state...the broken one so that it can be removed, and the new one so that it can be inserted into the frame area. Once in place the tool RH368 is installed to hold the compressed spring in position, the retention bolt is removed, and then the compression is released with RH368. The removal of broken pieces is similar. RH368 is installed, the suspension compressed which compresses the spring, the retention bolt inserted, the suspension tool removed, and the compressed spring and retention bolt removed from the chassis. Once on the floor I presume that it is put into the pot which holds it in the compressed state while the retention bolt is removed, then the pot is unwound in order to release tension on the old spring, and the broken pieces discarded. I presume that any safe compression tool that allows for room to get the retention bolt into place and removed will suffice. Thanks for assisting!! . | ||
christopher carnley Unregistered guest Posted From: 86.149.112.129 |
You will notice the photograph of my tool shows two stud extensions screwed onto the torque arm studs. These are necessary to obtain the vertical direction of pull. They are shown on the Service Bulletin. The STD416 is a flawed design, I will explain. 1)The torque arm nuts are removed, and the adaptors fitted on, tightly. 2) The top hook is attached and the bottom link is bolted on. 3) The compressor is turned until the spring is choc-a-bloc. The retaining bolt is inserted up the retaining plate holes (seen through the spring in my picture) and the long nut tightened. OK so far? 4)The compressor is removed along with the bottom link. 5) It is then possible to wiggle the spring out. 6) So now you have to decompress the spring and get the bolt out safely, and you cannot do that with STD614. Neither mild steel nor stainless steel can be used in making the stressed parts of the tool. The main screw is M16 x 2 HT 8.8. The depth of thread ensures safe use. Fine threads are not appropriate. (Message approved by david_gore) | ||
christopher carnley Unregistered guest Posted From: 5.80.53.27 |
I should mention that the free length of the spring is about 12 3/4", plus the fabric end caps and the steel "retainers" it makes for a little over 14". (Message approved by david_gore) | ||
Christian S. Hansen Grand Master Username: enquiring_mind Post Number: 868 Registered: 4-2015 |
Christopher... Thank you for your most valued input. I will be transferring the Dawn to Montana over the next few days so will be out of touch. I'll take another look at the situation once I get there and unloaded. How the elevation (6000ft above sea level) affects the engine carburation will be of interest. Service bulletin seems to think things will be OK. . | ||
Carl Heydon Prolific User Username: car Post Number: 152 Registered: 2-2004 |
Very nice to have the correct tools and if this becomes available I will definitely get one. I have changed the front springs a few times by the use of three STURDY jacks (and stands), un-bolting the centre pan and carefully lowering it with the arms. Quite safe with the correct equipment but a PITA to align on the way back up. | ||
christopher carnley Unregistered guest Posted From: 109.145.118.53 |
Carl, It is when you need a two more pairs of hands and a load of "podgers". (Message approved by david_gore) | ||
Christian S. Hansen Grand Master Username: enquiring_mind Post Number: 871 Registered: 4-2015 |
Just to be clear, Christopher's Aug 22 discussion while being accurate refers to the suspension mounted tool RH368 rather than the potting tool STD416. While the former is used to extract the compressed and retained spring, the later is used to release the compression of the old spring and to compress the new spring. Finally the suspension tool is used again once the compressed and retained new spring assembly is in position, tightened, retaining bolt removed, and compression of the replacement spring released with the suspension tool RH368. He simply reversed the tool numbers. No problem! . | ||
christopher carnley Unregistered guest Posted From: 5.80.22.168 |
Hi Christian, I never got that far. No 6, is on how to get the retaining bolt out of the spring as removed from the car. (Message approved by david_gore) | ||
Christian S. Hansen Grand Master Username: enquiring_mind Post Number: 872 Registered: 4-2015 |
Christopher... Now I am confused. Forgive me as I thought you were saying that the suspension tool RH368 was flawed because first one needs to make and use the two fastener bolt extensions as in your photo and secondly because it is not capable of compressing the new and releasing compression of the old spring. As to the second, my thought was "Of course. For that you need a potting tool to compress release the spring i.e. STD416." Are you saying that steps #1 thru #5 utilize RH368 but then the potting tool STD416 as illustrated in the tools manual is flawed because in fact its design does not allow a compressed and retained spring to be decompressed with it and that it is equally useless to compress a full lengh spring such that the retention bolt can be inserted? If so, what sort of potting tool do you use? Kelly Opfar and anyone else planning to use this procedure needs to know this. . | ||
christopher carnley Unregistered guest Posted From: 86.140.181.148 |
That is exactly what I said, The tool STD416 is a flawed design. How do you remove a long through bolt holding the spring in compression, then release the spring? Bearing in mind that the overall free length of the spring with the retaining/retained end caps is about 14". When I know how far the process has been developed then I may show you mine. (Message approved by david_gore) | ||
Christian S. Hansen Grand Master Username: enquiring_mind Post Number: 875 Registered: 4-2015 |
In which case wouldn't something like this work? 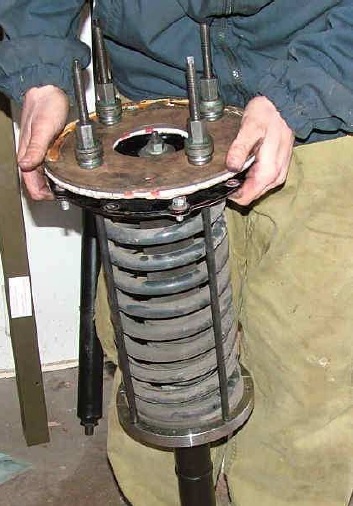 | ||
Patrick Lockyer. Grand Master Username: pat_lockyer Post Number: 1955 Registered: 9-2004 |
No, and what tool you are showing will not allow decompression of that spring. Cripes it is for compression. Heard of really horrid accidents with folk who don't understand the basics with these type of operations. Compression Decompression you have been warned! | ||
Kelly Opfar Prolific User Username: kelly_opfar Post Number: 207 Registered: 7-2004 |
Christian's picture shows a post '89 Spirit spring compressor with a top plate adapter - very similar to what I make and have sold dozens of. My version of the tool is shipped with 27" long threaded rods which will easily allow for decompression of the spring instead of transferring to a separate decompression tool. There is no reason why a tool like this wouldn't work. http://BritishToolWorks.com | ||
christopher carnley Unregistered guest Posted From: 86.140.181.148 |
Yes, Christian, but my device is simpler and more stable, not involving the venerable McPherson strut as it does. It involes the use of large purpose made wing nuts as there are lots of turns, are there not? (Message approved by david_gore) | ||
Christian S. Hansen Grand Master Username: enquiring_mind Post Number: 876 Registered: 4-2015 |
Carl.... Referring to your post from Aug 24 and considering that others have noted the method of lowering the center pan which allows access to other suspension components such that they can be examined and refurbished if necessary as well as doing both springs simultaneously, would you care to articulate the step by step procedure for following this method as well as discussing the problems encountered? Such a dissertation would be quite valuable contribution to this thread, not only for me confronted with the task, but for any future readers deciding which way to proceed. Thanks for any further details that you can convey. . | ||
christopher carnley Unregistered guest Posted From: 5.80.49.85 |
I give up! Not only are you doing Kelly out of a project but you are intending going down a dangerous "backyard mechanics "path. The lower suspension pan lowering should only be done when the internal components are rusted beyond service and the service tools cannot be used. To "articulate", place convenient jacks under the pan with the chassis on stands. Remove a load of little square headed 1/4" and 5/16" bolts. Lower away. Incidentally, what is your source for new springs? (Message approved by david_gore) | ||
Christian S. Hansen Grand Master Username: enquiring_mind Post Number: 877 Registered: 4-2015 |
Relax. I'm just asking. That's okay? Gathering information. There are often varying and contradictory opinions with any task and getting the facts on variant ideas is relevant. Not doing anyone out of a job, but there have been discussions and unanswered suggestions as to the proper tool for the spring compression and decompression task. So far we have been told what won't work, but not what will. Possibly one advantage of the plate lowering is that the spring decompresses as the assembly is lowered? If that is the case then that would be convenient but also a complication since it means that you are fighting the spring compression and the attendant dangers as you lower and raise the assembly and if not, then how do you get the springs out once the pan is lowered? Passing reference has been made to this alternate procedure but little supporting documentation as to procedure. It is hard to believe that you simply remove a bunch of bolts and lower away. If so, why would any other tool be required or any other procedure pursued? Just trying to connect the dots and get the facts and no matter which technique is used, more complete facts regarding the tools and procedures is lacking even yet. . | ||
Christian S. Hansen Grand Master Username: enquiring_mind Post Number: 878 Registered: 4-2015 |
P.S. Source for new springs? Any suggestions? I did not see that as an issue at this stage of the task. So far we haven't even figured out how to proceed so the source seemed premature. I know that FS has them. Probably others. Albers? . | ||
Tim North Unregistered guest Posted From: 86.153.92.103 |
I obtained a new spring made to the original spec from a company called The Tested Spring Company in Birmingham, UK. I removed and replaced the springs using RH 368 and RH672- easy peasy. I took the old compressed springs to a local garage who used a foot operated Sealey spring compressing tool to decompress and to clamp up the new ones. Time spent in the 4 journeys was well spent, quick, cheap and safe. (Message approved by david_gore) | ||
Kelly Opfar Prolific User Username: kelly_opfar Post Number: 223 Registered: 7-2004 |
Well, it took a lot more time than I anticipated (doesn't everything?), but I finally finished the run of EPW spring compressors. 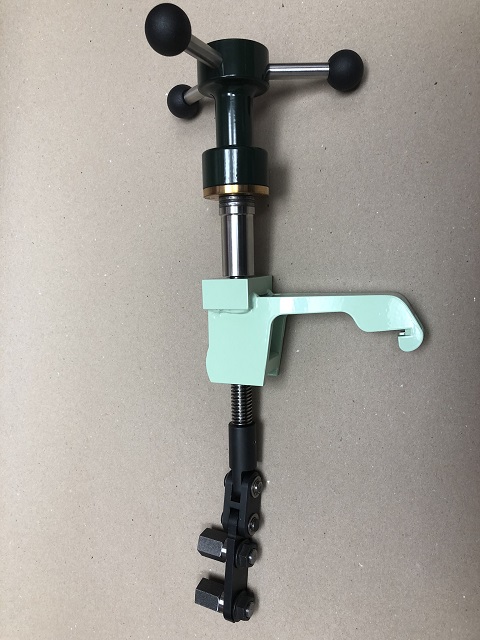 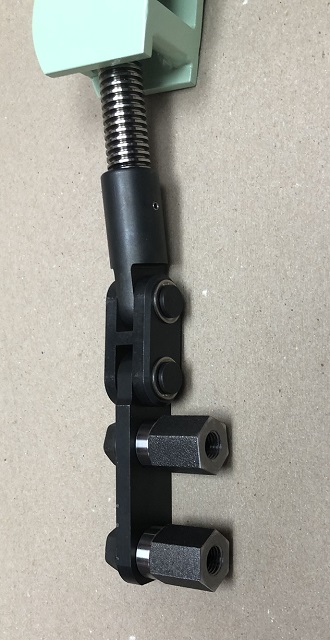 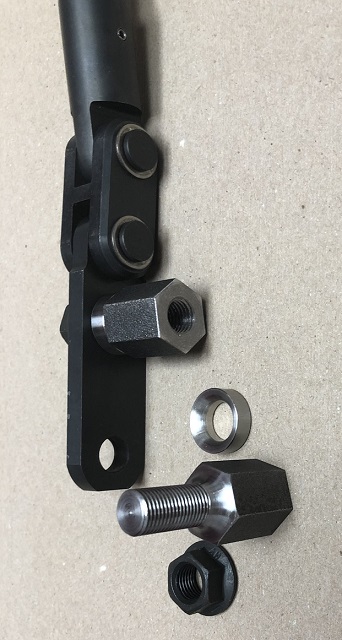 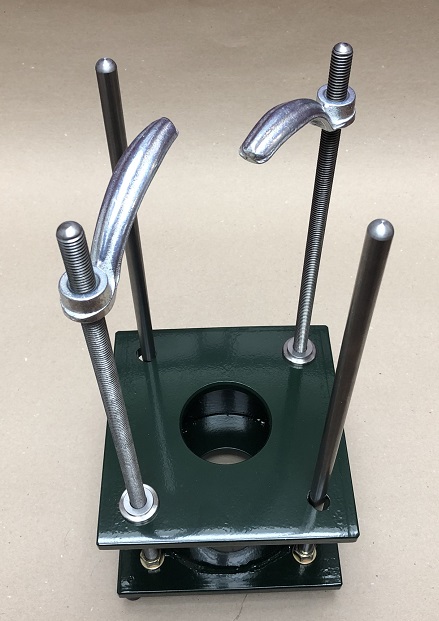 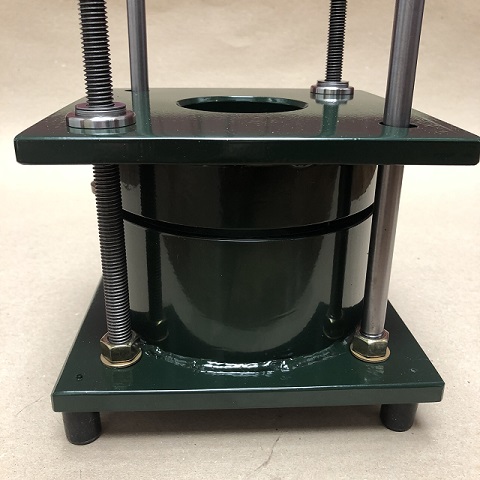 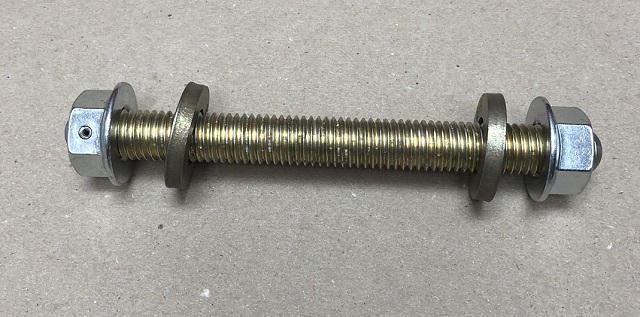 I'm looking for a volunteer who would like to try this for free as soon as possible - preferably in the States. I still have a couple of questions and some improvements I'd like to make. | ||
Brian Vogel Grand Master Username: guyslp Post Number: 2771 Registered: 6-2009 |
Kelly, Seafoam (or maybe mint) green and hunter green?!! What were you thinking! ;-) Brian, who is sure you'll find someone to volunteer, given how well your earlier efforts have worked and how responsive you've been to feedback | ||
Kelly Opfar Prolific User Username: kelly_opfar Post Number: 224 Registered: 7-2004 |
China Mint and Deeps Woods Green. I love 'em. If UPS can drive around in brown trucks ( "What can brown do for you!"), then I can use green.  | ||
Robert J. Sprauer Prolific User Username: wraithman Post Number: 137 Registered: 11-2017 |
My .02 I luv both colors but on a British Tool..gotta go dark green and it won't show dirt as easily. Beautiful workmanship as usual. | ||
David Gore Moderator Username: david_gore Post Number: 3160 Registered: 4-2003 |
Traditional British Racing Green as used on the pre-WW2 racing Bentleys. Gold pin-striping enhancement may or may not work and would require evaluation. | ||
Mark Luft Prolific User Username: bentleyman1993 Post Number: 246 Registered: 10-2016 |
Kelly Oh but if I had a pre war Bentley. I must say those tools are a true work of art. Amazing. | ||
Tim North Unregistered guest Posted From: 81.141.230.7 |
Kelly, I would happily try the tools for you but I live in the UK so perhaps not very practical. (Message approved by david_gore) |