| Author | Message | ||
Patrick Francis Frequent User Username: jackpot Post Number: 51 Registered: 11-2016 |
Hi guys, Just removed my height control valves and serviced them overnight. Unfortunately, all the fluid flowed out of the rear reservoir so I put in the reconditioned valves, refilled and started the bleed process - accumulators, rear rams, front callipers but shockingly for me I just cannot get enough pressure up to switch off the warning light. The rear pump is noisy and the brake pedal pulsates when I press. Whatever I try and bleed in the system produces slow pulsating fluid. I have managed to bleed all the air out of the system in this way, but the light will still not go off and pressure will not build up! What is shocking is that everything was fine before (apart from sluggish self levelling). I am about to trawl the forum and tee one before starting the process of elimination repair. Just wondering if anyone might have a "Eureka" suggestion. Thanks guys. | ||
Brian Vogel Grand Master Username: guyslp Post Number: 2229 Registered: 6-2009 |
Double check that you don't have an air block in the gravity feed from the reservoir to the pump. Also, if you haven't checked the reservoir itself it is entirely possible that you had a lot of free floating "gunk" at the bottom that rushed into the filter screens when the reservoir quickly emptied itself and has substantially blocked the filter screens. | ||
Larry Kavanagh Frequent User Username: shadow_11 Post Number: 53 Registered: 5-2016 |
Are you sure you bled the lower bleed valves on the rear wheel callipers and the rear callipers on the front wheels? Did you let off the air at the no.2 pressure switch? | ||
Paul Yorke Grand Master Username: paul_yorke Post Number: 1768 Registered: 6-2006 |
With the engine off, loosen the pump top union very slightly. PUT A CLOTH OVER IT. Do not allow it to spurt out or spray anywhere. Start the engine and carefully watch for fluid to start to flow / pulsate. There may be a problem with a valve reassembled incorrectly or in the wrong position so it's just allowing fluid to circulate through it. You will need to remove the rear accumulator flex pipe and fit a bleed nipple in the outlet to isolate the car from the pump/accumulator system. Then run again. | ||
gordon le feuvre Prolific User Username: triumph Post Number: 180 Registered: 7-2012 |
Good points, both Brian and Paul. I would also check the low pressure feed pipe to pump, does it feel "squishy" having closed up internally and not giving pump enough fluid-same effect as reservoir filter being blocked/restricted. | ||
Martin Taylor Frequent User Username: martin_taylor Post Number: 64 Registered: 7-2013 |
Block off the feed to the levelling system, if there is crud stuck in a levelling valve or a hose or pipe connected incorrectly fluid may return direct to the reservoir hence no pressure, if that is the only part you have had apart I would start at that end with a bearing or bolt to block it off and see if pressure then builds. | ||
Martin Taylor Frequent User Username: martin_taylor Post Number: 65 Registered: 7-2013 |
Also,check the cams on the levelling valves haven't turned too far as this will cause similar issues. Why were you servicing them? Leaks or function? What was involved? | ||
Larry Kavanagh Frequent User Username: shadow_11 Post Number: 54 Registered: 5-2016 |
Similar thing happened to me a couple of years ago when I had been playing around with the HCVs. No.2 light wouldn't go out and there wasn't enough pressure to properly bleed the No.2 pressure switch. I noticed that if I jacked up the rear to take the weight off the HCVs the No.2 light would extinguish but light again once I lowered the jack.. Eventually by blanking off the solenoid valve I managed to get the No.2 light to extinguish. Seems that the solenoid valve had crud on the valve seat which allowed fluid to return directly to the reservoir before building up pressure in the height control. When I looked in the rear section of the reservoir with the lid removed I could see the fluid gushing up through the return pipe when there should only have been a trickle there. There was a knocking noise in the pipes between the HCVs and the solenoid valve when I revved the engine but the restrictor valves were not blocked. Replacing the solenoid valve cured the problem. In my case the electrical side of the solenoid was also defective. See if your No.2 light extinguishes when you jack up the rear and that may indicate a similar issue in your case. If the electrical side of your solenoid is OK you should hear a clicking sound when you detach one of the solenoid wires with the ignition on. | ||
Patrick Francis Frequent User Username: jackpot Post Number: 53 Registered: 11-2016 |
Thank you all so much for your invaluable advice. So many possibilities, I didn't know where to start! I was just going to get in there and take things apart, but then stopped to think. So far: - Rebuilt self levelling valves on both sides, and I am pretty sure I rebuilt them correctly, although I am beginning to doubt myself! - Rear reservoir emptied overnight - on replacing valves, could not get no2 light to go out, so no pressure build up. - only pulsating, slow fluid flow in time with the pump. - All the air is bled out of the system using the slow fluid flow at every point. Also I move the HCVs by hand whilst bleeding the rams. I have tried up and down to try and excite something into action. (thanks Larry). - Valves are moved carefully so they don't jump off cam (thanks Martin) - Noisy rear hydraiulic pump - Clicking solenoid valve in time with pump. - When travelling fast, no2 light sort of flickers and brake pedal pulsates when braking. - Feed pipe to rear pump healthy and not collapsed.(thanks Gordon) - Lid off reservoir, strainers OK no crud.(thanks Brian) - The forward compartment of the reservoir warms up quite quickly (to my touch) and there is a healthy return flow into it. - The rear compartment is not warming up and return flow is minimal and pulsating. I am thinking that either I have a broken rear pump, or I have assembled the HCVs wrongly and fluid is just recirculating without building up pressure. I will be checking the pump as Paul suggests, but I will probably connect a tube to the accumulator bleed screw and check that I get 250cc per minute al 1000rpm as the book says. If I do, then I conclude that I assembled the HCVs badly. If not, then I will remove the rear pump. Until then, any suggestions, however silly or trivial are still welcome! This car once had a broken rear pump con rod (10m years ago) which may have been caused by the pump sticking, which may have happened again? Dunno. Duh. Still guessing. Will let you all know when and if I find out. Thanks to all again. Cheeers Patrick | ||
Larry Kavanagh Frequent User Username: shadow_11 Post Number: 55 Registered: 5-2016 |
If you have a hydraulic pressure gauge you can check your whole system quite easily starting at the bleed screw on the accumulator valve. If you don't have a pressure gauge they're easy and fairly cheap to build. The pulsating might indicate that the pumps are working but pressure isn't building because the accumulators are dumping fluid back to the reservoir too soon or the pressure is being released somewhere farther down the line. No harm to check the pump output anyway as you already plan to do. Before you remove and dismantle the HCVs you could blank off the feed to the HCVs using male & female UNF 3/8 x 24TPI steel or brass blanking plugs and if that solves your pressure loss you can be fairly certain that the HCVs are at fault. If you blank them off one at a time you will know which one is dodgy. As a precaution check behind the boot/trunk carpet at the top of the suspension turret to be sure that no fluid is escaping from the height control ram pipe connections. Good luck, Larry. | ||
Larry Kavanagh Frequent User Username: shadow_11 Post Number: 56 Registered: 5-2016 |
I overlooked your mention of the clicking solenoid valve in tandem with your pump. It should give one click if you disconnect one of the wires with the ignition switch turned on. When you say clicking continuously I'm not sure that it should do that but I'm not certain. If you have a clogged restrictor valve of which there are two mounted on the rear sub frame near the solenoid valve you will hear a steady knocking sound that will get louder on acceleration, it sounds like a plumbing knock in a household water system. In my case I had that knocking noise and pressure wasn't building and the culprit was the solenoid valve but your problem may not be that and the solenoid valve and restrictors are usually the final things to check when the problem hasn't already been located. | ||
Alan Dibley Experienced User Username: alsdibley Post Number: 47 Registered: 10-2009 |
I have seen no mention of "pipe-squeezer" clamps which are useful in this kind of puzzle. They consist of a finger-operated screw clamp with jaws made for squashing hydraulic hoses shut without damaging them. They are small enough to use in almost any place. I've used a pair for 20 years on assorted cars, with no problem. For instance - to check the HCVs, just clamp the feed pipe. No need for messy pipe disconnections..... Or does everybody use them already? Alan D. | ||
Paul Yorke Grand Master Username: paul_yorke Post Number: 1770 Registered: 6-2006 |
Not recommended on aeroquip Alan. | ||
gordon le feuvre Prolific User Username: triumph Post Number: 182 Registered: 7-2012 |
I can only reiterate what Paul Yorke says. Disconnect the outlet pipe from rear accumulator valve block and blank with spare bleed screw. This then ISOLATES the reservoir, pump and accumulator from rest of system. Is the light going out now? as Larry says gauge is best. I have seen just the bottom snap off pump pushrod, so it only had very short stroke, so flow test is important. Also if front (no 1) light working ok to spec, try just swopping accumulator switches. | ||
Brian Vogel Grand Master Username: guyslp Post Number: 2231 Registered: 6-2009 |
Not that I am arguing with anything that's been offered, since the range of possibilities has been accurately presented. That being said, try the checks that are the simplest first. They don't take much time and they save you getting into things such as isolating the reservoir/pump/ACV from the rest of the system until you've determined that this is the next logical step. Whether others agree with me or not I always choose to look for the simplest explanations and easiest solutions first. That has worked very well for me. Brian | ||
Larry Kavanagh Frequent User Username: shadow_11 Post Number: 57 Registered: 5-2016 |
I agree with Brian, on the assumption that the hydraulics were working fine before the HCVs were serviced then just blank of the HCVs one at a time and see if that restores the pressure needed to extinguish the No.2 warning light. If that works you will know that the problem is in one or both of the HCVs so you can limit your concentration to that area without having to test any other components. | ||
Patrick Francis Frequent User Username: jackpot Post Number: 54 Registered: 11-2016 |
Hi Guys Just to let you all know what happened in the end: Put the car up on the 4 post lift. Put a bleed tube on the accumulator valve and measured the amount of fluid pumped in 60 seconds at 1000rpm. Should have been 250cc by the book, I measured 220cc appx. - so good. Capped off the pipe that leads to the rear rams off the T-piece at the front of the car. What works very well is a ball bearing of the right size. LIGHT WENT OFF IMMEDIATELY So obviously, I had assembled one of the valves wrongly. I removed the LHS valve and very carefully took it apart and found everything in place as it should be. I put a ball bearing in the pipe leading to the RHS valve. LIGHT GOES OFF I removed the RHS valve and carefully dismantled it to check where I had gone wrong. I had swapped the two large screw in adaptors that the brake pipes connect to on one side of the valve body. These are very easily interchanged, especially since the two self levelling valves are identical but partly mirror imaged, with the lever spigot coming out of opposite sides. So when you have them both apart and laid out in front of you, great care is needed to make sure that you assemble each one correctly. Thank you to everybody for the advice and for tempering my desire to just take everything apart! | ||
Christian S. Hansen Grand Master Username: enquiring_mind Post Number: 556 Registered: 4-2015 |
Always a relief to hear of a happy ending. I guess the takeaway lesson is when considering the source of a new problem, to ask, "what have I done recently", and that is the place to start for assembly errors. Sort of reminds me of a previous live experience when in college I was an apprentice at a "old car garage" and the proprietor noted that whenever a car came in and owner stated that the problem was not a, b, or c because he just checked them, the first items you check are...that's right...a, b, and c! . | ||
Patrick Francis Frequent User Username: jackpot Post Number: 59 Registered: 11-2016 |
Interestingly, when I was driving to my garage to fix the rear suspension hydraulics, there was a constant vibration from the car, which was duly cured when the hydraulics were fixed. Proper functioning rams, and the correct rear suspension height are important for keeping the half shafts and trunions working horizontally and efficiently, I presume. | ||
Jeff Young Grand Master Username: jeyjey Post Number: 330 Registered: 10-2010 |
> Proper functioning rams, and the correct rear suspension > height are important for keeping the half shafts and trunions > working horizontally and efficiently, I presume. Yes, ride height is critical to the trunnions. They don't like sharp angles. BTW, does anyone know why they used Detroit joints (trunnions) at the inner ends of the drive shafts and Cardan joints (cross-type u-joints) at the outer ends? Cheers, Jeff. | ||
Paul Yorke Grand Master Username: paul_yorke Post Number: 1780 Registered: 6-2006 |
Hi Jeff, because the length of the drive shaft has to change length. But not enough to need two of them. | ||
Jeff Young Grand Master Username: jeyjey Post Number: 331 Registered: 10-2010 |
Ahh... and I guess there's not enough space for a sliding spline joint like on the propshaft? | ||
Robert Noel Reddington Grand Master Username: bob_uk Post Number: 1354 Registered: 5-2015 |
A sliding spline will also lock up under torque. Jag solved this problem by using the drive shaft as top suspension member, its a fixed length. I wish Crewe had used similar. | ||
Paul Yorke Grand Master Username: paul_yorke Post Number: 1781 Registered: 6-2006 |
Jag rear suspension. No thanks. Later lobro shafts help I guess. But probably about 50% of shadows are running around on their original shafts. Once again (apart from a boot going) maintenence and lubrication is the key. Look after them and they will go on indefinitely.  Was working on 70k mile Shadow II today. FSH . Obviously didn't bother to top up half shafts or grease UJS. So much rust and goop to clean out before finding a ridge in the trunnion giving a vibration under load. All due to lack of lubrication changes.  | ||
Brian Vogel Grand Master Username: guyslp Post Number: 2234 Registered: 6-2009 |
Patrick Francis wrote, in part: Proper functioning rams, and the correct rear suspension height are important for keeping the half shafts and trunions working horizontally and efficiently, I presume. There is a slight problem with what this implies about your car. When the car is unladen (and having a driver and front passenger still counts as unladen) the height control should not be activating to adjust ride height. When the car is unladen the rear springs and shocks (dampers) should be more than sufficient to keep everything in its correct position. Mind you, the above being said, these cars are notorious for getting "saggy rears" over the years and that generally means that you either need to replace the rear springs or use rubber spring spacers between a couple of coils to achieve the correct standing height without any assistance from the height control system. Brian, who took option number two after finding that I could not extract my rams in order to get new springs and shocks installed | ||
Patrick Francis Frequent User Username: jackpot Post Number: 61 Registered: 11-2016 |
Ah Brian!! Than definitely means my lady has "droopy bottom syndrome". Thanks for the heads up. Can you please clarify "using rubber spacers betweena couple of the coils". Also is there any harm just letting the self levelling do this job permanently? Thank you | ||
Brian Vogel Grand Master Username: guyslp Post Number: 2236 Registered: 6-2009 |
Patrick, I believe I have posted about what I did with the spring spacers at some length in these very forums. The search function on the forum has become inconsistent, so if you can't find anything on "spring spacers" using it then use a web search engine with the following as a search criterion: site:au.rrforums.net/forum/messages There seems to be no consensus with regard to the self-leveling taking on a corrective role on a permanent basis. It seems that most say you shouldn't allow this while others say that the whole purpose of the system is to perform this function and the way it works means that shouldn't be a problem. Brian | ||
Geoff Wootton Grand Master Username: dounraey Post Number: 1661 Registered: 5-2012 |
There seems to be no consensus with regard to the self-leveling taking on a corrective role on a permanent basis. In 2002 I went to one of the RREC weekend workshops at Hunt House. Highly recommended I must say. They had a series of guest speakers/experts. The ones that commented on the above issue were in no doubt - the unladen car should be at the correct ride height on the springs alone with no compensation from the self leveling system. Patrick - There's a picture of the spacers I used on my car before replacing the rear springs here: http://au.rrforums.net/forum/messages/31/21789.html?1471981039 You just jack up the car to elongate the spring and push the spacers between the coils. Geoff | ||
Brian Vogel Grand Master Username: guyslp Post Number: 2239 Registered: 6-2009 |
Geoff, I just want to make clear that I was not trying to cast any doubt on what the correct situation is. What there does not seem to be any consensus about is whether allowing the height control system to be a "compensatory strategy" for saggy springs on a constant basis damages the height control system. I threaded my spacers in when the car was up on a lift, but the exact same situation - expanded springs - are essential to allow fitting the spacers. Brian | ||
Geoff Wootton Grand Master Username: dounraey Post Number: 1664 Registered: 5-2012 |
Hi Brian What I was offering was support for your statement in your 9:22 am statement "When the car is unladen (and having a driver and front passenger still counts as unladen) the height control should not be activating to adjust ride height." It is indeed an interesting point as to whether prolonged use of the self leveling system to compensate for tired springs does shorten the longevity of the system. My guess is that it does. Geoff | ||
Patrick Francis Frequent User Username: jackpot Post Number: 62 Registered: 11-2016 |
My opinion guys: 1. Ideal situation is for good springs, holding the rear of the car at the required height -but- if you are the only one driving it and occasionally take a passenger, then I would invite a couple of 50KG sack of potatoes to accompany you in the boot every once in a while to keep the hydraulics working, to prevent degredation from lack of (substantial) use. 2. Using the hydraulics to keep the car level due to a saggy bottom would not do damage, but I would guess an occasional depressurisation of the hydraulics when you park for a few days would not go amiss allowing the rear rams to keep moving. The main downside is that withthen hydraulics levelling the saggy bottom, the springs are compressed and therefore less supple, giving a slightly "jiggly" ride. | ||
Patrick Francis Frequent User Username: jackpot Post Number: 63 Registered: 11-2016 |
Hi Guys As they say, you live and learn: After having replaced the seals on both self levelling rams (about 3 months ago)with the upgraded kit from Flying Spares, and both height control valves (about 2 weeks ago). After correcting my reassembly error with the valves, I then proceeded to level a saggy bottom by 2cm using the adjustment on the control valves. Things were great, and the car seemed more than happy, and so I came to the conclusion that is in my post just above this one. So then I am invited to go for a classic car rally in Morocco. Everything is great and going swimmingly, until this afternoon, when my No2 brake light came on. On checking below the car, I see I have a failure on one of my rebuilt rams. In the middle of the rally, so what I could do was disconnect the levers, and top up with fluid, so brakes are still good but no self levelling. I have been trying to think why I had a failure on a recently rebuilt ram, and I have come to the following conclusion: Using the rams to obtain the right ride height is not advisable since they are now working beyond or close to their design limits. I mean that they should be fully depressed at normal rest position of the rear suspension, with the correct springs giving the proper ride height. Instead, mine were 2cm extended at normal rest position , and so with 5 people and luggage, they were working and or over full extension. So my conclusion, without being able to remove and examine the rams since I am still on the rally, is that the seal failed because the ram piston was over extended, and so the seals could not be held true by the running shaft in the ram so efficiently. Which is a strong argument for correcting ride height either with new springs or spacers and not with the rams! Geoff, a question if I may: The spacers that you sent me a link to, are they available on the net, and are they measured by diameter and thickness, or some other way? Are they a standard available item, or exclusive to RR. I would love to take yours, if they are available, but guess freight to Europe might be prohibitive? Thanks to all. | ||
Martin Taylor Frequent User Username: martin_taylor Post Number: 69 Registered: 7-2013 |
the seals would have failed because they are old and would have at some point anyway, the only difference in using the springs to correct for sag would probably be when the car was fully loaded the control valves may have still been in a position to provide pressure to the rams, I load my car with sound gear and people and drive good distances with it still lower than normal (the system was designed to take people and luggage, not heavy gear and people), mine still works fine, better exercised to keep the rams clean of rust etc, lack of use is bad for them. | ||
Patrick Francis Frequent User Username: jackpot Post Number: 64 Registered: 11-2016 |
Hi Martin The rams and seals are 3 months old. Recently serviced - no rust. That is why my conclusion that since they are working 2cm further extended than they should at full throw, because of the saggy bottom may be the reason. Are your suspension levels correct with your system depressurised, or does yours also have a saggy bottom? Thanks | ||
Patrick Lockyer. Grand Master Username: pat_lockyer Post Number: 1188 Registered: 9-2004 |
Patrick F, years ago I had a ram seal let go and fitted a new genuine part. Like you it only lasted months and started peeing 363 out. My solution was to fit some sort of industrial seal, I will try and find the part no I think it may have been posted on this forum. Since fitted I have added extra weight with LPG tank and have not had any leaks. | ||
Jeff Young Grand Master Username: jeyjey Post Number: 334 Registered: 10-2010 |
I haven't had that issue with the rams, but I did rebuild my water pump with new seals only to have the gland seal fail 3 months later. Some new parts just aren't what they should be. Cheers, Jeff. | ||
Martin Taylor Frequent User Username: martin_taylor Post Number: 70 Registered: 7-2013 |
My rams have never been apart (only part of the system that hasn't) I regularly carry lots of gear so the system is always lifting the rear. My springs are old and soft, I have added some shims so that the half shafts slope down to the wheels, this brings them inline at cruising speed and just sloping up under hard acceleration, these springs are very soft. If you drove across the continent with three or four passengers the system would be working most of the time, it is a brilliant system as it pushes on the top of the spring so the spring rate stays the same at all times although it will feel different as springs will be more compressed as load increases. The levelling system is there to keep the drive shafts in line with soft springs, a hydraulic ram should be able to sit at 2500psi all day without leaks (otherwise hydraulic elevators would simply not work!) If your springs have sagged you can install spacers at the bottom of the spring, the rubber ones that go in between coils will ruin the ride and not be good for the springs either as they will bend over the shorter distance left unblocked. | ||
Patrick Lockyer. Grand Master Username: pat_lockyer Post Number: 1189 Registered: 9-2004 |
Martin I am not afraid to load the old girl up ie 90 litre LPG tank + using the car to tow a small and large plant trailer, I use the spring assisters within the coils and have not had any probs yet, vibrations or otherwise. Patrick F found the packet looks as though I bought some spare seals, I made a note to say that they have no wiper seals. The packet part no is f-137200031c. Seal is p-200137-4.  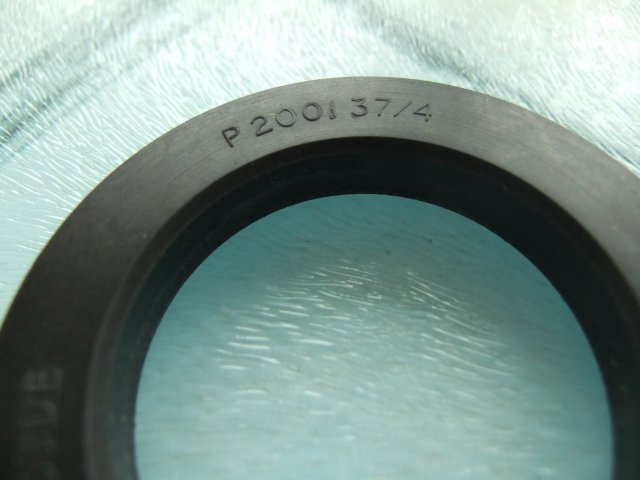 | ||
Patrick Francis Frequent User Username: jackpot Post Number: 65 Registered: 11-2016 |
Thank you all so much. Patrick L, I have already ordered the seals. I am interested in raising my rear suspension, and without lighting a fire, would be interested in advice as to whether I should pack with a spring assist doughnut, or packing at either end. Does anyone know the diameter of the rear springs please? Both diameter of the overall coil and of the spring steel? | ||
Geoff Wootton Grand Master Username: dounraey Post Number: 1666 Registered: 5-2012 |
Hi Patrick F There shouldn't be any fires lit here as we are all simply reporting back on our own personal experiences. I fitted 4 assisters on each of the rear springs of my car without any noticeable change in ride quality. However I could never get a high enough ride height even with 4 fitted. When I changed my rear springs I found they had only 9 coils and were far shorter than I had expected. I suspect a previous owner had fitted non-standard springs. This probably explains why I was never able to get enough lift from them. I bought my assisters from here: https://www.summitracing.com/parts/MRG-1287/ Check out this forum entry for spring dimensions and some useful discussion: http://au.rrforums.net/forum/messages/17001/16457.html?1438295588 I will call in and get an estimate on shipping costs for the spacers. Using the lowest priority, doesn't matter if it gets lost service, it may be cheaper than I think. Geoff | ||
Geoff Wootton Grand Master Username: dounraey Post Number: 1667 Registered: 5-2012 |
I looked into packing the end of the spring but I personally decided not to. On my car the groove the bottom of the spring fits into was, as I recall, only about 1 inch. I was concerned the spring may jump out under certain load conditions. This is just my personal opinion - I know other owners have used this method without incident. The other problem is you have to practically remove the spring anyway, so you may as well go the final furlong and replace them. My springs came from a specialist company here in the US for $110 each. | ||
Brian Vogel Grand Master Username: guyslp Post Number: 2241 Registered: 6-2009 |
Mr. Lockyer, From whom were these seals acquired? Yours is the first offering I have seen of alternative ram seals and I'd been looking for years, so I thank you. It's always helpful to know who's carrying them at a given point in time, though. For anyone who's interested in replacement springs for their SY cars, and if you live in the USA (at least if you care about shipping charges), download the RR & Bentley Parts, Repair, Restoration & Other Resources Compilation and search for "coil spring." I also document the spring spacers there. I used between-coil spacers and they've been working wonderfully for years now. Brian | ||
Patrick Francis Frequent User Username: jackpot Post Number: 66 Registered: 11-2016 |
The seals I put in both rams were an upgraded kit supplied by flying spares that they say is better than the original which sometimes failed. I did not examine the seal before putting it in, but now that I have to dismantle, I'll take pics of it and serial numbers etc. http://www.flyingspares.com/shop/rolls-royce-bentley-shadow-t1-t2-corniche-mpw/suspension/rear-suspension-silver-shadow-corniche-bentley-t-1-2/height-control-system/ram-seal-kit-rh2714p.html | ||
Brian Vogel Grand Master Username: guyslp Post Number: 2243 Registered: 6-2009 |
Mr. Francis, Thank you. Careful documentation of the contents of these kits could become critical in the future if they cease to be produced. I have tried to do the same with every single kit of various sorts that I've ever used on my cars. For some of these, like seal kits, they can be put together for a song compared to the cost from any of the usual suppliers. I've done that for a number of the RR/Bentley SY Hydraulic Kits. Brian P.S. If anyone's interested, but doesn't feel like acquiring all the bags of seals, I've got some of these kits for sale. RR/Bentley SY Seal Kits for Sale | ||
Patrick Lockyer. Grand Master Username: pat_lockyer Post Number: 1191 Registered: 9-2004 |
Brian Vogel, the seals were purchased through a local industrial hydraulic ram etc supplier. I took the measurements with the old new seal as a pattern. The company is still going but under new management, when I am that way I will call in for any details of the manufacturer. The only company I have come up with are these but have not had time to check. http://www.claron.co.uk/products.htm | ||
Jim Walters Frequent User Username: jim_walters Post Number: 99 Registered: 1-2014 |
Don't forget that common hydraulic seals are NBR rubber composition which are not compatible with glycol brake fluids like RR363 or DOT 3 & 4. The 200137/4 seal shown above appears to be NBR according to Claron's website info. Seals for use in Shadow rams must be composed of EPDM. SRH8505 SRC18015 SRE22493 NAC-05370 www.bristolmotors.com | ||
Patrick Lockyer. Grand Master Username: pat_lockyer Post Number: 1192 Registered: 9-2004 |
And from some old notes, from what I can make out the replacement seal that let go was Trist SCN I have a no 805253 don't know if that is the patent or part no. At the time the polyseal was deemed ok for this type of fluid! so far this type heavy duty seal has lived up to expectations. | ||
Patrick Francis Frequent User Username: jackpot Post Number: 98 Registered: 11-2016 |
Hi Guys An update on the situation. The ram seals were fine! What had gone was the flexi hose that goes from the self levelling valve to the ram. I have taken pictures of the spare ram seal that I ordered from Flying spares which is an upgraded version that they supply, and I have to say,it looks bomb proof. 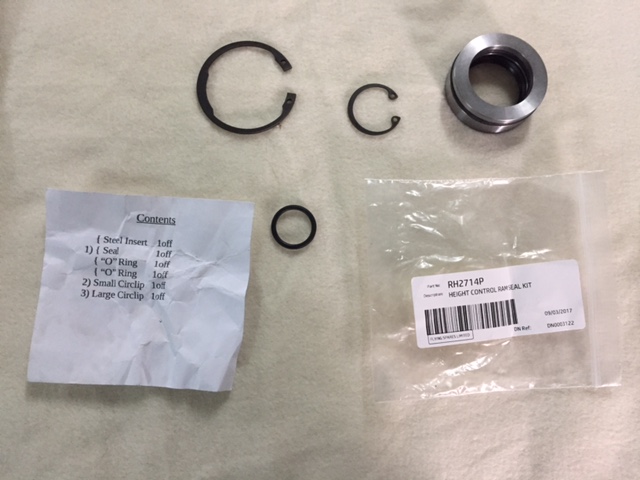 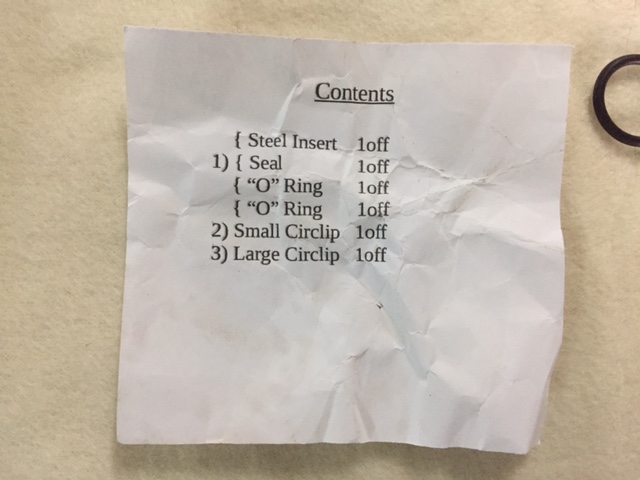 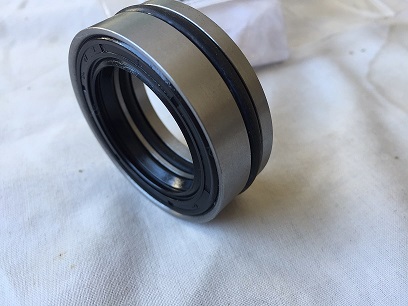 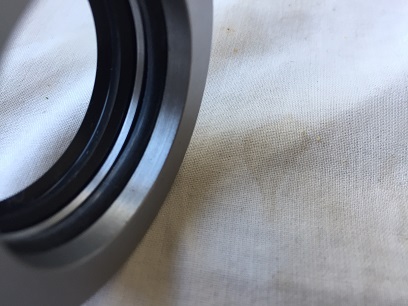  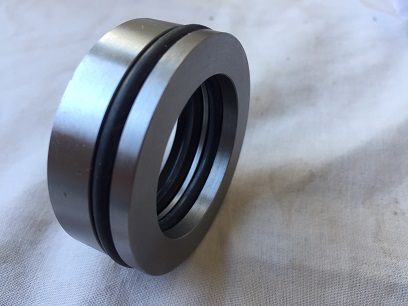  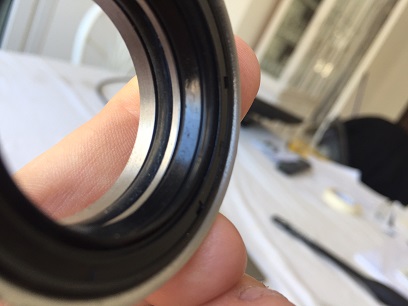 * | ||
Patrick Francis Frequent User Username: jackpot Post Number: 99 Registered: 11-2016 |
Just checked all my flexi hoses. All need replacing - not surprising since they have been there since 1974. Just a heads up for everybody to check them all, since they should be changed every 12 years or 100,000km, and are easy to overlook. I have 4 on my self levelling and 10 on the braking system. The one that went was the high pressure self levelling one - there are 3 low pressure and one high pressure. This was probably due to saggy rear springs, combined with 5 people and luggage, making the little fellow work overtime. Also just replaced my rear springs which has cut out the vibration I had and brought her back level without any help from the self levelling. Interesting observations: 1. Rolls manual say the drivers side rear spring has slightly greater poundage than offside. Flying spares springs are the same poundage. 2. Old and new springs were exactly the same length at rest, 2cm difference under load. 3. There is an American company that supply the springs. They supply standard springs and slightly uprated springs for people that decide to do away with the self levelling system. | ||
Brian Vogel Grand Master Username: guyslp Post Number: 2287 Registered: 6-2009 |
Patrick, I'm trying to figure out how you came up with 14. If I ignore the hoses that have no fittings - gravity feed to pump (2), ACV return to reservoir (2) - plus the two high pressure hoses from the ACV to the car body (2) - by my count there should still be 15 more on the "original series" Shadows and derivatives. Download the RR & Bentley Parts, Repair, Restoration & Other Resources Compilation and search for "Hydraulic Hose Substitution Chart". Do I have an error or did you miss one? The US company that makes springs for our cars, Coil Spring Specialties, is also listed in that document. Brian | ||
Patrick Francis Prolific User Username: jackpot Post Number: 101 Registered: 11-2016 |
You are probably right Brian. I got in a bit of a muddle trying to work out what I needed. Flying spares and Introcar advised either 13 or 14 depending on chassis number and differing hoses for RHD and LHD. My physical count gave me: 2 to each wheel = 8 2 to rat trap 3 to LHS self levelling valve 1 to RHS self levelling valve gives me 14. In the end, I ordered a complete set for my chassis number from Introcar. Mine is SRH 17968 https://www.introcar.co.uk/rolls-royce-bentley-models-1965-1980-c89/brakes-c32746/hoses-pipes-unions-c32771/chassis-numbers-1001-26700-c38656/brake-height-control-valve-hose-set-rhd-p46207 Did I get it wrong? Thanks for the document. I think I got the contact for the springs from that document. Seems I am preaching to the converted! Thanks again Brian | ||
Brian Vogel Grand Master Username: guyslp Post Number: 2288 Registered: 6-2009 |
Patrick, You have the correct number at 14. I had forgotten that the later original series Shadows have the same number of hoses as the Shadow II and derivatives. The earlier cars had 4 hoses at the left height control valve while the later ones have 3. I was doing the "earlier car" math rather than the later. Brian P.S. If anyone happens to know the chassis number where the left height control valve had that 4th hose deleted please let me know and I'll update the compilation with the precise chassis number split. | ||
Patrick Francis Prolific User Username: jackpot Post Number: 102 Registered: 11-2016 |
Hi Brian If you look on the Introcar link that I sent you, there is a breakdown of chassis numbers and required hoses I think! If you can decipher it! Good luck. | ||
h_kelly Prolific User Username: h_kelly Post Number: 233 Registered: 3-2012 |
Hi, I have a question re fast height solenoid, the one on my SS 2 ain't making the destinctive click which the shadow 1 does, power going to same. Thing is I have a spare one but when I apply current no click so I'm assuming it's stuck, is the unit easy to disassemble,..any advice or links to previous discussions appreciated Many thanks Hk | ||
gordon le feuvre Prolific User Username: triumph Post Number: 210 Registered: 7-2012 |
It I can be stripped, refer to w/shop manual. There is an adjustment that I seem to recall requires a dial gauge and extension inserted through pipe union insert to adjust? When solenoid energized. If you drive car (somewhere safe) and put in neutral, maybe a hill. By turning steering side to side you should here rams "knocking" as solenoid on fast level. Easy way to check solenoid operation! | ||
h_kelly Prolific User Username: h_kelly Post Number: 234 Registered: 3-2012 |
Thanks for that Gordon, with the spare one I have (which I sealed when put in storage) I thought experimenting with some air through the 3 ports in the hope the "piston" might free up if stuck. In a way I assume on a bench test with the current flowing through same I could recreate the click effect. Having researched this topic this evening intro car gave the best diagram of the said part. |