| Author | Message | ||
John Rowney Experienced User Username: johnrowney Post Number: 50 Registered: 2-2015 |
I am removing the engine of my 1938 Wraith WXA68 for an engine rebuild after it was diagnosed as having poor white metal bearings. When I removed the radiator, I took off the overflow piping. The first nut I undid just came out - it looked like it had been glued in with a broken stud. The second nut came off easily, but the stud looks quite bent. 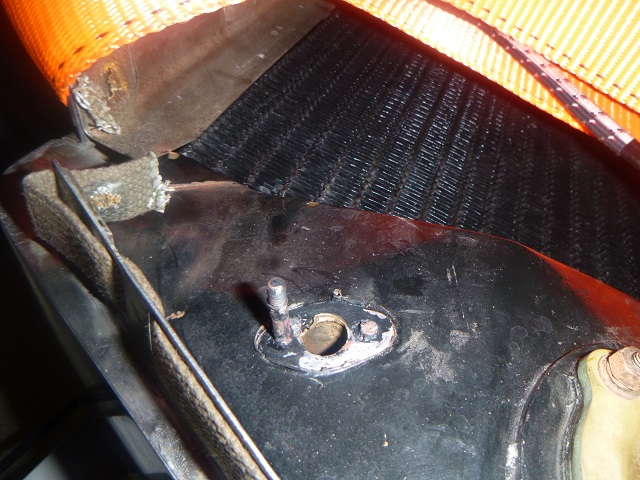 I have looked at the SHRF drawings for the overflow fitting, but cannot determine how the studs are installed to the top tank. If they are just silver soldered in, I would be able to heat things up and extract them. Does anyone know how these studs are attached? Your advice would be most welcome and any advice on the best way to remove the studs would be also most welcome. John Rowney | ||
Christopher Carnley Unregistered guest Posted From: 5.80.16.198 |
John, You would be best advised to take it to a radiator specialist, as heavy as it is. Warming old soft soldered parts may lead to extensive weakening and leaks. (Message approved by david_gore) | ||
John Rowney Frequent User Username: johnrowney Post Number: 51 Registered: 2-2015 |
Thanks Christopher. Sounds like the solution. I was advised by others that this is the way to go too. It will take me a while before I get back to the radiator, but I will get to it once the engine is at the rebuilders, maybe in a couple of weeks. Once it is sorted I will let the forum know the outcome. | ||
John Rowney Experienced User Username: johnrowney Post Number: 52 Registered: 02-2015 |
I finally decided to take a punt and take the stud out using the conventional method of using two nuts together on the exposed thread of the stud. This came out easily. 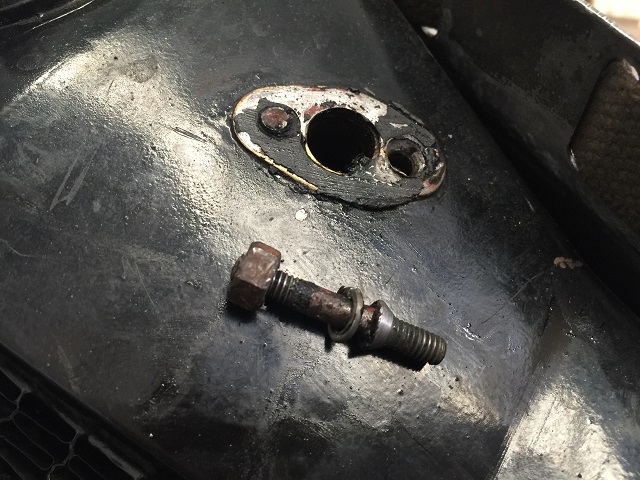 The stud has a 60 degree conical section, which was silver soldered into the flange. To get the broken stud out, I bought a micro screw removal kit. The first step was to drill a hole in the stud. This proved almost impossible - the stud material was exceptionally hard. I then took the radiator to a radiator repair shop which had done other work for me in the past. Unfortunately, they had the same problem, and were unable to drill a hole in the broken stud due to its hardness. They recommended a mobile stud removal expert to remove the stud. Back in my shed I rang the Stud Man and he came to perform his magic. He tried to drill a hole in the stud, and ruined a $70 full carbide drill bit in the process. Eventually the hole was drilled, but the screw extraction tool could not get purchase in the hole due to the extreme hardness of the stud. The Stud Man then built up a thin section with a Tig welder and then welded a nut in position. Voila! The broken stud was easily screwed out. 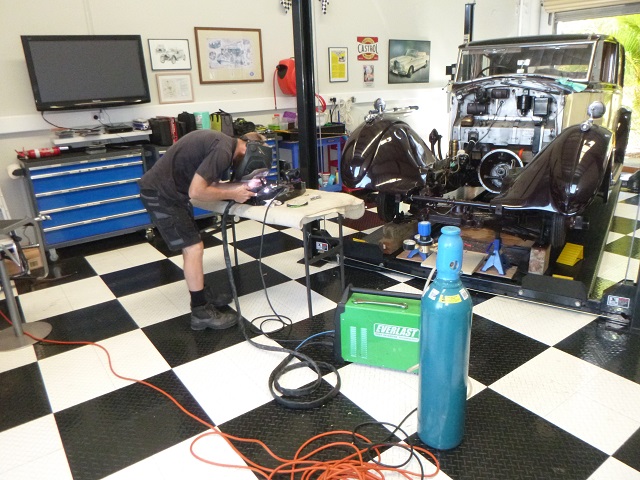 I then bought a 60 degree countersink bit to clean up the flange. 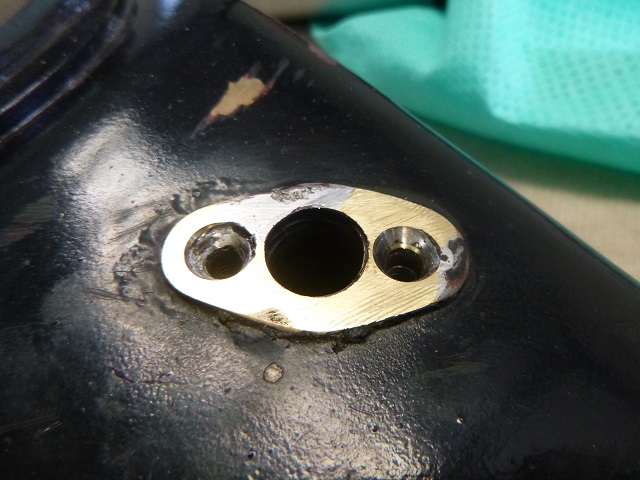 I have sent the "good" stud to Garth Selig to duplicate the stud with the cone section. I will probably just seal the stud with Loctite or gasket glue rather than use the old fashioned silver solder. This will have to wait until early next year after I get the rebuilt engine back and installed. | ||
Christopher Carnley Unregistered guest Posted From: 86.182.144.175 |
An excellent result. The stud and bolt material changed 3 times during the 1930,s but 3 1/2% nickel steel being so hard? I too have failed to drill it but I wonder if the red heat during the silver soldering altered the structure. The problem with cobalt bonded tungsten carbide is that it is brittle and has to be used in a drilling machine with the work clamped. Any irregularity will cause it it bind and break. I suppose the stud man built up a core on the broken one and then welded the nut to that. The thermal shock may have loosened the grip Your workshop puts mine to shame, so tidy like an operating theatre. I doubt that the studs were hard soldered in. (Message approved by david_gore) |