| Author | Message | ||
Brian Vogel Grand Master Username: guyslp Post Number: 457 Registered: 6-2009 |
Hello All, I'm nearing the end of my proverbial rope with both these problems, so I'm soliciting opinions. Since a picture, with sound, is worth a thousand words please view this video. If anyone recognizes anything distinctive about the way the solenoid sounds when the starter doesn't crank or how the starter sounds please share your thoughts. I also would like opinions regarding where you think the source of the obvious leak is once it appears. I have my own theory, but don't want to offer it so that it doesn't influence the opinions that others may have. Thank you all in advance for your assistance. Brian, who really wants to stop working on SRH33576 and focus on LRK37110 | ||
David Gore Moderator Username: david_gore Post Number: 1302 Registered: 4-2003 |
Hi Brian, The starter solenoid sounds like a classic case of low voltage most likely due to a poor earth connection between the engine block and the car body. The first place I would look is at the starter motor mounting bolts as these should have an earthing strap attached to one of them and grounded on the body structure. If the strap is missing, this will almost certainly be the cause of your problem. If the strap is there, undo the chassis connection and check the resistance of the strap between the mounting bolt and the chassis termination lug; it should be 0 ohms. If there is a resistance reading, remove the strap and carefully check the conductor for damage and the terminations for continuity; it is not unknown for the strap to be damaged when removing and/or replacing the starter motor. It is also possible the strap has not been replaced if the starter motor has been removed/replaced by an automotive electrician who is not aware of the importance of the earthing straps. Can I see thread tape on the end of the nipple attached to the body of the component? If not, my suspicions are either a crossed thread or a thread mismatch possibly involving the use of a parallel thread nipple instead of the requisite tapered thread. Unfortunately, I am away from home and do not have access to my thread guide to determine what threads could match the UNF threads used for the Shadow hydraulic components. The first threads I would look at would be BSP as a BSP parallel threaded nipple might have been inadvertently supplied instead of a tapered thread [parallel threads require a gasket/seal to prevent leakage whereas a taper thread does not and is the correct thread to use] and the US NPT tapered thread. If these threads are not compatible with UNF then my expectation is a parallel threaded nipple and not a tapered thread version is responsible for the leak. | ||
Paul Yorke Grand Master Username: paul_yorke Post Number: 1055 Registered: 6-2006 |
As David says plus the main terminals on the starter solenoid. Is the starter staying engaged as well? Something sound horribly metal on metal on the video. Crossed wires on the low power starter relay by accelerator linkage bracket? | ||
Brian Vogel Grand Master Username: guyslp Post Number: 458 Registered: 6-2009 |
Gentlemen, Thank you both for your input, particularly regarding the starter. There is no thread tape of any kind on the hydraulic connections. You do see a piece of masking on the fitting that is the return to the reservoir. I label things when disassembling them and don't often remove those upon reassembly. All of the connections you see are those that have always been in the car since I've owned it. None of these previously leaked. Given the connections we're talking about it would seem highly unlikely that anyone could/would be able to replace the components in question with anything else. I have no idea whether the starter is staying engaged but I would doubt it. When she starts she starts just like she always did. If the starter were staying engaged I would imagine it would have self destructed long ago. You must remember this video was made with a camera on a tripod parked inside the wheel well. One will hear all sorts of things "up close and personal" there that one doesn't typically hear at any distance. Brian | ||
Paul Yorke Grand Master Username: paul_yorke Post Number: 1056 Registered: 6-2006 |
Brian, it must just be the way the mike is picking up the sound frequencies. Paul, who spends more of his life inside a wheel arch than out  If you are sure nothing is cross threaded then you can hold the adaptor and keep tightening the pipe nut. Otherwise a new pipe and a used adaptor would be next. Can't tell from the angle it's filmed at but if the flex pipe and the return hose are touching you should adjust them and allow for engine movement. | ||
Chris Browne Prolific User Username: chrisb Post Number: 112 Registered: 2-2010 |
Brian, I have just replaced a starter motor on a friends 1970 Shadow with what sounded like exactly the same fault. The solenoid was engaging every time I turned the key but the starter motor would only engage intermittently. Replacing the starter motor obviously cured the fault but I took the opportunity to dismantle the old starter motor solenoid. Inside it there are two heavy duty, copper terminals which make and break when the ignition key is turned which, in turn, spins the starter motor. The contacts were dirty and very pitted but as they are made of quite thick copper, I was able to clean both contacts and file them smooth and the starter motor works perfectly again now, every time. You would have to remove the starter motor from the car to gain access to the solenoid. Hope this helps, Kind regards, Chris | ||
Brian Vogel Grand Master Username: guyslp Post Number: 459 Registered: 6-2009 |
Paul, I keep hoping that I can achieve balance between "in and out" of wheel arch time! ;-) You, of course, are condemned by your chosen profession! Since I was able to hand thread the large pipe nut on to the adapter nipple on both sides and screw it down until it stopped I can't imagine that I'm dealing with cross threading issues here. As an additional data point, but which is now in the past tense, when I first put everything back together for the side you saw in video it was not leaking at all. The initial leak it developed was rather weird in that it would gush upon starting the car but very shortly after would seem to stop spontaneously. This is what has been "corrected" to the state you're seeing now (along with having put new crush washers beneath the adapter as well). Neither the return hose itself nor the short piece of bundy tubing make any contact with the large input line from the pump. They're fairly close, mind you, and I knocked it loose at one point with a wrench yesterday, but I'd say the clearance is at least 3/4" at the closest point and that's very near to the ACV itself. Brian | ||
Paul Yorke Grand Master Username: paul_yorke Post Number: 1057 Registered: 6-2006 |
with each over, I was taking about. but wits any really. loosen and retighten the 3/4 | ||
Brian Vogel Grand Master Username: guyslp Post Number: 460 Registered: 6-2009 |
Chris, Thanks for this information. On my car what I thought was the starter solenoid is external to the starter itself. However, I'm now having one of those "where in the *^%($ did they hid *this* information in the Illustrated Parts Manual" with regard to the starter motor. The only reference I can find is Chapter K13, and that is clearly for early cars. If someone knows where the starter is documented and the exploded view is located in the Illustrated Parts Manual would you please let me know? Thanks, Brian | ||
Brian Vogel Grand Master Username: guyslp Post Number: 461 Registered: 6-2009 |
Paul, Your last post is indecipherable to me. Were you posting via mobile device or something? I'm presuming you're telling me to loosen the 3/4" line nut on the brake pump input line and to tighten it down again. If I am mistaken on this please correct me. Brian | ||
Paul Yorke Grand Master Username: paul_yorke Post Number: 1058 Registered: 6-2006 |
HA! I was and I was! This site is so mobile unfriendly . . . along with many forums  Also that the flesi and return looked close to each other. | ||
Geoff Wootton Prolific User Username: dounraey Post Number: 228 Registered: 5-2012 |
Brian I have measured the adapter for the high pressure pipe from the pump on my SY-I and it is a parallel thread. Therefore the seal between the pipe and the adapter is effected by a clamping action. I believe, from previous entries that you are using a high pressure flexible hose from the pump to the adapter. My question is are you sure that the flare on this hose exactly matches the flare on the adapter? It may well be that Paul's suggestion of loosening and then re-tightening the nut may help to re-seat the joint. Geoff. | ||
Brian Vogel Grand Master Username: guyslp Post Number: 462 Registered: 6-2009 |
Geoff, No, there is no flexible hose whatsoever used in this section of the system. There is a shaped mild steel (or I presume it's mild steel) tube that is of greater diameter than the lines in the rest of the system running from each pump to its respective ACV. The line nut is slipped on to this tubing and it must be flared after the nut is on just like brake lines are (but I presume the flare is not the same, it would have to be a "female" format to seal on the adapter). I have just come back inside after performing said "loosen and then tighten again" action on the ACV adapter from the video. What I wonder is whether it's possible at this point that I could have work hardening in the line such that it isn't sealing correctly. When I have it loose I can definitely wiggle things around, and did, hoping that it would seat ever so slightly differently this time. Now to do the same on the other side. I don't think I'll even try to start the car again before checking out all the things recommended with regard to the starter. My gut is telling me the leaks will still be there and I'd like to hope I can have at least one success here! Brian | ||
Brian Vogel Grand Master Username: guyslp Post Number: 463 Registered: 6-2009 |
Now, in the "a picture is worth a thousand words" department, here are two:  In this photo I've identified what I believe to be the starter solenoid, which is mounted on the outside of the starter itself. Of course, since I have not as yet been able to find the starter in either the workshop or illustrated parts manual, I'm probably wrong. If so, someone tell me what that thing is. 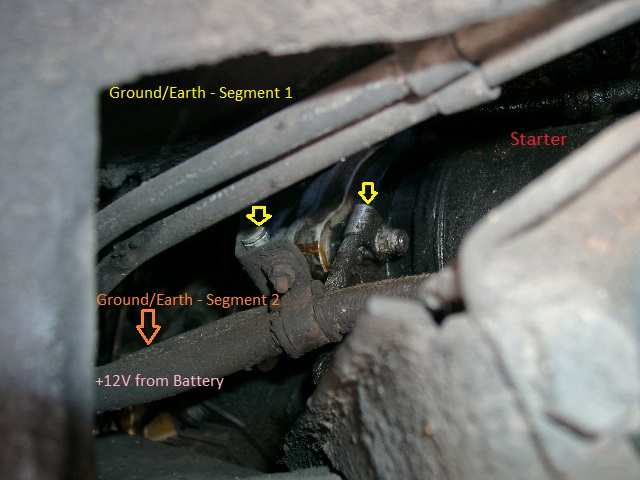 The ground/earth arrangement here is the most bizarre multi-segment setup I've ever seen. There is a short segment that goes from one of the motor case bolts to a bracket that surrounds what I believe is the main +12V battery cable. At this bracket, another of the more conventional braided cables is connected and then runs back toward the chassis atop the battery cable. You can't see where it connects to the chassis in this picture. My sense is that this particular arrangement is, shall we say, fraught with steps that could cause suboptimal performance or failure. Have I identified everything correctly? If so, would it make sense to purchase a new, additional earthing/grounding strap and run it directly from the nut that holds segment 1 on to the motor to the chassis? Brian | ||
Brian Vogel Grand Master Username: guyslp Post Number: 464 Registered: 6-2009 |
Well, you can scratch a bit of that last post related to the second picture. This car has so many adventures related to having been converted from RHD to LHD and I try to photograph and make guesses before actually touching anything. The somewhat bright thing pointed to by the yellow arrow in the center of the above photo turns out to be a mystery object, about which more, later. It was cradled in a bracket that obviously at one time held the battery cable to something but that is now an orphan on the cable itself. Here is a picture of the cleaned up earth/ground strap at the starter end. After cleaning up the ends of the strap it tested between 0.0 and 0.3 for resistance (always starting at 0.0 - my multimeter will do this 0.0 to 0.3 ohms thing for a solid block of copper). The chassis area was cleaned up as well and everything coated with NoOxId grease before being put back together. 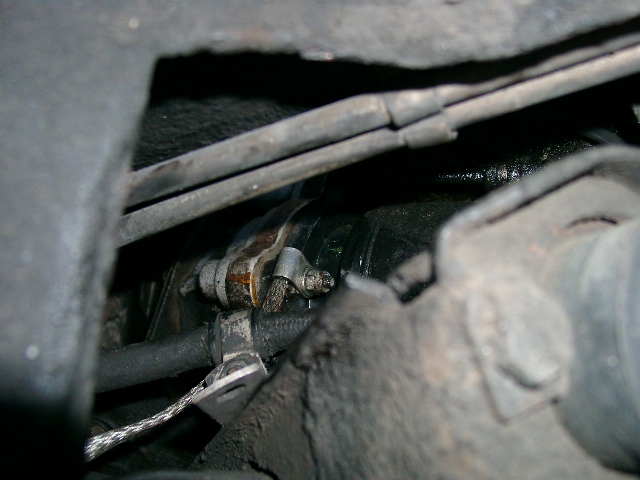 She cranked and started instantly when I turned the key after the clean-up. She has not been doing that for some time now, so I think the culprit (the common culprit of bad earth/ground) has been found. On the left side the hydraulic leak has been entirely stopped and on the right (video side) I've reduced it to almost nothing. I gave one more nip to the line nut but decided not to test again this evening. I'd rather wait until tomorrow for another disappointment. I'm just tickled about the other side and the starter!. Now, on to the mystery object. Here are three photos, one side view and two from each end. This thing looks virtually new and I'm presuming it was one of those "dropped parts that went into the \i(black hole}" for some previous mechanic. the black bits you see on each end appear to be rubber. If anyone recognizes what this is, or is a part of, please share. 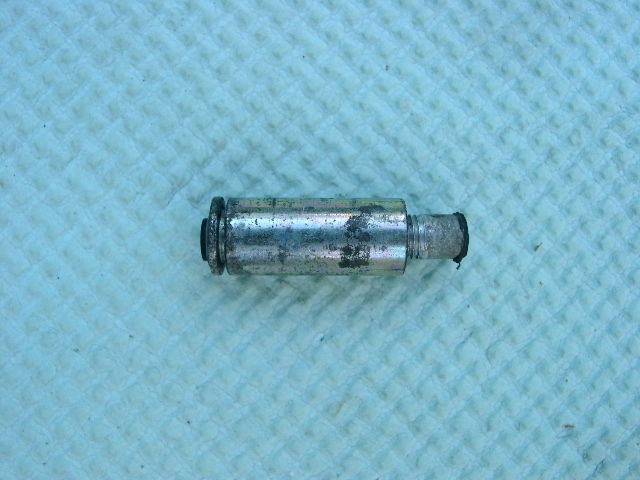  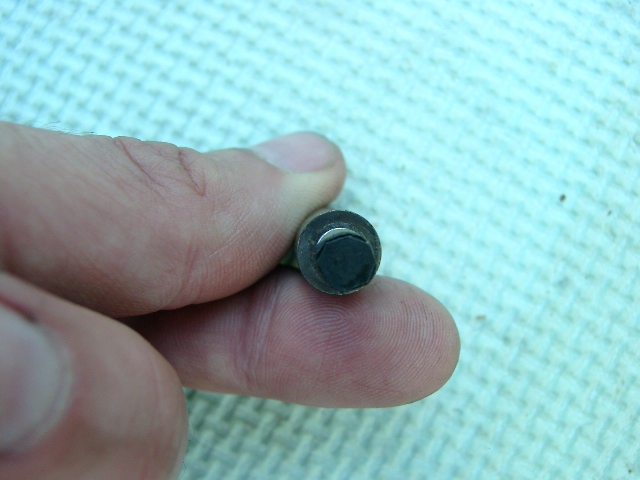 Last, but certainly not least, I offer my sincerest thanks to all who have so kindly offered support, help, and theories with regard to troubleshooting these, and other, problems. Your assistance is valued more than I can possibly say. Brian | ||
David Gore Moderator Username: david_gore Post Number: 1303 Registered: 4-2003 |
Hi Paul, Your problem with the mobile is probably similar to mine; large fingers, small buttons and problems with the time delay for multiple pressings of a key to get the letter you want. David who absolutely refuses to use one of these infernal devices until they include voice recognition so you can dictate your message. Brian, On DRH14434, the earthing strap was a single one-piece braided conductor similar to yours but was not restrained in any way, just floated free between the block and chassis. I suspect engine vibration over the years may have fractured some of the wires in the braid reducing its current carrying capacity which will not show up in a low-current resistance test. If you can get a jumper lead clip onto the mounting bolt and the other clip onto a good chassis earth point, see if this improves the reliability of the starter motor. Chris's suggestion re the solenoid contacts is also very relevant as it reminded me of my similar experience with the Corniche, the contacts were badly worn beyond reclamation and I ended up buying a length of copper flat bar and fabricating new contacts to fix the problem. As far as the leaking fitting goes, your information makes me think Geoff is on the right track with a possible deformed flare from misalignment during reassembly flattening one side of the flare. | ||
Brian Vogel Grand Master Username: guyslp Post Number: 467 Registered: 6-2009 |
OK, the leaking fitting . . . This morning's test required the engine to be running for somewhere in the area of 3 minutes or more before the very slightest "ooze" for lack of a better term began at this fitting. I can't even begin to describe how slow it is. What I want to know is whether this is something that might "self resolve" after a couple of thermal cycles? I'm certainly not worried that I've got gushers of fluid coming out and will have any chance of losing my brakes. I am worried that I am almost certainly at or beyond the suggested torque tightening figures and would prefer not to go tighter or undo/redo again if there is any reason to believe this may work itself out. I seem to recall someone, somewhere suggesting that these micro-leaks sometimes do stop after you've given everything a chance to get to full operating temperature and cool off a couple of times. However, I realize this could be wishful thinking. Does anyone have experience with this theory and how it works out in practice? On a related note, is it possible to anneal the flare on this pipe (once disconnected, of course) in situ? I still wonder if work hardening could be at play here, particularly if there is some very tiny deformity that I induced somewhere along the way. Brian | ||
Geoff Wootton Prolific User Username: dounraey Post Number: 231 Registered: 5-2012 |
Brian I personally would drive the car for a while to see if it seals itself. I'd just keep a very close check on the fluid levels and for any increase in the rate of dripping under the car. Your other circuit is ok and your ACV pressure switches are working. There is no risk for someone like yourself who is well in tune with the mechanicals of your car. Could I ask if you are using two wrenches when tightening the joint? Before a ton of criticism descends on me, I should say I am well aware the adapter needs to be fully tightened first and then the pipe nut tightened on top whilst holding the adapter with a second wrench. Failure to do so will likely twist the pipe and cause a split in it. However, when this joint is already fully tightened, the temptation may be to use just one wrench, perhaps due to access problems, knowing that the flex in the pipe will be sufficient to allow the very small movement of additional tightening on an already tight joint. If so, some of the force of the additional tightening may be directing itself on the crush washer of the adapter, rather than the flair joint. Just a thought. On a related note, I believe I have finally cured the leak on my accumulators/ACVs, caused by the wrong size O-rings being supplied in the re-conditioning kit. As someone who does not have an engineering background I assumed that an O-ring of nominal size (say) 7/8" x 1/8" would have precise measurements of 0.875" and .125". I did not realise the nominal sizes were merely to identify the O-ring and that the precise dimensions are very different. The AS568A standard for 1/8" is 0.139", not 0,125" for example. The kits I used for the accumulator and ACVs contained O-rings of the correct nominal sizes, but did not conform to the AS568A standard. The accumulator sphere to ACV O-ring was 0.118" as were the 3 ACV bobbin O-rings. 20 thou difference does not sound much but it is this 20 thou of O-ring that prevents your expensive RR363 from being pumped out onto the garage floor. The situation in practice was worse than this as I got a grace period of a few thousand miles before the undersize O-rings failed. In future whenever removing an O-ring from anywhere on the car I will check the nominal size of the ring and then check the replacement conforms to the AS568A standard. The only benefit of having to remove and refit the accumulators three times is I can now remove an accumulaor from a Silver Shadow in just 45 minutes (3 hours if you include the coffee breaks). As a result of these leaks, I now have 10, litre bottles of used RR363 awaiting disposal. 300 bucks worth!! I have read the discussions on KAC363 and OMAR363 and was swayed by David's argument that if we all stop using RR363 then Castrol will stop manufacturing it. This argument wears a bit thin however when your brake fluid bill exceeds your petrol bill. So help me, if another leak appears within the next few months I'm going to take a trip down to the local pharmacy and buy a gallon of castor oil. Geoff | ||
Jeff Young Prolific User Username: jeyjey Post Number: 168 Registered: 10-2010 |
Brian, If the leak doesn't resolve itself, you might consider a flare seal. I don't know if the sizing is right, as I've only used them on a Formula Ford, but it's worth looking in to. https://www.pegasusautoracing.com/productselection.asp?Product=3202 Cheers, Jeff | ||
Brian Vogel Grand Master Username: guyslp Post Number: 475 Registered: 6-2009 |
Jeff, Thanks. I will have to wait to see if things "settle in" but I would definitely be willing to try these as opposed to going through the hell and expense of new parts. The *%$#@! aluminum crush washer that's used under the adapter fitting costs around $20 from Crewe Original here. After buying two I went to my local machinist and had 10 custom machined for less than the cost of one. I dread to think what either the adapter itself or the steel pipe between pump and adapter cost, and at the moment I'm not inclined to ask!! Looking at the fittings shown on the webpage you referred me to it makes me wonder if the adapter itself is some "dirt common" fitting that could be sourced virtually anywhere. It seems highly unlikely that Crewe would "boutique engineer" something like this. If anyone happens to know the correct AN number for the adapter nipple (or knows what the "generic" spec for this adapter fitting is) please share. That's another tidbit for me to file away for future reference. Brian | ||
Randy Roberson Prolific User Username: wascator Post Number: 132 Registered: 5-2009 |
Agree with Jeff about the flare seals. I almost resorted to these but was able to get the adaptor on my car to stop leaking after removing the tube and polishing the flare with a pencil eraser and abrasive. I think this may be a 37 degree or AN flare, not certain. I know the tubes on my Car were aircraft or AN fittings: both accumulators on the B-side, though. Don't get discouraged; remember we are not only maintaining, we are starting with an old car, and we spend a lot of time and effort catching up maintenance and repairing things which only break after 40 or so years. Once you fix it, chances are it will stay fixed a long time if it is right. Make it a goal to make the Car a little better every time you work on it, even if it is only cleaning a small corner of the engine compartment. You will be pleased with your efforts. Stop when it stops being fun or interesting and save something for the next time. | ||
Brian Vogel Grand Master Username: guyslp Post Number: 478 Registered: 6-2009 |
Randy, Thanks for the words of encouragement. I really do try to remember that I should walk away when I get really frustrated and come back later. I think at this point I'm getting more frustrated because I want to get things to "where I want them" in order to sell the car in good conscience. I could not even consider selling this car with the brakes and hydraulics in the condition they were in when I became her custodian. Today I decided to tackle the low coolant amplifier and am reasonably confident that I will have fixed that. Unfortunately, I've also had an unexpected, one-time, "Gearbox Fault" on my Jaguar that appeared last Wednesday and has not recurred since. I had to take it to our local expert this evening and when they did the "dealer style" code reading on the car it had *no* stored powertrain codes! I can say that there have been many occasions when these cars stop being fun, at least temporarily, but they've never ceased to hold my interest. I sometimes believe buying one SY era Rolls-Royce, let alone two, was a way to throw myself into the life of the ancient Chinese curse, "May you have an interesting life." Brian | ||
Geoff Wootton Grand Master Username: dounraey Post Number: 508 Registered: 5-2012 |
In an earlier entry, Chris Browne said he dismantled the solenoid assembly on a starter motor to clean the electrical contacts. When I dissembled my starter motor I could see no obvious way of removing the end-cap of the solenoid to access the internal contacts. Does this cap just pull off? I did not try this as I did not want to force the part and damage it. I include a photo below with a pointer to the part in question. 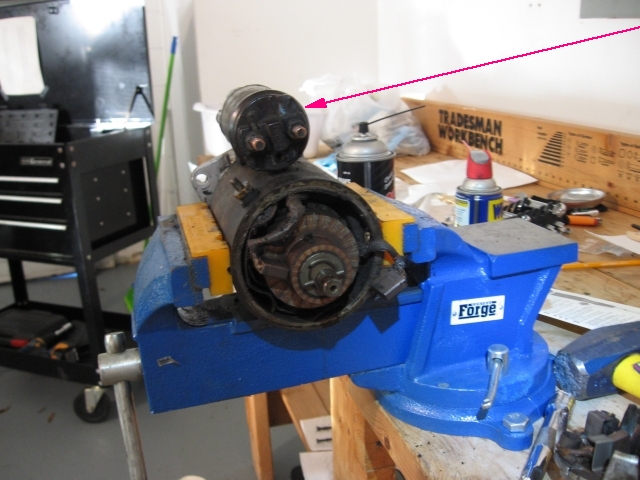 I'd be grateful for any help on this. Geoff | ||
Chris Browne Prolific User Username: chrisb Post Number: 161 Registered: 2-2010 |
Hello Geoff, I have attached several photographs of the starter motor I worked on. It was from a 1970 Shadow so I am not sure if the motor fitted to your car is the same model. The solenoid did not separate at the Bakelite cap but much further down the casing. The large copper contact, which was the cause of the problem, is clearly visible. From memory, this was reversable to present a clean face to the contacts but it is also thick enough to file the wear marks flat and re-use the same side.   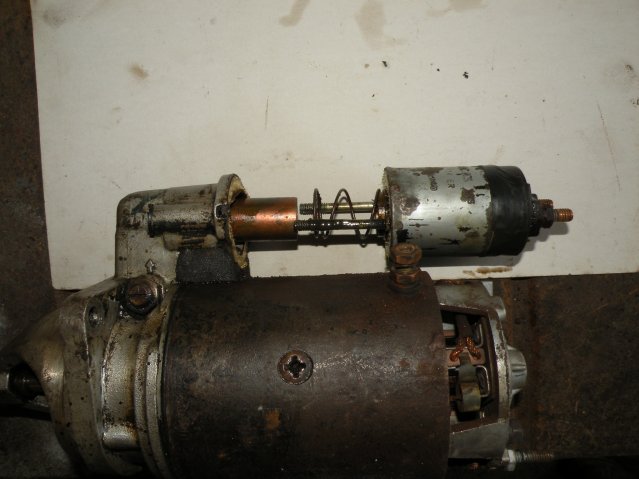   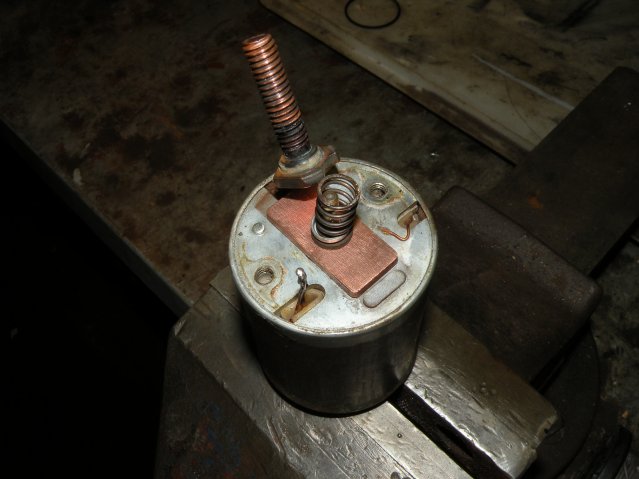 Hope these help. Kind regards, Chris | ||
Geoff Wootton Grand Master Username: dounraey Post Number: 509 Registered: 5-2012 |
Hi Chris All is now clear. My starter motor, off a 74 SY1 is the same. Thanks so much for putting up the pics. I really appreciate it. Geoff | ||
Brian Vogel Grand Master Username: guyslp Post Number: 1082 Registered: 6-2009 |
Chris, Another set of thanks from me. On my list of "when I get around to it" tasks is rehabilitating the starter I removed from SRH33576 to have as a spare. These photos go a long way toward helping with that process. Brian | ||
Chris Browne Prolific User Username: chrisb Post Number: 162 Registered: 2-2010 |
Geoff and Brian, I have learned a lot from this forum and am glad to pass things on when I have them. Kind regards, Chris | ||
Geoff Wootton Grand Master Username: dounraey Post Number: 511 Registered: 5-2012 |
Chris Can you remember if you had to desolder the external connections on your starter solenoid to remove the end-cap. I can see no other way in on mine. I've arrowed the connections that appear to need desoldering on the 3rd pic. 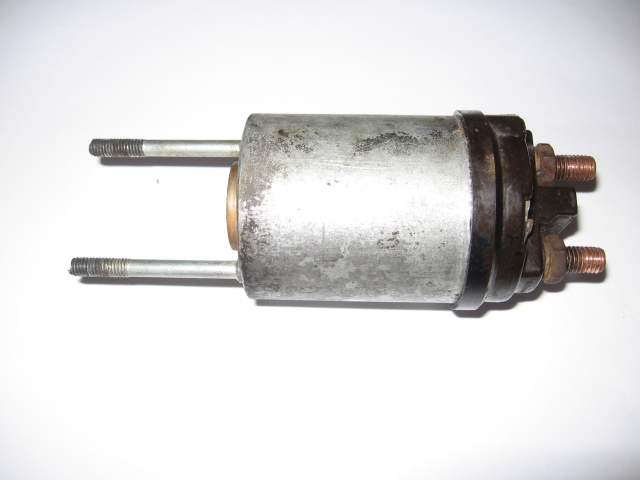 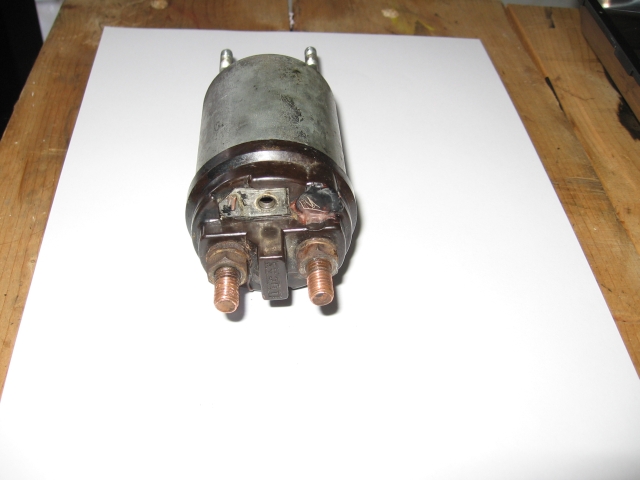 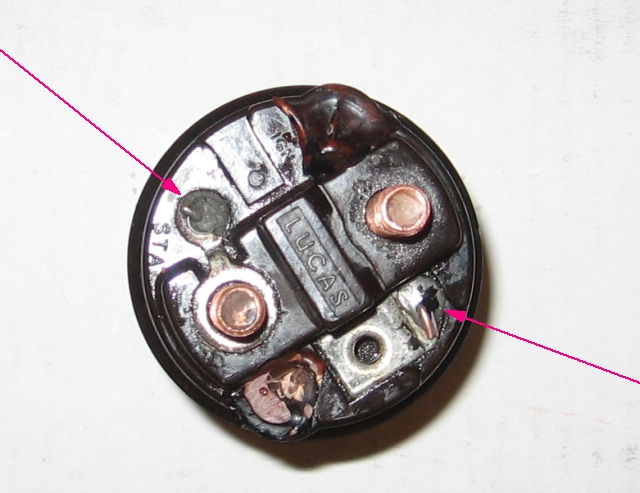 Geoff | ||
Chris Browne Prolific User Username: chrisb Post Number: 163 Registered: 2-2010 |
Hello Geoff, Yes I did. Easy to desolder and to resolder afterwards. You can see the desoldered wires on the last three photos I posted. Sorry I didn't make that clear. Kind regards, Chris | ||
Geoff Wootton Grand Master Username: dounraey Post Number: 512 Registered: 5-2012 |
Chris Many thanks again. Off to dig out my soldering iron and desoldering tool. Geoff | ||
Bob uk Unregistered guest Posted From: 94.197.122.80 |
The blobs of solder are the correct ones. This job is well worth the effort because that solenoid is no longer listed and expensive. However the solenoid may be used on other Lucas starters if a solenoid is total scrap. These starters are very simple machines. The switch that connects the motor is very repairable even if one has to make the bits. To test the starter try to stop the pinion with a piece of wood. The pinion should rip the wood up. Never run starter unless it's in a vice because it can jump up off the bench. Excellent photos. (Message approved by david_gore) | ||
Geoff Wootton Grand Master Username: dounraey Post Number: 513 Registered: 5-2012 |
Hi Folks I have now removed the cap from the starter solenoid. It is held in place by two setscrews that are buried deep beneath some sealant that has to be dug out to access the screws. You can see the sealant in the previous photo. The next photo is the solenoid end cover with the sealant removed. 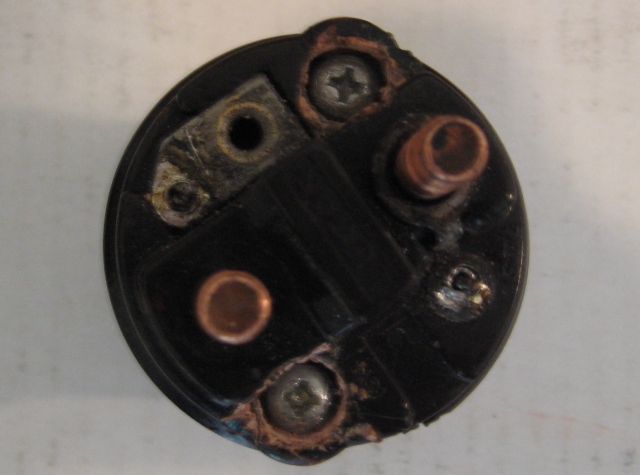 Does anyone know what sealant was used, or what would be a good substitute now? It is obviously used to stop oil/water/road dirt etc getting in past the setscrews. I am thinking maybe an O ring on each setscrew may be enough. Any ideas? The other thing I am thinking is putting a short length of inner tube over the barrel of the solenoid to give an extra shield against the elements. Any suggestions on how to make this unit super sealed will be gratefully received. Here is a photo of the solenoid switch. No wonder the car used to click but not turn the engine. It's amazing it used to start at all. 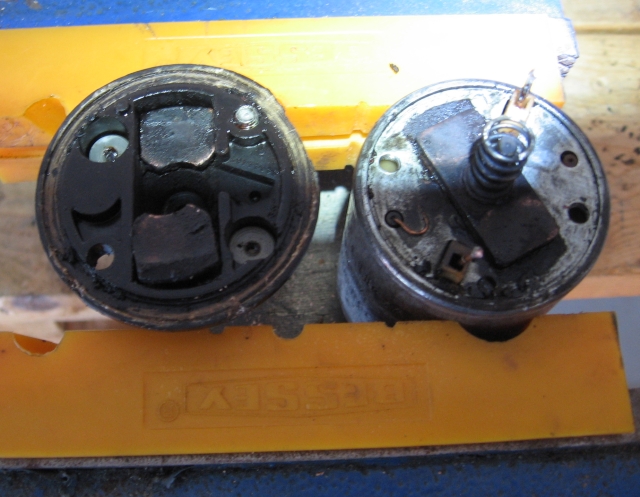 Geoff | ||
Brian Vogel Grand Master Username: guyslp Post Number: 1083 Registered: 6-2009 |
Geoff, Based on your earlier photo what was used over those screw heads looks for all the world like sealing wax. I'll bet it took quite a bit of digging to get it out!! One thing you could use, provided you've completely cleaned the surfaces of all grease and dirt, would be clear silicone or latex-water-based (e.g., DAP or PolySeamSeal) sealant. The latter takes longer to dry, but is easier to apply and clean up, and has been oil resistant in another application where I've used it where exposure is almost constant. A thin smear of this around where the plastic cap mates to the metal cylinder had ought to work very well for keeping out the kind of dirt that's in your photos as well (unless it happens to be a lot of carbon from arcing over the years). Another option is Duck Brand Waterproofing Tape (see here for availability at your local Wal-Mart). Although the stuff is not designed for "outdoor" and is not UV resistant it's been working just fine (and far better than the tape SU used originally) to seal the end dust caps on my fuel pump rebuild. Heaven knows that application, and this one, aren't subject to very much ambient light. The stuff grips like iron, almost immediately, and is quite resistant to removal. If you can't stand the bright "aluminum foil" exterior, though, then this option is not for you. Brian | ||
Geoff Wootton Grand Master Username: dounraey Post Number: 514 Registered: 5-2012 |
Hi Brian Yes, the sealing wax did take some removing. I thought I'd put this up as I spent quite a while trying to figure out whether the bakelite end cap was just bonded to the solenoid or if there were some hidden screws. It was not obvious that the blobs of sealing wax were in fact concealing the recessed screws. Re: sealing wax, I think your guess is correct. I've checked out the web and find sealing wax is only available now mail order, so I shall use one of the permatex sealants. I will go with the duck tape. There is an O-ring to seal the unit but I like the idea of duck tape covered with a short length of inner tube to hopefully form a better seal than before. Thanks for the suggestions. Geoff | ||
Chris Browne Prolific User Username: chrisb Post Number: 164 Registered: 2-2010 |
Hello Geoff, Glad you managed to get it apart without damage. I'm sure you will notice a massive difference in the performance of the motor when you have cleaned up the copper contacts. Kind regards, Chris | ||
Geoff Wootton Grand Master Username: dounraey Post Number: 515 Registered: 5-2012 |
Hi Chris Thanks for your help in this. As I mentioned earlier, having seen the state of the contacts inside I'm surprised the starter motor turned at all. It was pleasing to see that the brushes were in good condition. Hopefully this will cure the problem of the "clicking" starter motor and I will be able to start the car each time without having my fingers crossed. Best Regards Geoff. | ||
Geoff Wootton Grand Master Username: dounraey Post Number: 522 Registered: 5-2012 |
Hi Folks I still have the clicking starter fault. This is where on turning the ignition key there is a click of the solenoid, but the starter motor will not crank the engine. The engine always eventually starts, but is taking 2 or 3 attempts. So, given that I've just removed, dismantled, checked and cleaned the starter motor, the fault must likely be either a bad earth wire or the power supply lead from the battery. I will be investigating this. The photo below shows my starter motor before I removed it. Does anyone know if there should be an earth wire attached to the end cover, arrowed in the photo: 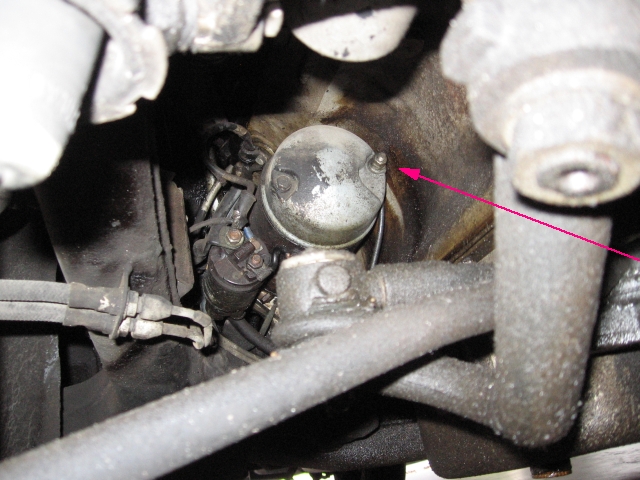 There was no earth wire here, which is strange given that there are two nuts and a lock washer which implies there should be an earthing strap. Could this have been left off by a previous owner? If there should be an earth wire here, where does the other end attach to - the engine or the bodywork? There is an earth wire that runs from the "6 o'clock" starter motor bolt to the engine, not visible in this photo, so the starter motor appears to be earthed, but does it require the additional earthing strap. Geoff | ||
Geoff Wootton Grand Master Username: dounraey Post Number: 523 Registered: 5-2012 |
Here's a closeup of the end cover. 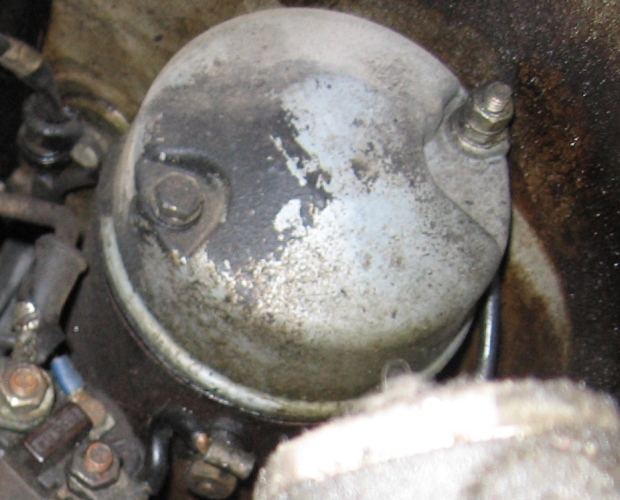 It does look as if an earthing strap should be present here, otherwise Lucas would have just used another bolt. Geoff | ||
richard george yeaman Prolific User Username: richyrich Post Number: 230 Registered: 4-2012 |
Hi Geoff it looks like it to me it surely wouldn't do any harm to try it and it wouldn't take long to do it. Richard. | ||
Brian Vogel Grand Master Username: guyslp Post Number: 1094 Registered: 6-2009 |
Geoff, There is definitely a ground/earth strap connected to the starter. You can see back up at the beginning of this thread where the connection is where the starter mates to the rest of the car on SRH33576 (although I was confused about what was what when I posted the photo). The other end connected to a flat spot on the chassis. I can definitely snap you a photo of where it is on the chassis if you'd like one since that end of the ground strap is in the same spot even with the new gear reduction starter. The end that connects to the new starter is also pretty much in the same location as it was. Brian | ||
Geoff Wootton Grand Master Username: dounraey Post Number: 525 Registered: 5-2012 |
Richard - Agreed - I am going to fit an additional strap. Brian - The strap shown in the first photo is the same on my car. The end cover on the SY2 is different to the SY1. I have checked my repair log photos and can see the this "terminal" attaches internally to the base plate casting that houses the brushes. I can see that the mating surfaces to the casing of the starter motor may not be electrically perfect, hence the need for the external strap. I intend to run a strap to the one already present on the car, as depicted in the top photo. As always Brian, thanks for the help. Geoff | ||
Bob uk Unregistered guest Posted From: 94.197.122.90 |
To check engine earth straps. The chances of there being a bad connection between the starter and the engine with correctly torqued mounting bolts is zero. The earth strap just needs to go from an engine or gearbox bolt to the chassis. Favourite place is from a bell housing bolt to the chassis not subframe. To test connect digital voltmeter between the engine and chassis and operate the starter. any thing more than 0.0001 volts and the earth is bad. To further check connect engine to earth with a fat jump lead. To check earth cut out switch in boot connect volt meter across the switch and operate the starter. Any reading over 0.002 volts means the switch needs a strip down and the contacts cleaned. Also check the earth bonding to various subframes and crossmembers. note the engine earth strap must go to the car body and not the subframes. Another place to fit an earth is from engine to suspension turret. To make earth straps get braid solder ends up for about 3/4" and drill hole. Use brass washers. The body earth must be bare metal. Use petroleum jelly to protect. (Message approved by david_gore) | ||
Paul Yorke Grand Master Username: paul_yorke Post Number: 1298 Registered: 6-2006 |
To check it, lay under the car ready to bridge the two large solenoid terminals with a substantial piece of metal ( it may get very hot) Get an assistant to turn the key so you get the clunk but without the starter turning. Once clunked, keep the key in the start position and bridge out the large terminals. If the starter turns, most likely the problem is in the solenoid. Sods law dictates that the car will start first time every time while you are ready to bridge the terminals . . . so plan to go off for a cup of tea whilst the car relaxes and them sneak back quietly and try again. | ||
Geoff Wootton Grand Master Username: dounraey Post Number: 526 Registered: 5-2012 |
Bob and Paul - many thanks - I appreciate the advice. I have checked the earth strap that runs from the starter motor. I've cleaned both ends, one connected to the starter motor mounting bolt and the other that is bolted to the chassis side of the gearbox mount. To no avail. I will check the connections with a voltmeter as specified by Bob. I will also try Paul's suggestion of shorting the large solenoid terminals with an assistant operating the starter switch. I think however I may have made a mistake in assessing the starter motor when it was off the car. I had it firmly held in a vice and connected it up to the battery using 14 gauge wires as I did not have any jump leads. The solenoid clicked each time and the motor turned slowly. Needless to say the wires very quickly got hot. I assumed the slow speed of the motor was due to the resistance of the wires, however I've been told that the motor should run at full speed even with the light gauge wires I used, as it was under no load. Is this correct? Geoff. | ||
Bob uk Unregistered guest Posted From: 94.197.122.80 |
The chassis side of the engine mounting on the converter housing is wrong. Because the subframes is rubber mounted. The earth strap must go to the chassis proper. Unless the subframe is properly earthed with another earth strap. Note the subframes are earth bonded but with light earth straps. The earth strap to carry the starter load needs to be 1/2 wide at least. These are available from car parts shops. About �3. Various lengths. To check with meter put one lead on the engine and the other on the suspension turret. Good connection important. The solenoid is connected in series with the motor. When energised the motor turns slow. Then the main switch at the terminal end closes and full power goes to the motor. This happens very fast and is not obvious by observasion. Using a pair of insulated pliers bridge the two large terminals on the solenoid the motor should run very fast. It won't engage because the solenoid coil is not energised. The size of the leads used to test were a bit small and the heat is a good indication that the motor is trying to draw a lot of amps. I think the motor bit is probably ok. I know it's only 12 volts but 12 volts at 200 plus amps is arc welding territory so be 'king careful. How pre engaged starters work seems obvious but it is still worth reading the how starters work bit. Because few understand about solenoid operation and holding current. Syptoms of bad engine earth for all cars. throttle or choke cables get hot or even spark when starter is used. Funny traces on oscilloscopes. Charging problems and voltage surges. Ford as usual are different Ford prefers to earth the battery direct to the engine then a small earth to the chassis. When the little wire breaks or is not tefitted all sorts of wonderful electric faults happen such as indicators comming on with the headlights. Old starter cables from junkyard make reasonable jump leads but proper jump leads are �30, keep them safe and don't lend them to people. (Message approved by david_gore) | ||
richard george yeaman Prolific User Username: richyrich Post Number: 235 Registered: 4-2012 |
Hi Geoff I was wondering did you ever conclude what the actual fault was with your starter I have a friend who has an 1987 Silver Spur with the usual Click might help to know the outcome Thanks in advance. Richard. | ||
Geoff Wootton Grand Master Username: dounraey Post Number: 931 Registered: 5-2012 |
Richard, I'm sorry I missed your question. I will answer it belatedly. It may also have relevance to your recent question on the other thread. I was satisfied the brushes, commutator and solenoid switch were all ok, on the bench. When I put the unit back on the car I again got the clicking. I figured the problem on my starter motor must be with the windings. Rather than spend any more time in trying to repair the Lucas unit, I bought a new starter and fitted it. It is from Britishstarters.com. It's been on since late November 2014 (9 months) and has been perfect. Geoff | ||
richard george yeaman Grand Master Username: richyrich Post Number: 346 Registered: 4-2012 |
Geoff thank you for the reply I will reread a lot of these posts and see where to go next. Richard. | ||
ross kowalski Grand Master Username: cdfpw Post Number: 318 Registered: 11-2015 |
Gear starter going in. 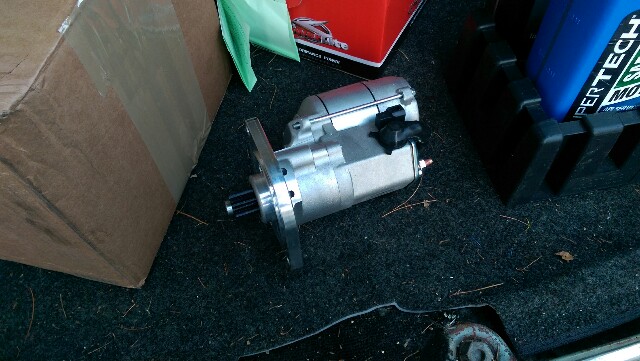 | ||
Patrick Ryan Grand Master Username: patrick_r Post Number: 1208 Registered: 4-2016 |
And save a good bit of weight. 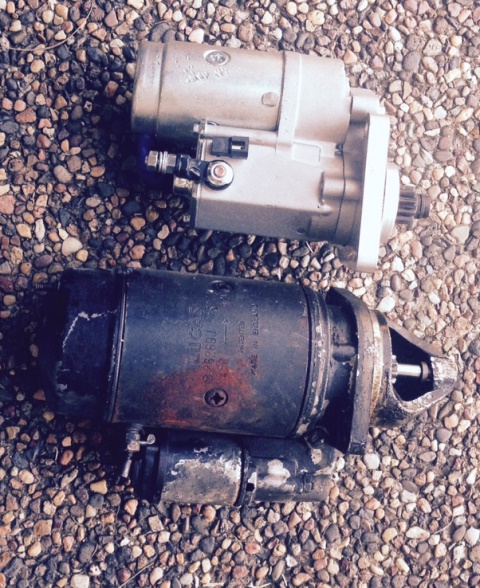 | ||
ross kowalski Grand Master Username: cdfpw Post Number: 321 Registered: 11-2015 |
Patrick, I was thinking less voltage drop and thus faster turning when cranking. But it has to be lighter as well. | ||
ross kowalski Grand Master Username: cdfpw Post Number: 343 Registered: 11-2015 |
Finally put in the new gear starter this morning. results | ||
ross kowalski Grand Master Username: cdfpw Post Number: 344 Registered: 11-2015 |
The new starter turns the car over like a top. It is a straight forward job with the only special tool a 24 inch 3/8 drive extension to get at the upper starter bolt. I bought the starter from Holden parts. Money very well spent. The starter that was in it. 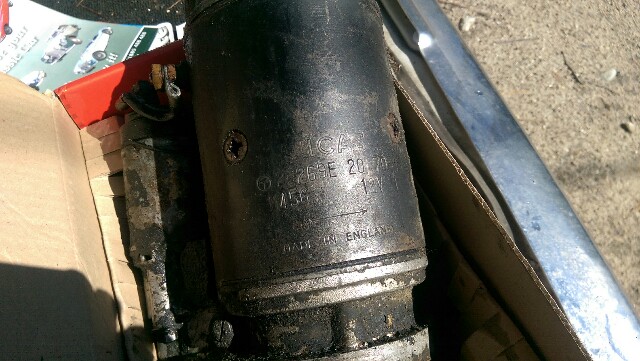 New and old comparison.  Scrungified starter in situ. Oil washes off in seconds broken rusty bolts take hours.  Ooops, looks like my weep holes are indicating a o-ring failure. I will schedule an engine pull, let's see.... hmmm..... maybe.... ... never? 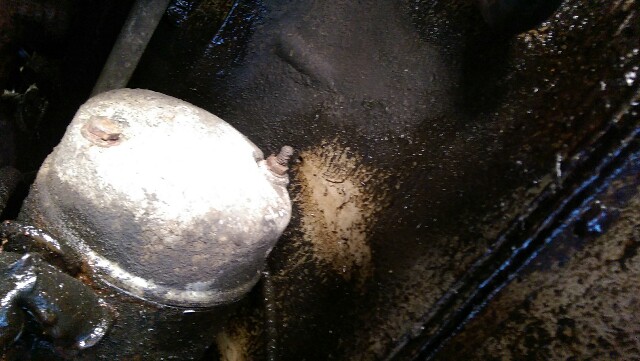 | ||
ross kowalski Grand Master Username: cdfpw Post Number: 346 Registered: 11-2015 |
Here is a link to the starter I used. https://www.holden.co.uk/displayproduct.asp?pCode=081.268 | ||
richard george yeaman Grand Master Username: richyrich Post Number: 731 Registered: 4-2012 |
Ross thank you for the link, will put it on my list. Richard. | ||
Brian Vogel Grand Master Username: guyslp Post Number: 2246 Registered: 6-2009 |
Ross, Was there any information regarding the HP rating of this particular starter unit? I installed one of the gear reduction starters from BritishStarters.com, which is rated at 1.9HP, in SRH33576 and it's been working like a champ. It was once claimed: They are only 1.9HP and have a large gear reduction to compensate. They barely crank the first time on many motors (even with a new 750CCA battery), and are generally 30% undersized for the job. This applies especially to 9:1 compression SYs, but even 8:1 SYs and SZs struggle badly. A 7.3:1 motor will no doubt crank more easily, but the starter output speed will still endanger the ring gear. When they do crank, the starter whizzes nicely but the motor itself is cranking at only about 2/3 of the safe speed. Once the engine starts the motor speed overtakes the starter speed far too soon and thrashes the ring gear. You can hear it on any Crewe V8 with these slow starters, and it is in no way acceptable. Hence, as soon as the motor fires you must release the key, far earlier than with any other car, in fear of stripping the ring gear. None of the above has exhibited itself in practice and I'm curious as to what HP rating other vendors are using for this starter in this application. It appears that there is a different one for the cars that have the later 4-speed transmission, but I have no idea what the difference is between the starter used for the 3-speed versus the later 4-speed transmissions. It would be interesting to know the specs on the gear reduction starters being marketed for the different eras of cars. Brian | ||
Mark Aldridge Grand Master Username: mark_aldridge Post Number: 419 Registered: 10-2008 |
Brian, is it necessary to check the depth of engagement of the pinion into the ring gear ? I recently replaced the Lucas unit on my 1983 Mulsanne with a recon Lucas and there appears no difference in cranking speed between this and the original Nippon geared unit on my 1987 Bentley8. Mark | ||
Brian Vogel Grand Master Username: guyslp Post Number: 2247 Registered: 6-2009 |
Mark, I can't answer your question with any certainty. The same post that contains the claim I quoted above states that the original Nippondenso units introduced with the 1987 model year were 2.6HP and that later these were superseded by 3.2HP units. I would imagine that higher HP units would crank at a higher speed than the lower HP ones and that whatever Crewe put on as an OEM gear reduction starter would have closely matched the cranking characteristics of the original Lucas starters on the earlier cars. After all, the engine "DNA" on these cars remains the same even if there was some evolution over the years. Brian | ||
ross kowalski Grand Master Username: cdfpw Post Number: 347 Registered: 11-2015 |
Brian, The starter is a Powerlite RAC 421 http://www.powerlite-units.com/products/stater-motors/?page=5. As to the paragraph, I'm not really sure what that's really about, but I can say that 1.4kw with whatever gear reduction Powerlite gave it is fine. This electric starter on a 6.75L 1970 shadow turns over fast, the engine also turns over fast and without a lot of voltage drop. If anything happens to the stater I will definitely report back. | ||
Brian Vogel Grand Master Username: guyslp Post Number: 2248 Registered: 6-2009 |
Ross, Thanks. 1.4kW translates to approximately 1.9HP, so it's the same starter from the aspect of specifications to the one I have from BritishStarters.com. Your experience with your 1970 Shadow is the same as mine with my 1978 Shadow II. My engine doesn't turn over fast, even if I make sure the SU pump has stopped ticking, if it's been sitting for any period of time but turns over almost instantly if it's been driven even somewhat recently. I don't think I've ever cranked for more than 30 seconds if the car has been sitting for far longer than I'd like. If I've been actively driving it it takes a lot less time that that. If it's been driven during the day and I need to restart it it turns over almost as soon as I turn the key. I remain extremely pleased with this starter when compared against the original Lucas unit as it aged. I also love the fact that it will crank if the battery has drained to a level that would never get the Lucas starter to even make a try. Brian | ||
Alan Dibley Experienced User Username: alsdibley Post Number: 50 Registered: 10-2009 |
I have a theory that the long cranking needed after the engine has not been started for a long time is because the hydraulic tappets are drained, so the valves don't open for long and then not much. It takes time for engine oil pressure to get the tappets to something like running condition. Any other opinions? It is a useless thing to wonder about, 'cos there's no way to cure it, but.... Alan D. | ||
Randy Roberson Grand Master Username: wascator Post Number: 718 Registered: 5-2009 |
I switched the Wraith II to Pertronix last weekend. It had been down without a start for a week prior to that. When I finished the installation I followed my usual start routine: key on, push accelerator pedal and release while giving pump a few seconds to ensure filling of the carbs, then crank. She started in a fraction of a second, likely within a couple revolutions, and idled very nicely. It always starts quickly when warm, but I was surprised by this. That's what cast suspicion on the condition of my OPUS system: occasional starting difficulty, mostly but not always when the engine was warm. | ||
Omar M. Shams Grand Master Username: omar Post Number: 1163 Registered: 4-2009 |
I concur with your theory Alan | ||
Jeff Young Grand Master Username: jeyjey Post Number: 337 Registered: 10-2010 |
Another common cause is some of the fuel having evaporated out of the carburettor bowls, leaving the mixture lean. | ||
Randy Roberson Grand Master Username: wascator Post Number: 721 Registered: 5-2009 |
Hence allowing the pump to fill the bowls before cranking. This was an issue with the old Buick straight eight engines and it caused long cranking times. It had a mechanical fuel pump, though. It should not be an issue on Rolls-Royces with electric pumps, IMO. | ||
Jeff Young Grand Master Username: jeyjey Post Number: 339 Registered: 10-2010 |
D'oh. Forgot about the electric fuel pumps. (I'm used to this on my old Series Land Rover, but there it's a mechanical pump like the Buick.) Cheers, Jeff. | ||
ross kowalski Grand Master Username: cdfpw Post Number: 356 Registered: 11-2015 |
Alan, "It is a useless thing to wonder about, 'cos there's no way to cure it, but.... " start worrying | ||
Brian Vogel Grand Master Username: guyslp Post Number: 2259 Registered: 6-2009 |
Ross, Since cars have been living very long lives without these since, well, forever I'm still not worrying. The number of "interesting gadgets" that serve no real useful purpose in the automotive world is just huge. Solutions in search of any real problem . . . | ||
ross kowalski Grand Master Username: cdfpw Post Number: 372 Registered: 11-2015 |
Brian, While the pre-oiler probably does work, I'm not going to be buying one anytime soon. The geared starter is an amazing thing. I have been using it for a couple of weeks now and it is as good as it originally seemed. It turns over the 6.75 with ease and the car starts immediately. Hot starts, no problem. Cold starts, no problem. I couldn't be happier with this modification. It costs basically the same as the original starter and does the job way better. | ||
Patrick Ryan Grand Master Username: patrick_r Post Number: 1440 Registered: 4-2016 |
Well said Ross, They are a great starter, and a must modification if the old starter gives up. | ||
Brian Vogel Grand Master Username: guyslp Post Number: 2274 Registered: 6-2009 |
Ross, While I have no doubt the pre-oiler does what it says it does I do have a lot of doubt as to whether what it says it does is in any way necessary or that it extends the life of a car's engine in any way. I once owned one of the Jaguar cars with the timing chain tensioner issues and the problem had nothing to do with oil or the lack thereof, it had to do with the fact that the tensioners were made of a high-tech plastic that wasn't supposed to degrade with exposure to heat but did, and became quite brittle and fracture prone as a result. No amount of oil is going to fix that. Brian | ||
Patrick Francis Frequent User Username: jackpot Post Number: 80 Registered: 11-2016 |
Great thread guys, My starter is getting tired and will need looking at soon. Also Ross I like the "real" wing mirrors on your car in the before and after video. I have them on a 1965 Jag mk2 . Love the look of them, but curse them every time I get in the car and they are not aligned. I am sure this has been more than discussed in a thread somewhere, but Interesting how you can estimate a shadows age by the postion, shape, and number of wing mirrors. | ||
ross kowalski Grand Master Username: cdfpw Post Number: 376 Registered: 11-2015 |
Patrick F, I don't know if it shows in the video, but I put curved blind spot mirrors over mine so it really doesn't matter where they are pointed. | ||
ross kowalski Grand Master Username: cdfpw Post Number: 377 Registered: 11-2015 |
Brian, I've never retired an engine because of wear, so even if a preluber reduces wear by 100% I wouldn't be getting one. Prelubers probably do reduce wear on startup and would put oil to the tappets for quicker firing on a dry start. Now if a preluber could prevent me from turning up the boost on the Volvo or make me change oil filters at every oil change then maybe I would have a reason to get one. |