| Author | Message | ||||||
Bob uk Unregistered guest Posted From: 94.197.122.80 |
A while back I said compressed air in spheres could cause an explosion on contact with oil. Since then I have found out that the danger is caused by the compressed oxygen in compressed air. But because of the small size of the spheres it is very unlikely. In very large accumulators it is dangerous. AEC Route Master buses have a power hydraulic system similar to RR/Citroen. This has accumulators which are charged with nitrogen or compressed air. If using air the mechanics used a intensifier. This ran off a garage 80 psi compressor. The 80 psi worked a cylinder which worked a smaller cylinder. say a 6" dia cylinder and a 1" cylinder. The ratio produced air at 750 psi. The accumulators were charged to 650 psi. The reserve capacity was 20 pumps with 10 being time to recharge. The pump was belt driven from the gearbox input shaft. This meant that while stationary in gear the pump was not working. In neutral the pump worked. later years when Scania engines were fitted the pump was moved to the engine. The air compressor fitted to the engine runs the gearbox and not the brakes. So if anybody wants to design and build their own intensifier check out Route Master bus. To produce a 1000psi or 68 bar the high pressure pump needs a compression ratio of at least 68 to one, call it 100 to one to be safe. Also instead of a hp hose screw the sphere directly into the smaller high pressure cylinder. That way the spheres own non return valve is used as part of the hp cylinder. The only problem with air is damp. So if using scuba tanks make sure the charging station has good air dryers. Carbon dioxide or pub gas is maybe another source but a regulator will be a problem, because the pub regulators go to about 10 psi only. Lager at a 1000 psi would douse a egg vindoloo curry. (Message approved by david_gore) | ||||||
David Gore Moderator Username: david_gore Post Number: 1478 Registered: 4-2003 |
Bob, I am not certain if the elastomer used for the R-R/B accumulator diaphragms is compatible with Oxygen/Ozone if compressed air is used to replace the specified Nitrogen. Ozone exposure can degrade susceptible elastomers very quickly if the conditions are right. Something that needs to be very thoroughly investigated - Ozone is a particular concern as it causes problems with synthetic materials and it is present in small quantities in normal air and in higher concentrations in areas close to electrical devices that create sparks and/or ultraviolet light when in use. | ||||||
Bob uk Unregistered guest Posted From: 94.197.122.85 |
I did not think about the 1% of other stuff in air. I assumed that oxygen doesn't degraded rubber. But thinking about it, it does. Lots of stuff oxidizes. How long I have no idea. I personally don't muck about with spheres because I have two outfits locally that do spheres and charging, �15 for a charge up. Plus there is the legal implications of straying from the book. If my brakes fail and I crash into a home for disabled children in a ball of flames. I am because of my qualifications unable to say I thought it would be ok. However some have problems getting spheres charged due to expense and or local conditions. Therefore compressed air is better than nothing. However nitrogen is used by many industries and surely no matter where you are in the world there's nitrogen not far away. Most air fields have nitrogen for tyres and planes have accumulators every where. CO2 is not inert and something in the back of my mind tells me that CO2 has a problem as replacement for nitrogen. The Route Master bus brakes were designed by Lockheed in 1955 which is when the Citroen introduced the DS. The bus had no chassis just subframes each end. The body had stressed skin construction which was designed by the same guys who designed the spitfire fighter plane. A Route Master weighs 8 tons the modern replacement 12 tons. Rolls Royce of buses. (Message approved by david_gore) | ||||||
Jan Forrest Grand Master Username: got_one Post Number: 686 Registered: 1-2008 |
The problem with using CO2 in an accumulator is the simple fact that it can't normally be compressed much over 5 BAR without it starting to precipitate into its liquid phase. This can be overcome by carefully mixing it with argon as in the production of MIG welding shielding gas where pressures over 300 BAR are often used for certain cylinder sizes. The CO2 quantity in shielding gas can vary from 5% to around 30%, but why not just use pure argon as it's hardly any dearer and has the advantage of being truly inert. In the UK you can buy a cylinder rather than having to rent one from BOC or Air Products, but the deposits are high - usually well over �100 for a 20 litre cylinder - and refill prices can hit �40 for less than 150 BAR of gas. Thankfully the VeeDub community have managed to negotiate a deal with BOC (The Volkszone Deal) which means the first full cylinder of Argoshield Lite (20 litres of 95% argon, 5% CO2 @ 230 BAR) can be obtained for under �80 including the first year's cylinder rental. Pure argon is also available on the same deal for around �10 more. | ||||||
Chris Miller Prolific User Username: cjm51213 Post Number: 262 Registered: 5-2013 |
Hi Jan, I have a tank of Argon that I got for shielding gas and it turns out that pure Argon is only suitable for welding stainless steel. Pure Argon is too "cold", so the wire won't penetrate the work. So, since I had it and I wasn't using it, I asked the question, "Could Argon be used instead of Nitrogen?" My conclusion was, that it could, but the cost of Nitrogen was was the same, so why introduce the variables? There were two considerations that came from that discussion: First, believe it or not, Argon is less compatible with o-ring material in general than Nitrogen.
It is not clear to me what "compatible" means in this case. Degradation of the o-ring material? Or failure to form a tight seal? The first would be chemistry and the second physics, but irrespective of the cause, it is inconvenient, so should probably be avoided. Second, the Argon atom is bigger than the Nitrogen atom, but the Nitrogen molecule is much bigger than the Argon molecule, so it is harder to contain, although I have no idea how much more difficult Argon is than Nitrogen. We know that accumulators will loose their Nitrogen charge over time, so does this mean that that they would loose an Argon charge faster? How much faster? Dunno... Chris. | ||||||
Bob uk Unregistered guest Posted From: 94.197.122.88 |
Chris, get a bottle of CO2 and run it along side argon. I use a tee piece from screen washer system. That way any mix of argon CO2 is possible. (Message approved by david_gore) | ||||||
David Gore Moderator Username: david_gore Post Number: 1479 Registered: 4-2003 |
A good source of screen washer line components [elbows, T and Y pieces and non-return valves] is an aquarium or pet shop; I recently found sourcing a replacement non-return valve for my 4WD washer system from local auto supply shops virtually impossible until a Repco staff member suggested I go to the local pet shop who had exactly what I needed on the shelf at a very affordable price [$2 each]. | ||||||
Brian Vogel Grand Master Username: guyslp Post Number: 1084 Registered: 6-2009 |
To follow-up Mr. Gore's excellent suggestion, you can often find these items at garden centers that sell drip irrigation materials. The last time I needed Ts of that size I got them at either Lowes or Home Depot. At this time of year you've also got end of season clearances going on in this part of the world as well. I'd imagine the start of season stock up is going on in the southern hemisphere. Brian | ||||||
Jan Forrest Grand Master Username: got_one Post Number: 687 Registered: 1-2008 |
Argoshield and Argoshield Lite are different in that the 'full monty' includes 2% O2 as a wetting agent and to increase the heat of the arc. As implied both types aren't always as good for stainless MIG (and not at all for TIG) welding due to the carbon disassociating and entering the molten weld puddle turning it, partially, into carbon steel. However the use of the correct grade of welding wire can usually overcome this and produce a pretty good stainless weld bead. Obviously there's a lot more to it, but that might be better tackled in a dedicated thread. | ||||||
John Beech Frequent User Username: jbeech Post Number: 83 Registered: 10-2016 |
Robert Noel wrote in part . . . "If using air the mechanics used a intensifier. This ran off a garage 80 psi compressor. The 80 psi worked a cylinder which worked a smaller cylinder. Say a 6" dia cylinder and a 1" cylinder. The ratio produced air at 750 psi. The accumulators were charged to 650 psi. The reserve capacity was 20 pumps with 10 being time to recharge. . . . from this last sentence I made a wild leap. Tootsie has one brake light that comes on between 9-14 pumps, usually 11-12 strokes, but call it 10. The other light comes on between 17-24 pumps, usually 22-24 but let's call it 20. The leap? That the latter is at ~650psi and the former at ~300psi. I figure I'll know for sure as soon as I connect the nitrogen regulator because before opening the bottle the gauge will show the existing pressure. I've been wondering if there were any correlation between number of pumps to turn on the lights and pressure inside the accumulators. Thanks for posting this clue, Robert because it's an interesting data point. | ||||||
Christian S. Hansen Grand Master Username: enquiring_mind Post Number: 436 Registered: 4-2015 |
John... Others more experienced will certainly jump in but I submit that the "leap" you need to be making is that one brake system is borderline critical and the other is borderline hazardous. You have been warned. | ||||||
John Beech Frequent User Username: jbeech Post Number: 86 Registered: 10-2016 |
Hi Christian. Thank you for your concern. However, I have a receipt where accumulators were replaced in 2010 as part of a very, very expensive brake service. Hence my interest in recharging them - first - because it makes no sense that they would be bad in a mere 6 years. Especially because my understanding is these accumulators may easily go 20 years, or more! Moreover, what have I got to loose? If they don't hold pressure, then no big deal and I can always replace them. That's easy! Look, I don't mind spending money (I have spent as much, or perhaps more, for the capability of nitrogen recharging than it would cost to purchase rebuilt accumulator units), but I am loathe to throw money away unnecessarily. Thus, operating under the presumption these units are good, first I seek to recharge them. Subsequently, I will decide what to do next. Remember, for me (and probably you and many others on this forum in similar circumstances) Tootsie is not daily transportation. She is just one of several choices of vehicles available. So it could be fairly said, this Rolls-Royce is a hobby car, a source of fun, and thus, I still await an answer . . . can the accumulators be recharged in situ, or not? I do not wonder if it's a good idea, just whether they can be serviced in place without first dismounting. John, who has read quite a bit on the subject before making this inquiry public because I cannot find where this has been asked and answered previously. | ||||||
Patrick Lockyer. Grand Master Username: pat_lockyer Post Number: 1057 Registered: 9-2004 |
Hi John The shadow 1 accumulators can be charged in place. Have replaced a diaphragm in one sphere back in early 2003 and fitted it to the car and recharged the unit on the car with just one gauge. The other sphere was ok just low on pressure so that was charged in place. What nitrogen was still in the sphere was released after bleeding pumping down the systems first. A good time to replace the 363 that turns a brownish colour as the nitrogen slowly escapes into the system. I used ball bearings instead of plastic balls for sealing of the caps from memory. have not had any probs since. Used a four jaw chuck [locked] in the lathe to locate the dismantling of the sphere. I may well have charged the ss2 spheres on the car but cannot remember, will have to look that up. | ||||||
John Beech Frequent User Username: jbeech Post Number: 92 Registered: 10-2016 |
Hi Patrick, Thanks for confirming the sphere may be recharged in situ. Do you recall the specific fitting involved? I have read to pump the pedal until the lights comes on, pump another 50 strokes because each reduces pressure further (just to be sure), and to wear eye protection (I have an enhanced sense of self-worth plus a broad yellow streak down my back so I will diligently apply myself to the task of not being careless). Any other tips? Also, does anyone have the part number for the nylon ball? Or a dimension? I'm not certain why the system pressure is low but want to give myself the best chance of avoiding the necessity of doing the job again soon. By the way, does anyone have an estimation of how much RR363 I should lay in before proceeding? I know Tootsie's brakes were serviced abut 6 years ago (new calipers, hoses, several rigid lines, accumulators, etc. but have no records of anything to do further with the systems since then so I figure now's a good time to flush and refresh. However, I don't recall mention of how much fluid to have on hand. Is a gallon enough, overkill? Finally, you mention using a 4-jaw chuck to locate dismantling. Should it come to it, I watched a video where a fellow (French?) used an aluminum fixture, maybe 1/2 plate with three bolts threaded perpendicular to the tangent, which was bolted to a workbench leg along with a chain wrench to disassemble the sphere. Seemed straightforward. I can make a fixture with the mill but your mention of using a 4-jaw chuck is intriguing but since my largest chuck is 10" details and photos would be very nice. Cheers, John who sincerely hopes I get away with just a recharge and the gas has leaked down via a less than secure check-ball. | ||||||
Jeff Young Prolific User Username: jeyjey Post Number: 285 Registered: 10-2010 |
Using a lathe to hold the sphere is a great idea. (The spindle on my lathe is locked by engage the back-gear without dis-engaging the clutch, but I don't know if they're all the same in that regard or not.) Cheers, Jeff. | ||||||
John Beech Frequent User Username: jbeech Post Number: 94 Registered: 10-2016 |
Perhaps I wasn't clear; once I reverse the jaws, what I'm not certain is whether they will be deep enough to grasp the cylinder. Anyway, I agree, a great idea and far simpler than milling a fixture. | ||||||
Jeff Young Prolific User Username: jeyjey Post Number: 286 Registered: 10-2010 |
Hi John, I imagine you're gripping one half of the sphere, not the joining ring (which would still get a chain wrench or pin wrench). If so, 10" chuck jaws should be plenty deep. But I'm only imagining here; I haven't done this myself. Cheers, Jeff. | ||||||
Brian Vogel Grand Master Username: guyslp Post Number: 2129 Registered: 6-2009 |
John, See this thread entitled, Brake Pump, (yes, it had drift to related topics) for my sphere holding set up as well as some other useful information. There are a number of threads showing various people's custom made pin wrenches for rebuilding the accumulators. I needed something quick to fabricate, easy to use, and easy to install and uninstall for holding the accumulators to open them. Kelly Opfar has even made a wrench for separating the accumulator sphere from the ACV body. I simply give the ACV a couple of taps with a hammer and that has consistently gotten it to come loose. If you're trying to take it off the car without the ACV coming with it you can use a socket on the hex at the base of the accumulator to unscrew it as a unit. You have to be certain that the whole sphere is turning, but given how tight the retaining ring has been on every one I've worked with I can't imagine there's ever been one that even tried to separate at the center when being removed this way. It's even mentioned in the Workshop Manual, I believe. Brian, who would give in situ charging a go on an SY1 | ||||||
Geoff Wootton Grand Master Username: dounraey Post Number: 1503 Registered: 5-2012 |
Hi John There is an article with pictures in chapter 45 page 674 of tee-one topics on recharging accumulators in-situ. When you have removed the plate between the sump and charging caps, clean the bottoms of the accumulators. Make sure the whole area is clean and dry. Remove the charging caps (eye protection essential). Having removed the caps, if brake fluid drips from the charging port you know the diaphragm has been holed and the accumulator sphere has to be replaced. If you need to replace the accumulator spheres and opt to recondition them yourself, be aware the hemispheres range from seriously tight to practically welded together. Here's what Bill Coburn says about it (ch30, p428) "These muthas�s are tight. I remember carrying out the undoing bit on a set of accumulators at my old matrimonial address and after using a 3/4'� break bar with a five foot steel extension and two 170K helpers, I found next day that my residence had actually changed its post code!" Here's a picture of the clamp I fabricated to hold the accumulator. Like the video you mentioned earlier, I clamped onto the lip of one of the hemispheres. I bolted the clamp to the bench and used a pin-wrench to undo the ring. We had to move the bench into the side walk alongside the garage and jam it between the house and a brick wall to hold the bench steady. With two 4' extensions the damn thing would still not undo. Finally released it by hammering the pin wrench in the correct direction to undo the ring. 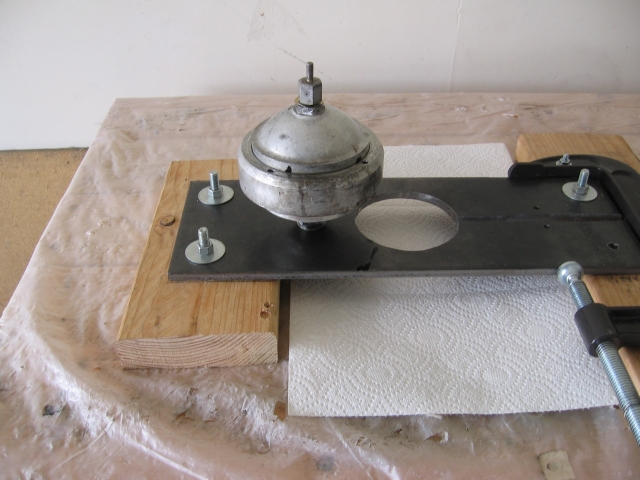 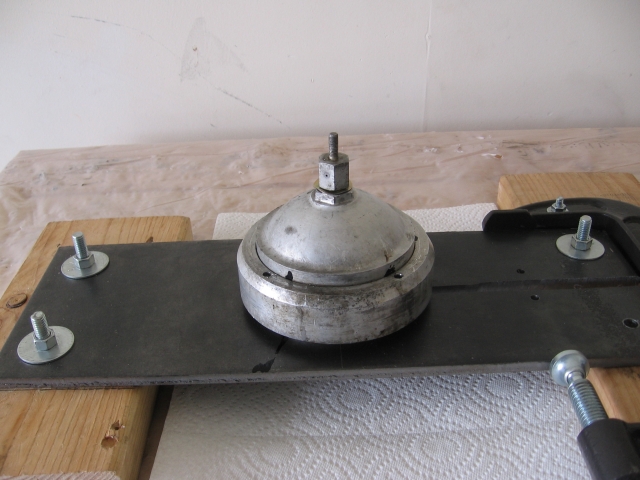 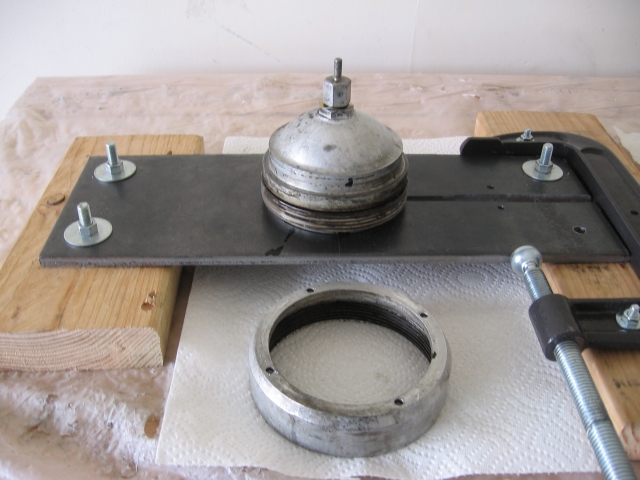  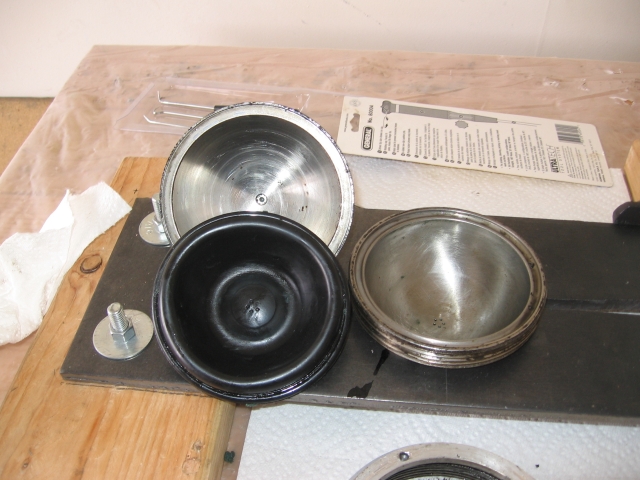 Geoff | ||||||
Brian Vogel Grand Master Username: guyslp Post Number: 2130 Registered: 6-2009 |
One thing I will add to Geoff's post, that I know I've mentioned at some point in the past after someone gave me this tip. Even before trying to remove the retaining ring find yourself a large (say 2.5 to 3 lb) hammer and a concrete floor. Give the retaining ring a good, solid hit (not like you're trying to squash the accumulator, but it's not delicate, either) around its entire circumference as you rotate the accumulator sphere. Even though the torque figure for this is very high, it appears to me that most of the sticking on these things is the result of corrosion (and it's very slight) that occurs once these things are in place that "welds" the retaining ring threads to the treads on the upper half of the accumulator on to which it screws. That hammering around the circumference before even trying to open the thing breaks most, if not all, of the corrosion bonds. I always use anti-seize lubricant before putting these things back together so that the next poor schlub that needs to take them apart has a much easier time of it. That schlub could be me. It also appears that Flying Spares has managed to do another production run of the new disposable accumulator spheres with the "triple membrane" [if I'm remembering correctly] that was developed by Citro�n for use with LHS/RR363 or LHM/HSMO and that's supposed to have a much longer service life. They have these specially made with the correct threading for the SY series ACVs. See the RH2390P Accumulator. Brian | ||||||
Patrick Lockyer. Grand Master Username: pat_lockyer Post Number: 1059 Registered: 9-2004 |
"Even before trying to remove the retaining ring" Before the above and after the bleeding off the pressure in the system remember to release the nitrogen in the charge side of the spheres before dismantling. | ||||||
Brian Vogel Grand Master Username: guyslp Post Number: 2132 Registered: 6-2009 |
Patrick, Your warning about releasing any nitrogen charge pressure that remains in the accumulator certainly did bear repeating. After a while I start to, incorrectly I might add, presume that anyone doing this has already read through how the event is supposed to proceed according to the official instructions, which clearly include this information. So, I guess my general addition now, for any given task, not only this one, is to please refer to the Workshop Manual for the complete instructions before considering the shortcuts or additional tips and tricks that are offered. The original context, and understanding it, is a basic requirement. Brian | ||||||
Kelly Opfar Prolific User Username: kelly_opfar Post Number: 132 Registered: 7-2004 |
Geoff, I like that separator arrangement. Very clever - like a bit flat collet. I held the hex on my accumulators in a mill vise and used the quill to apply downward pressure to a piece of pipe on top of the wrench to keep it seated. Brian made a clamping arrangement that locked his wrench device in place to keep the pins engaged. I thought it was a great idea. This is the wrench Brian mentioned that I used to unscrew the locking ring: 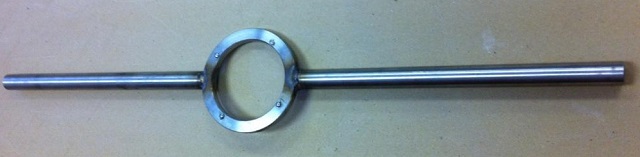 It still took two people and a couple of cheater bars as I remember. John, the fitting on the bottom of the accumulators is just a straight 5/8"-18 standard thread. I made this adapter that screws on the fitting. It has a flat bottom and seals with an oring. Nothing fancy. It is connected with a pipe nipple to a quick coupler that fits my nitrogen tank. 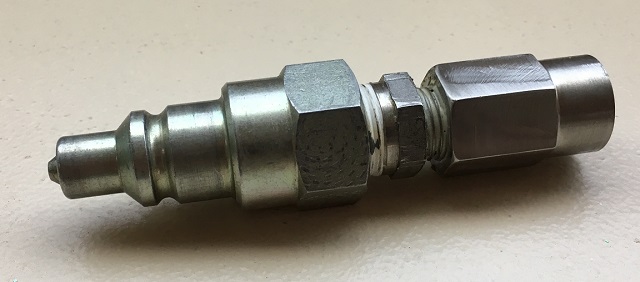 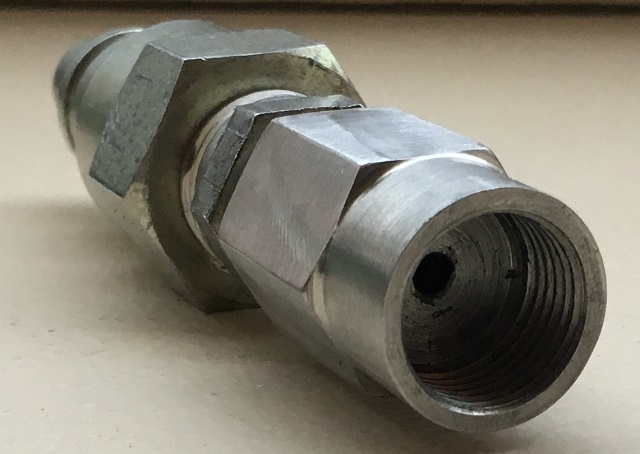 If you can manuever the charging line in place, you can certainly charge the accumulators in situ. Here is a little tool I made to depressurize acccumulator spheres gracefully. 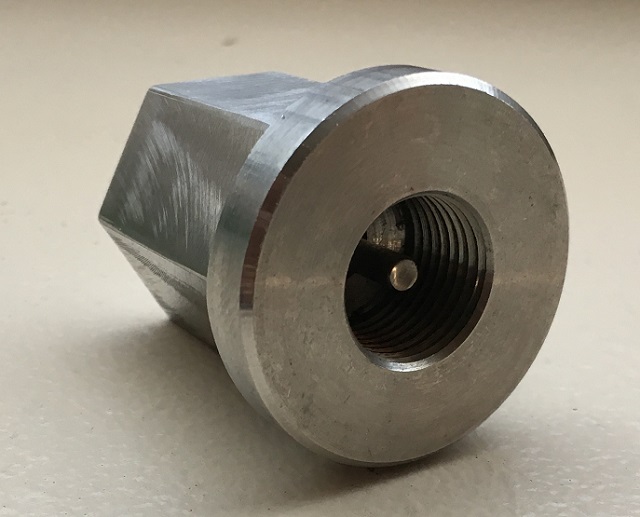 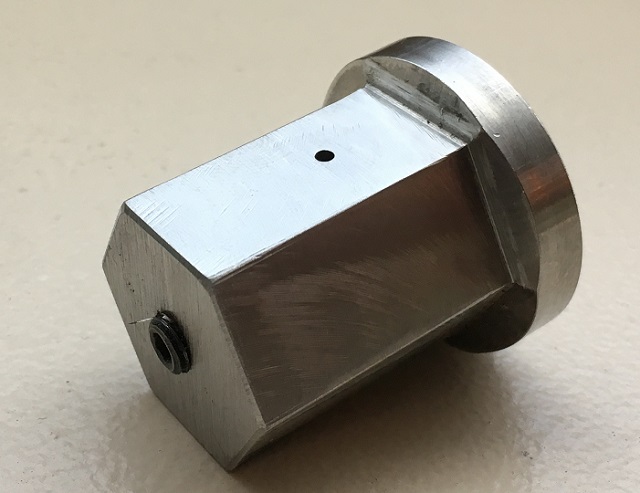 The set screw (or grub screw as you non- 'Muricans call it) pushes a pin into the accumuator port and lifts the ball off it seat. The pressure slowly escapes through the small hole drilled on the side. A hammer and small pin punch does the same thing but doesn't look as cool.  | ||||||
Patrick Lockyer. Grand Master Username: pat_lockyer Post Number: 1060 Registered: 9-2004 |
Kelly You are a brilliant master tool maker wow, words fail me. If I was in need of any of the above I would soon be in touch. | ||||||
John Beech Frequent User Username: jbeech Post Number: 99 Registered: 10-2016 |
Geoff, in part wrote . . . "Having removed the caps, if brake fluid drips from the charging port you know the diaphragm has been holed and the accumulator sphere has to be replaced." Great - immediate feedback on whether to order kids or proceed to recharge them! Thanks for the tip. Meanwhile, I'm waiting on the nylon balls, which I ordered from Flying Spares (in anticipation of merely needing these to recharge the accumulators). Me? I'm keeping mt fingers crossed! Kelly wrote in part . . . "the fitting on the bottom of the accumulators is just a straight 5/8"-18 standard thread. I made this adapter that screws on the fitting. It has a flat bottom and seals with an oring. Nothing fancy. It is connected with a pipe nipple to a quick coupler that fits my nitrogen tank." . . . "If you can manuever the charging line in place, you can certainly charge the accumulators in situ." Thank you for the thread dimensions, which is a key piece of data. Now I have the answers I was seeking in regard to recharging accumulators in situ. Thank you one and all. By the way, Kelly, is gaining access with my hose to the two fittings that big a deal? I have yet to raise my car and stand beneath (to see for myself) because I've been snowed under this past week and thus, haven't had time to wire the newly installed 2-post lift. Maybe I get to it this coming week (but since the nylon balls aren't here yet, there's no special hurry). Anyway, based on the photos I've seen, it looks straightforward to access the caps and recharge the spheres from beneath when the car's on a lift . . . or am I mistaken and it requires a contortionist? | ||||||
Robert Noel Reddington Grand Master Username: bob_uk Post Number: 1209 Registered: 5-2015 |
If the spheres still have a bit of pressure then the diaphragms are not split. | ||||||
John Beech Prolific User Username: jbeech Post Number: 102 Registered: 10-2016 |
The spheres were serviced (and for certain one new one fitted, but possibly both) in 2010. I'm hoping for a puff of nitrogen when I apply a punch to the valve. By the way, how Tootsie stops is weird to me. It's like two stage braking where modest application of pressure slows the car 'somewhat' but it takes a little more pressure before suddenly there's a gracious plenty of braking force. Someone, somewhere, mentioned an adjustment in the rat cage below the car, does this make sense, Robert? | ||||||
Kelly Opfar Prolific User Username: kelly_opfar Post Number: 133 Registered: 7-2004 |
John, my car is still in pieces and it's been so many years I can't say for certain what's in the way. Also, different years have different exhaust arrangements. There might be something in the way. An angle adapter might be useful. I'm just speculating. Remind me, what year is Tootsie? Early cars have a small master cylinder in the rat trap to provide a tertiary braking system. Later cars rely solely on the brake pumps and accumulators. It sounds like there may be some resistance in your lines. All of the brakes lines on my car were filled with green jelly from never having been serviced. If you still have the stock flexible lines on your car, change them all immediately. Search for Brian's post on here somewhere about having new flexible lines made. Don't forget about the two flexible lines under the reservoir that mount to the frame. I'm a little short on time or I'd post some pics. Search also for Brian's easy peasy lemon squeezy bleeding procedure. Make sure all bleed points are free flowing. | ||||||
David Gore Moderator Username: david_gore Post Number: 2341 Registered: 4-2003 |
John, I would be more concerned with the possibility of a collapsed flexible brake hose[s] that restrict fluid flow during light brake applications and then open up from the increased line pressure when the brake pedal is depressed further in response to the slower than expected slowing of the car. Your depleted accumulator pressures may also be contributing to the erratic braking due fluctuating pressure when the brakes are applied. | ||||||
John Beech Prolific User Username: jbeech Post Number: 103 Registered: 10-2016 |
All lines new (something like 18 of them?), new calipers (six), etc., etc., etc. I'm hoping a top up of nitrogen fixes what ails her if Robert Noel doesn't pop in and confirm what I think I've read about an adjustment of the linkages. We'll see. | ||||||
Christian S. Hansen Grand Master Username: enquiring_mind Post Number: 443 Registered: 4-2015 |
Following upon David's observation of deteriorating flex lines, the next stage in that progression is that once the pressure has been applied to the caliphers, the restriction in the line prevents that pressure from being completely released with the resultant dragging of the pads, or in a worst case, not releasing at all. Two stage braking sensitivity is a red flag alert. Technically ALL of the flexible lines, yes, all 18, or 20, or I have forgotten how many, deteriorate with time irrespective of use. The manual specifies them, yes, all of them, not just the calipher lines, as service items (at customer's request I recall?) every 75,000 miles OR (BIG "OR") every 10 years, or was it 15 years, and it is a job that almost never gets done, so you can assume that 99% of used cars out there, Tootsie included, need that $10,000 service if done by a full service dealership, and of course NO seller is EVER going to admit that it either needs to be done or that they should adjust their pricing accordingly, but it does need to be done. . | ||||||
Brian Vogel Grand Master Username: guyslp Post Number: 2136 Registered: 6-2009 |
John, The "two stage" braking you describe, particularly if you know the car has not been perpetually neglected, is characteristic of air in the system that was not correctly bled. I will bet that you see a difference once you get your accumulators recharged and flush and bleed the system. I never noticed a difference such as this from low accumulators, and I've had 'em. | ||||||
Brian Vogel Grand Master Username: guyslp Post Number: 2142 Registered: 6-2009 |
John, I also meant to mention that the SY1 series cars have 21 flex hoses (at least up to the point where the master cylinder was deleted or whatever production change was done that got rid of the "missing" one) and the SY2 series have 20. Download the RR & Bentley Parts, Repair, Restoration & Other Resources Compilation and search for Hose Substitution Chart. That chart also contains the Crewe Original part numbers in it. If I ever do this job again I will definitely have a full set of PTFE carrier hoses made up so that I never have to do the job again. The degradation to the carrier tubes in the original "rubber" hoses is due to slow, long term chemical interaction between DOT3 brake fluid and the hose. Since PTFE is chemically inert that makes that factor a non-issue. Since every custom hose maker I've encountered uses tubing that meets the high pressure requirements for the ACV to car body hoses for any hose they make, and these things are covered in steel mesh which is then covered in a protective flexible synthetic coating they should have a virtually perpetual service life. Certainly a lot longer than I'll be around, that's for sure. Brian | ||||||
Omar M. Shams Grand Master Username: omar Post Number: 935 Registered: 4-2009 |
lately I have used the degradation aspect of DOT3 to my advantage. I have a 1994 Range Rover Classic which is renowned for leaking steering boxes. I read somewhere that a desperate owner filled up his reservoir with DOT3 by mistake and that caused the seals to swell and the leak stopped. I knew that I had no choice but to dismantle the steering box and replace all the seals..... so....I filled up with DOT 3 and the leak stopped within 48 hours. I am most satisfied with the result. | ||||||
Brian Vogel Grand Master Username: guyslp Post Number: 2144 Registered: 6-2009 |
Omar, And, based on my own single case study, the concerns about petroleum oil and EPDM is grossly overblown. Over the course of several years of soaking an O-ring it has swollen just ever-so-slightly and remains very elastic. I also can't get DOT3 brake fluid to work as "the world's best and most rapid auto paint stripper" which many descriptions make it out to be. Mind you, I'm not proposing that we bathe our cars in it, but a reasonably quick wipe when spilled on paint has yielded "you'd never know it occurred" results. Brian, who knows, as do you, that a number of stop-leak products rely on exploiting controlled swelling of seals via chemical inducement. The results often last just as long as seal replacement results do, so it seldom hurts to experiment | ||||||
John Beech Prolific User Username: jbeech Post Number: 111 Registered: 10-2016 |
Hmmm, the side-shifter cylinder of my fork lift, which uses AW32 hydraulic oil, has recently begun leaking. The chrome isn't pitted and both looks and feels perfectly smooth so I suspect it's because the lift truck isn't used much and thus, it sits a lot allowing the seals to dry out and shrink. Anyway, I was going to remove the cylinder and rebuild it this coming week but maybe a bit of DOT3 would swell the seals and save me a spot of bother. Might be worth a try since I don't really have anything to loose . . . or do I? Anyone know what's the composition of hydraulic leak repair products like Lucas or BlueDevil? |