| Author | Message | ||
Randy Roberson Prolific User Username: wascator Post Number: 270 Registered: 5-2009 |
I have dismantled one of my Car's HC valves (right side) and I seem to have an extra part: it is aluminum, about an inch long, about the diameter of one of the small plungers; it has a rounded, button head on one end, a conical spring of fairly light construction, and a little latch on the other end of the stem, which seems intended to swivel and lock it to something. I do not see anything like it in the other valve, nor on the parts listing (although the parts listing leaves something to be desired) My Car is SRH9391; each of these two valves has a different number: 5399 on the right one; 5390 on the left one, and these seem to have been scribed on with one of those electric buzzing tool markers. I do not know if this is the Car number or what it is; it does not seem to be the part number for the housing. Of course I realize my Car may have had rebuilt or salvage parts fitted at some time in the past. | ||
Randy Roberson Prolific User Username: wascator Post Number: 271 Registered: 5-2009 |
This is the part in question: 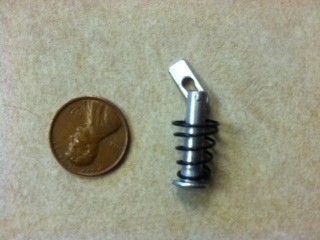 | ||
Randy Roberson Prolific User Username: wascator Post Number: 272 Registered: 5-2009 |
There is one possibility, assuming this is not a part of the height-control valve: I took the valves to work with me to clean them, and I might have picked up a stray part on the workbench. | ||
gordon le feuvre Experienced User Username: triumph Post Number: 45 Registered: 7-2012 |
Randy, definitely NOT from hc valve. When the position of valves was moved in I think 1971/2 lots of problems with cracking noises from valve as cross shaft had more load. Fix was to strip and fit different cross shaft bushes.Have overhauled lots! Do not worry about etched numbers being different. Valves were changed over at factory for lots reasons, maybe leak/noise. They were not "fixed" This was done elsewhere in hydraulic shop. Just look on Marinus Rijkers site for exploded drawing | ||
Randy Roberson Prolific User Username: wascator Post Number: 273 Registered: 5-2009 |
Thanks a bunch! I have been using the exploded view from Marinus Rijkers site as it is much more informative than the ones in the Factory manual. I do not recall a detailed article on overhauling this valve; perhaps Mr. Coburn or yourself might consider this! The cross shaft bushes in the right-hand control valve I dismantled are brass; the four replacements I bought are white plastic (nylon?). As there was no wear evident in the existing bushes, and it all seemed perfect, I left them in place. Mostly the O-rings were hard and even brittle. I lapped the large end of the upper valve due to some pitting from corrosion, but everything else looked fine so I have reassembled the first (right-hand) control valve and will complete the left-hand valve tonight. The four rubber dirt shields for the control link are somewhat flummoxing at more than $20 US each (!) but the other parts I bought were very reasonable. I'll have to get my courage up for these! The other hurdle is the hydraulic lines which are mostly routed on top of the subframe: it seems a garguantan and maybe impossible task to replace any of these without removing the subframe from the Car. I shall proceed, however, remembering Sir Winston's admonition to never give in... | ||
Bob uk Unregistered guest Posted From: 94.197.122.84 |
The bit in the photo looks like a quick toggle fastener for access panels on maybe aeroplane or boat. Mix ups like this in old car world are common bits of washing machine getting mixed up with car bits. Gordon. Why were the valves moved? (Message approved by david_gore) | ||
Brian Vogel Grand Master Username: guyslp Post Number: 931 Registered: 6-2009 |
Randy, I will virtually guarantee you that this is the bit that holds your circlip/spring clip plier head of choice to the handles. I've been gone for a few days, but I was doing work with these pliers (two different sets, in fact) shortly before my departure and both use this mechanism to keep the "plier part" on the "handle part" such that you can configure any of the pliers to open either inside or outside clips. Brian P.S. If your "hard lines" are not corroded I'd resist the temptation to replace them. | ||
Geoff Wootton Grand Master Username: dounraey Post Number: 445 Registered: 5-2012 |
Brian Brilliant - I knew I had seen this part before, but could not place it. Now we know. Geoff | ||
Randy Roberson Prolific User Username: wascator Post Number: 275 Registered: 5-2009 |
Brian is right: I broke out a new pair of snap-ring pliers, and this fell in amongst all the other bits. Thanks everyone! | ||
Bob uk Unregistered guest Posted From: 94.197.122.73 |
I have seen little rubber booties on motor bike gear linkage ball joints. $80 for these is a bit over the top. I have routed pipes in difficult places, to get the factory look is near impossible. The subframe removal does look daunting and I have never had one out of shadow. But I have on other cars and it always looks harder than it is providing the bolts come out. On the telly you see workers fitting subframe assemblies in minutes. This is the sort of job you do once. So it's best to take advantage and make it all look nice. I recommend ICI Dulux chassis very glossy black This is enamel/Bitumen dry time 24 hrs. Spray or brush. 1 litre is enough for all the frames on a Shadow. RR and many others used this type of paint up till the 1960 on chassis. It drys not quite hard and is a bit flexible. It needs no undercoat. Goes over other paint without problems. Thin up to 10% white spirit. 2 choices paint frame first and fit it out with the bits, which will look really good with shinny valves and pipes or assemble first and paint. Most makers would paint the chassis then assemble and then spray one light coat over the assembly. RR didn't use a final dust coat due to overspray on the other nice bits. I did this to a XJ6 and it looked new underneath. If a higher quality finish is required then this paint is not suitable because it doesn't polish with cutting compounds. I do draw the line at painting the bolt heads red though. I like building assemblies like this because when finished it can look so good in an traditional engineering way, only costs time and maybe �10 in materials. (Message approved by david_gore) | ||
Randy Roberson Prolific User Username: wascator Post Number: 277 Registered: 5-2009 |
Little rubber booties: anyone locate anything that will be sufficient for a good price, let me know. I think I can mold them myself for less than $24 US each. Sorry but this time it is "get the gubbins sorted" but I would like to remove Her subframe for cleaning, rework, and paint. Maybe when I replace the rear springs and overhaul the rear hubs. For now, I have Por 15 to touch up the area where the control valves reside. | ||
gordon le feuvre Experienced User Username: triumph Post Number: 46 Registered: 7-2012 |
As I said in my earlier post, the hc valves were repositioned slightly to give better response to vehicle height changes.(1 think around 11000 series cars) This resulted in more load being applied to bearings resulting in a cracking noise from rear footwell area at fairly low road speeds.. Did not affect every car. This is why bearings were changed from brass to "plastic" type material. | ||
Bob uk Unregistered guest Posted From: 94.197.122.72 |
Try motorcycle practitioners. Honda love little booties and those very small bellows for cables. Which elves use as steering rack boots for their tiny cars.} (Message approved by david_gore) |