| Author | Message | ||
Chris M Browne Unregistered guest Posted From: 91.105.180.152 |
Hello everyone, I am almost at the end of a full hydraulic overhaul on my 1979 Shadow 2. I am replacing all the flexible hoses and rubber seals and O rings throughout the car and all has gone well until today. Has anyone any experience of replacing the rat trap flexible hoses? I have disconnected them at the rat trap end without difficulty but seem to have inadvertantly left the most difficult unions until last. The front unions go into two brass tees which sit on top of the front subframe so are sandwiched between the body and subframe and are very difficult to reach. I can only get a spanner on them at an angle and cannot safely apply much leverage without starting to burr the hexagons. As (bad) luck would have it, these joints are sealed with copper washers which make the connections particularly solid. I am toying with the idea of cutting the rubber hose off as close as I can to the metal end in the hope that I can get a socket on the hexagon and use a ratchet handle. This looks like it might work but I am hesitant to do it in case I still can't undo the unions and once the pipe is cut..... Any advice that anyone can give about how best to proceed would be most gratefully received. Kind regards, Chris Browne (Message approved by david_gore) | ||
David Gore Moderator Username: david_gore Post Number: 935 Registered: 4-2003 |
Chris, I have been exactly in your position and co-incidentally at the same stage of the project. If I had started this part first, I would not have kept going!! First, if you are a dedicated DIY custodian, you can buy a set of brake line flare nut spanners at most tool outlets which are intended for use on brakelines to minimise the corner roll-over problem with tight nuts and difficult access. These are useful items to have in your toolbox - see the link below for an example: http://www.getprice.com.au/Sidchrome-4-Piece-AF-Flare-Nut-Spanner-Set-21459-Gpnc_537--41627534.htm I remember this part of the Shadow hydraulic system very well as I had the same problems as you especially as I have large hands. I had lots of problems and ended up having to replace both the hoses and steel lines as well as the "T"'s due to mechanical damage from separating them. When starting the flare nuts during re-installation, I found it easier to undo the "T" piece mounting bolt to move the "T"'s into a position where I could start the nuts without cross-threading [this is a real problem as you will experience]. Once the nuts are started, you can position the "T" to get more rotation of the spanner after wedging the "T" to stop it moving. The next problem is getting the two "T"'s into position to install the mounting bolt - much patience is required unless you can find an assistant with small hands. At the time, I did not know of the availabilty of flare nut spanners so I made my own flare nut spanners from "Metrinch" ring spanners after destroying the nut hex corners with an open-end spanner - I used a 100mm angle grinder to cut a slot in between the lugs which work on the flat face of the hexagon just large enough to slip over the brakeline/hose. I have found the "Metrinch" design very effective in undoing recalcitrant fasteners with a minimum of damage thus allowing them to be re-used. More information on "Metrinch" tools may be found on the following link - I have no connection with the company or its distributors other than the fact their products are some of the most-used tools in my toolbox: http://www.metrinch-tools.com/website/introductie.php?language=gb Hope this helps David (Message edited by david_gore on 11 March 2010) | ||
Clifford Donley Frequent User Username: flatus Post Number: 52 Registered: 12-2009 |
Dave, thanks for the detailed procedure. I'm about to tackle the rattrap so it's valuable for me, too. I also found a set of crows foot sockets that are excellent for flare fittings: http://cgi.ebay.com/ebaymotors/ws/eBayISAPI.dll?ViewItem&item=360236367642 They have them in both SAE and metric. | ||
David Gore Moderator Username: david_gore Post Number: 936 Registered: 4-2003 |
Clifford, the flare nut spanners are better than crows foot sockets as they are less likely to slip/twist in awkward access situations due to their one-piece construction. They are also less likely to damage the corners as the load is spread over a greater contact area. There is no way you will get a crows foot socket into the cavity where these particular "T" pieces are located - there just isn't enough space. From memory [it was 12 years ago when I did this job], you would also have problems driving the socket unless you were prepared to cut some access holes in the body structure Regards David (Message edited by david_gore on 11 March 2010) | ||
Nigel Johnson Experienced User Username: nigel_johnson Post Number: 32 Registered: 12-2008 |
Its just slightly easier if you dissconnect the steel brake pipes first, take out the centre bolt fixing then remove the whole lot and undo the flexibles with the Tee in a vice. Access from within the wheelarch.Age,wearing glasses and general inflexibility also make the problem worse! Regards, Nigel. | ||
Paul Yorke Grand Master Username: paul_yorke Post Number: 545 Registered: 6-2006 |
Chris, DO cut off the rubber hose and try a deep socket first. Did you not do that on most of the awkward hoses? Whatever happens you will be replacing the hoses and have nothing to lose, but hours to gain. (plus the fewer unions you disturb, the less chance of cross threading or damaging pipes - especially these buggers!) Doing up the new hoses needs less force and you can tighten with a ring or spanner. Watch out for larger hexes on the end of the flexies, as these can foul and make it more difficult. | ||
Clifford Donley Frequent User Username: flatus Post Number: 53 Registered: 12-2009 |
Thank you David. I shall get the metrinch tools before I start a project such as this. Nigel, you've been reading my medical history??  Paul, when you tackle the job, how many hours does it typically take you? Chris, thanks for asking the question! Cliff | ||
Bill Coburn Moderator Username: bill_coburn Post Number: 1222 Registered: 4-2003 |
Well I can't see why all this so difficult - I had no problem!!! 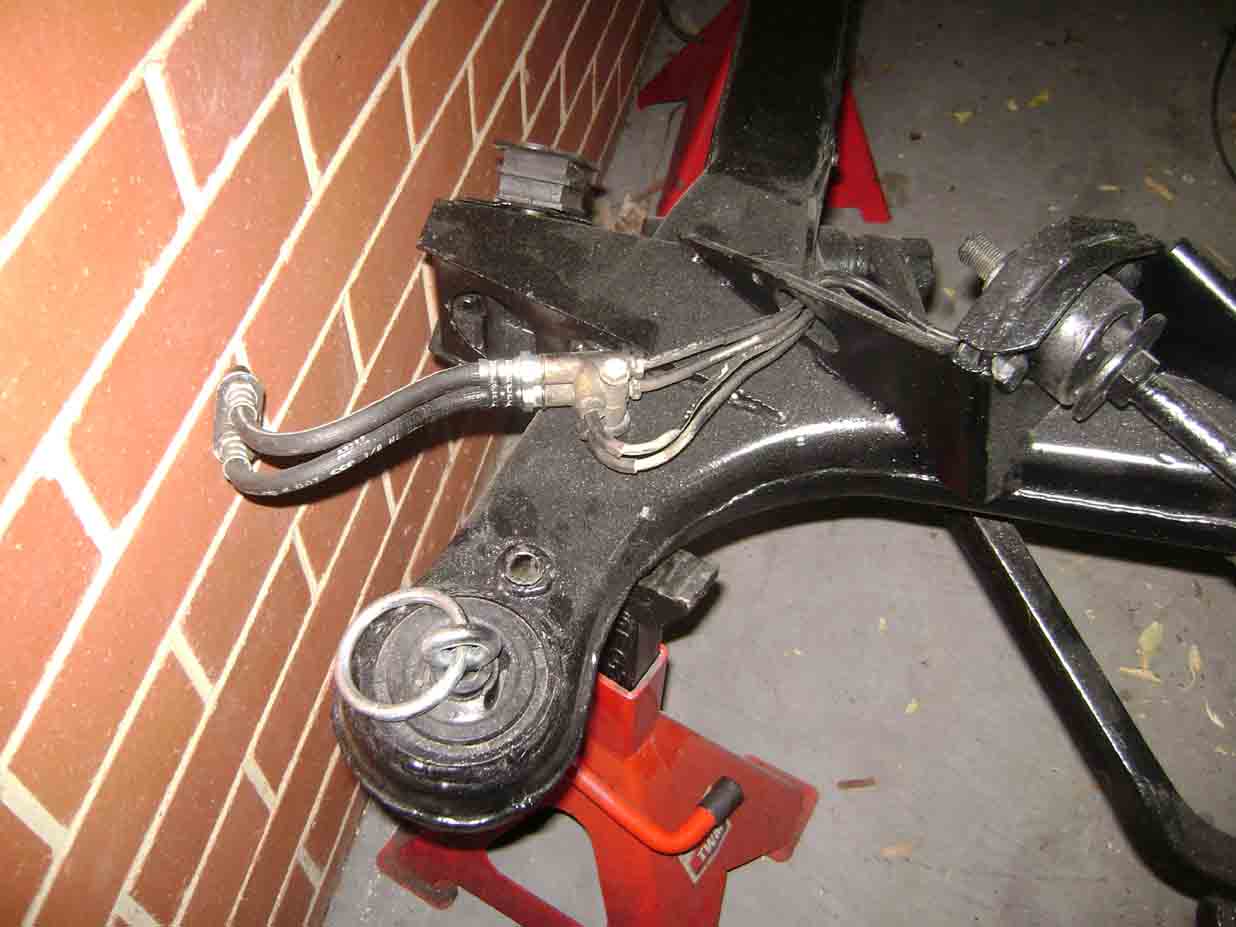 | ||
Bill Coburn Moderator Username: bill_coburn Post Number: 1223 Registered: 4-2003 |
OK David how do I do it? | ||
Paul Yorke Grand Master Username: paul_yorke Post Number: 546 Registered: 6-2006 |
Bill, can't believe you wimped out on this one and took the easy route! lol | ||
Paul Yorke Grand Master Username: paul_yorke Post Number: 547 Registered: 6-2006 |
Clifford, I don't think that there is a 'typical' time for any job on a 30 year old car!  TBH it's rare for us to do a full Hydraulic system overhaul like this, unless the car has been contaminated with the wrong fluid or the car has had no hydraulic work at all in the past 10 years or so. (a rare beast!) Most are done on a frequency that suits the individual component, not on an arbitrary / middle ground time or distance scale. Some items fail with alarming frequency, others last 5 times longer! Most often the jobs (and the cost) is then spread over a longer period. | ||
Clifford Donley Frequent User Username: flatus Post Number: 54 Registered: 12-2009 |
Bill, re your picture. I hate it when I'm working on a project and hit a brick wall. Cliff | ||
Chris M Browne Unregistered guest Posted From: 91.105.180.152 |
Thank you David, Nigel and Paul for your advice. It is gratifying to know that guys with your experience have had difficulty in this area also. I thought perhaps I was not thinking laterally enough but it would seem they are just ****** difficult! David, I have some flare spanners but there is insufficient room between the brass tees to allow a flare spanner over the nut. The thickness of the end of the spanner prevents this. Nigel, I must admit that I had not thought of attacking them through the wheel arch. At the moment the car is up on ramps and stands in a very small garage and the offside of the car is hard up against a wall so I have no room to remove the wheel. I am reluctant to move the car at this stage as it was very scary reversing it up the ramps in such a confined space without hitting the back wall and I wouldn't want to push my luck by trying it again! If all else fails though, I will give it a try. Trying to reverse the car up onto ramps without the brakes might be a problem! Paul, I did not need to resort to cutting any of the other flexible hoses so perhaps I was lucky. Using my trusty flare nut spanner, every single one of the others came undone without much of a fight. That's why I am a bit miffed that I saved the best until last. The annoying thing is that the unions which I can't undo are the cleanest of the lot. Yet another example of the Law of Sod, I suppose. Thanks again for all your advice which proves, once again, what a fantastic resource this forum is. Kind regards, to all. Chris Browne (Message approved by david_gore) | ||
Chris M Browne Unregistered guest Posted From: 91.105.180.152 |
Hello everyone again. After having absorbed the replies to my original post, I finally bit the bullet and tackled the rat trap flexible hoses today and after a bit of struggle managed to change them. It is always good to share a problem with like minded enthusiasts on a forum such as this and it is good to know that you are not the first to have a problem with these hoses. For the record, here is my method. Having disconnected the unions inside the rat trap (the easy part!)I cut off both flexible hoses as close to the metal ends as possible with a Stanley knife. The only socket which was a good fit was a 3/8" drive 14mm deep socket as it needs to reach over the crimped part of the union to reach the hexagon. As the deep sockets are quite long, I did not have enough room to fit the ratchet as the front plate of the rat trap gets in the way. I then took a hacksaw blade and sawed the end off the bottom hose as close as possible to the hexagon. This took quite a time as you are restricted for space so there is only room for a saw blade not the complete saw. Once the union was cut down, the socket fitted further onto the union which then gave me room to fit the ratchet.The union came loose after a good pull on the ratchet handle. Make sure you keep the socket in line with the union when you pull down on it otherwise you could round off the hexagon. Once the bottom union was out of the way, there is sufficient room to get a 9/16" A/F open ended spanner onto the top union and this, too, gave up without much of a fight. Needless to say, as the second union began to undo, I had a grin like a cheshire cat as I had visions of both unions being so tight that I would not be able to move them. The rest of the job was straightforward and I simply had to recover the two copper washers from the unions, clean them up and fit the new hoses. I greased the threads of the unions with moly grease in the knowledge that when I do the hoses again in 2018, they should be easier to deal with! Thanks again to everyone who responded to my plea for help. I hope the rest of the work will now be relatively plain sailing. Kind regards, Chris (Message approved by david_gore) | ||
David Gore Moderator Username: david_gore Post Number: 937 Registered: 4-2003 |
"OK David how do I do it? Bill, if I had your garage and equipment to be able to remove the car from the "T" pices; it would have been a "doddle" in the true engineering sense. I was flying absolutely blind as I did not know anyone in the Club at the time who could help me as Shadow hydraulics was not an acceptable topic for discussion. Chris, I was also working in a similar home garage environment and jacked the car up to be supported on some high heavy duty wide base stands used for 4WD vehicles. I had to put my jack on blocks to do the second lifting stage. I had just enough access to be able to undo the wheel nuts and remove the wheel to get the wheel arch access described by Nigel - didn't stop the reflux heartburn from extended periods on my back under the car though. Congratulations on a succesful outcome and I am very pleased to see your attention to detail with some preventative maintenance to facilitate the next replacement. Kind regards David | ||
Clifford Donley Frequent User Username: flatus Post Number: 55 Registered: 12-2009 |
Magnificent job, Chris! You along with the gurus, are building my confidence by the day if not the minute. Paul, the dreaded preview function resulted in the loss of my appreciative reply on the process you use when determining when and what needs replacing. Lots of common sense there. Thanks! Cliff | ||
Chris M Browne Unregistered guest Posted From: 91.105.180.152 |
Hi Bill, Your photograph of the solution to the rat trap hose problem made me smile. I wonder if I could ask a favour? I am, at present, writing a series of articles on the Shadow hydraulics system to be published in the RREC Bulletin. Would you have any objection to my using your photograph of the subframe in an article(with the appropriate acknowledgement, of course)? It is such an unusual view of the car which few people will have seen so would certainly be of interest as a reference for those mad enough to attempt the hose change! Kind regards, Chris (Message approved by david_gore) | ||
Paul Yorke Grand Master Username: paul_yorke Post Number: 548 Registered: 6-2006 |
Cliff - "the dreaded preview function" I hate it! The amount of replies that I've written just to lose - so I then just end up replying with a yes or no! . . . . or find the post the next morning, post it, and then find some poor soul's been struggling away overnight! You'd think we'd be used to it by now - but I think this is the only board that I use that has no post button. Grrrrr. | ||
Bill Coburn Moderator Username: bill_coburn Post Number: 1224 Registered: 4-2003 |
Chris by all means.. Private me and let me have your address and I will send you a pic of better resolution. Would you like other pics, I have a few thousand? They mostly all appear in Tee One Topics but this should not inhibit your writing for your Club since they, as far as I am aware, neither I, the Technical Library or Topics exist! | ||
Chris M Browne Unregistered guest Posted From: 91.105.180.152 |
Hi Bill. Thanks for your kind offer. For some reason, the forum won't allow me send you a private message. I have e-mailed the administrators about it and as soon as the problem is rectified, I will contact you. Kind regards, Chris (Message approved by david_gore) | ||
Bill Coburn Moderator Username: bill_coburn Post Number: 1225 Registered: 4-2003 |
Well try me on spur84@me.com. | ||
David Gore Moderator Username: david_gore Post Number: 938 Registered: 4-2003 |
Chris, you have to be registered as a member to send posts - as you will be a valued future contributor as your expertise increases; please register as a member. Paul, The current preview/post procedure has been made necessary by the number of spammers trying to access this forum especially those using automated programmes. The manual intervention involved has been a factor in reducing the workload associated with vetting queued posts for approval. The time interval between hitting the post button and the post appearing can sometimes be longer than you expect due to transmission delays between your computer, the forum server and return. I usually have to wait a minute or two and sometimes longer for my posts to appear. I do have a problem with my local internet hub being overloaded due to lack of upgrading which is probably contributing to my problem. | ||
David Gore Moderator Username: david_gore Post Number: 939 Registered: 4-2003 |
As a matter of interest, the last post took almost 2 minutes to appear in the thread. | ||
Chris Browne Yet to post message Username: chrisb Post Number: 1 Registered: 2-2010 |
Hello David, I am now registered as a member. Kind regards, Chris Browne | ||
Paul Yorke Grand Master Username: paul_yorke Post Number: 550 Registered: 6-2006 |
David, preview/post button . . . . It's not a problem with the board being slow to display the post when the button IS pressed. . . The problem is ME being slow to remember that you have to preview AND THEN press post! I press the button and then wonder off to some other page, completely forgetting to press the post button again. Mostly it just sits there waiting patiently for me to return . . . other times I click the page and end up somewhere else - and of course - all I've typed has disappeared! | ||
Brian Vogel New User Username: guyslp Post Number: 3 Registered: 6-2009 |
I did this job last summer and faced a number of the issues discussed here. The only thing I'll add is that I found that having a set of stubby open end wrenches to be a much bigger help than the flare wrenches (which were too substantial [read: long or the head was too thick]) for working in some of the hellishly small spaces one must deal with. While one can use a bench grinder to trim down the head thickness on wrenches most of us would hesitate to cut one end or the other off. Stubby wrench sets make that aspect, at least, unnecessary. I also found that you need two wrenches to remove/install all of the connections. One side needs to be held in place while the other needs to move. Let's not even discuss how fragile some of the brackets holding the connections to the car appear to be. |