| Author | Message | ||
Carl Heydon New User Username: car Post Number: 4 Registered: 2-2004 |
Does anyone know if the pinion seal is replaceable with a modern double lip seal? Mine, B 14 BH, has become incontinent and it needs to park on nice clean concrete next week. Any info would be much appreciated | ||
Bill Coburn Moderator Username: bill_coburn Post Number: 508 Registered: 4-2003 |
Carl in the meantime why dont you put up with the old felt seal (a new one that is and if the flange surface is scored simply cover it with a stainless steel redisleeve. | ||
Carl Heydon New User Username: car Post Number: 5 Registered: 2-2004 |
Thanks Bill, My parts list is a bit hard to decipher. What I was asking is if the seal is a redily available one or did R-R specify a metric ID and imperial OD made from unobtainum. My fantasy was that someone would be able to provide a part no. I was not keen(if I could avoid it) to pull the seal to measure it and find it odd and I have no problem with speedisleeves. Thanks for your reply from which I assume it is a standard seal. And many thanks for your efforts with T one. Carl B14BH SBH 4346 SBH 19606 | ||
Peter Colwell Experienced User Username: peter_colwell Post Number: 15 Registered: 3-2005 |
This may not apply in this case, but many a seal has been replaced when the cause of the leak is a blocked breather. Seals themselves rarely wear out unless attacked by mud, dirt, or dust from the outside and contaminated oil from the inside. A change to fresh oil, and a clean breather will cure many seepage leaks. I would certainly try that before going mechanical....it has worked for me more than once. Peter | ||
Ashley James New User Username: ashley_james Post Number: 8 Registered: 2-2005 |
I recommend that you contact the Font of all knowledge of rear axles for these cars, Norman Geeson. I have two of Norman Geeson's high ratio diffs in my MKVIs and both have a modern seal conversions. You can find his email address on www.kda132.com together with warnings about failure modes of rear axles and wheel bearings. | ||
Bill Coburn Moderator Username: bill_coburn Post Number: 509 Registered: 4-2003 |
SEE POST BY DAVID_GORE BELOW WHICH REPRODUCES BILL'S POST WITH RESIZED IMAGES (Message edited by david_gore on August 25, 2005) | ||
Richard Treacy Grand Master Username: richard_treacy Post Number: 870 Registered: 4-2003 |
So, Bill, Your special privileges allow pictures of any size ! The last was 1525x2885. We peasants are only allowed 640x480 pixels. More seriously, and this is neither a plug nor a denegration of anyone else, as Ashley implies Norman Geeson must be by far the leading expert on these differentials. He is almost the exclusive comprehensive rebuilder of these ones worldwide nowadays, and supplies even to the major Crewe retailers. When I stripped my R-Type's crown and pinion, I had to search very hard to find a brand new Australian-spec 12:41 pair, and that was with the expert help of Brian Thompson in the UK. Today, Norman has stocks of 11:41, 12:41, 13:40 and 8:34, and a few specials too. The reference to Swiss tunnels is his, not mine. Norman ran a fleet of R-Types from the UK to Italy through the Swiss Gotthard Tunnel when the cars were young, and devised several patented improvements to cure the problems endured. Outside the tunnel it may be 30C and dry, but inside it may be 2C and 100% humid. You can imagine what that does to the differential, with water being sucked in suddenly. It can also be hot and dry inside the tunnel, but cold and raining outside with the same effect. So, you thought that Oz conditions are the harshest. RT. | ||
Richard Treacy Grand Master Username: richard_treacy Post Number: 871 Registered: 4-2003 |
ps Item 13 is your baby, Mr Felt Seal himself. Bill's diagram shows the two different types of pinion bearings. On the right, item 1 is the early triple-row ball bearing like mine. On the left are items 2, the superior tapered roller pair. I don't know why mine, a "later" car, despite its 12:41 ratio, has the triple-row ball bearing. Maybe that was an export thing. It's strange, because export cars usually had updates earlier, like automatic transmission and inertia ring flywheels. My car also has the early water pump, supposedly discontinued in 1951, but has most improved features not introduced until the very last of the R-Types. A word of warning, even if the causality is unclear. I rebuilt my differential at around 300,000 miles using new bearings throughout as the pinion seemed a little sloppy on its nose bearing and triple row bearings. I did all the right things with Prussion Blue and dial gauges, and it was still perfectly quiet afterwards. The crown and pinion collapsed soon after, memorably on the way to a BDC event at Windsor in western Sydney. Bill C will remember this as I took the differential to Canberra for repair with his help, leaving the car perched at home in my Sydney garage for two months awaiting spares from the UK in pre- e-commerce days and times of $4/minute phone calls to the UK in dollars of the day. Spares purchasing was a real hassle then, around 1983. Presumably the increased bearing rigidity and slightly different gear settings caused new stresses and the resulting failure. The crown and pinion set me back about 4 month's salary. Maybe that was just bad luck, but I am ever since wary of rebuilds without a new gear set. Maybe Norman can shed some light on all this. RT. | ||
Carl Heydon New User Username: car Post Number: 6 Registered: 2-2004 |
Thanks for all your input. I would like to find someone local (Aust)with the skill and experience to rebuild the rear end. The prospect of sending the axle Home for a holiday is a bit steep. The cost alone, let alone the time factor. It is still quiet at a quessed 400,000+ but the clock is ticking.....loud! Now I find that the offending seal is a circle cut fron 1/4 felt, or has been supplied factory as a strip to cut and glue, my life is so much simpler. I will pop it up on the hoist today and cut a new one for it!! Many thanks again to all | ||
Bill Coburn Moderator Username: bill_coburn Post Number: 510 Registered: 4-2003 |
ABUSE OF Priviledges. My apologies to all. I have not gone mad I simply am mad! Life at our demesne is a bit stupid at the moment not helped by the prospect of an 800 K drive to Mildura on Friday. I will try and do thubnails in the future.!!! | ||
David Gore Moderator Username: david_gore Post Number: 498 Registered: 4-2003 |
Hi Bill, Could you please go to your post with the pictures - click on EDIT and delete the image files in the edit box. Then resize the original pictures to 640 x 480 pixels and then re-insert these in the edit screen using the [backslashimage{****}] command and we will not wear out our scroll unit or in my case wait 10 minutes for the piccy's to download. If you are uncertain how to do this successfully; just send the resized image files to me and I will fix it up. | ||
Bill Coburn Moderator Username: bill_coburn Post Number: 511 Registered: 4-2003 |
David I give up. please delete my bits. The machine tells me that I am not me so ??? Must get ready for Mildura. Off tomorrow. | ||
Richard Treacy Grand Master Username: richard_treacy Post Number: 872 Registered: 4-2003 |
Be my guest. Images edited by Richard are now included in reproduction of Bill Coburn's post below (Message edited by david_gore on August 25, 2005) | ||
Bill Coburn Moderator Username: bill_coburn Post Number: 512 Registered: 4-2003 |
Thankyou Richard. I need someone to have regard for my aging faculties!! I also had spent 3 hours wrestling with the low pressure return hoses on the Spur which have leaked since I had the car. The night before taking off for Mildura was obviously the time to do it. Very interested to see the reduction adapter presumably to cut out the rattle that was endemic to Shadow Toos! Must go and put the new ones on. BBC | ||
David Gore Moderator Username: david_gore Post Number: 499 Registered: 4-2003 |
Thanks Bill and also to Richard who reminded me privately how to access the images - unfortunately it is not possible to replace images in a post using the EDIT facility so the following is the next best thing. BILL COBURN'S POST Carl, Peter's advice is good. A blocked breather will certainly bloe seals I'll attach a pic of it so you can screw it out, give it a clean and eliminate that possible problem. 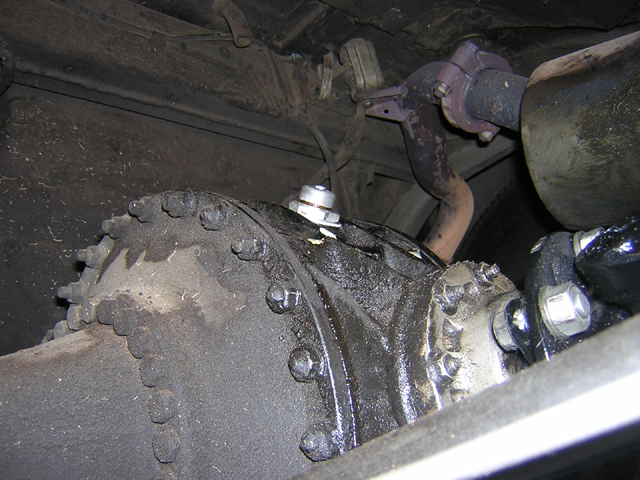 Incidentally these differential cases are unusual in that the oil is contained in the case and not allowed to wander down the axles and see what's goin on in the wheel department. To do this there are two seals either side of the crown wheel in the outer casing. Originally these were leather in a steel surround. To get at those one has to remove the U bolts disconnect the brakes mechanical and hydraulic (the latter for the Cloud)then undo the ten thousand bolts the Factory installed to hold the outer axle tube to the diff carrier! (I assume you remembered to jack the car up first). The seal and its dinky holder can then be removed a new bit fitted and the whole lot put back together. If these seals leak the oil will run or drip from a hole on the lower side of the axle tube near the diff. You might like to make sure this is not clogged up. But back to the pinion seal. It is simply a ring of felt packed into the removable flange and fits quite tightly around the pinion flange projection keeping the oil in. Richard Treacy tells me that one area that this didn't work was in Swiss tunnels so help me where temperature and humidity changes played havoc with the concepts of Henry Royce's professional descendants. 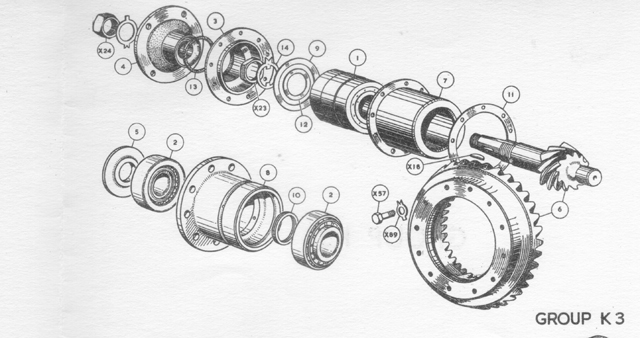 So step one is reef off the rear prop shaft and the pinion flange and replace that seal which I suggest you get from an RR supplier. If you go into a routine seal shop and ask for one you may have to leave in a straight jacket such is the total lack of comprehension of these cars by the current and immediate past generation. | ||
Norman Geeson Unregistered guest Posted From: 62.253.64.18 |
Carl It is not possible to replace the original rear axle pinion felt oil seal directly with a modern lip seal without carrying out some simple machining.The original felt seal is fitted in a recessed groove in the seal housing, this recess having no open end section to allow a modern seal to be pressed into position. In respect of the MKVI or other models using the similar axle, you have the choice of two methods to fit a modern seal. The first is to remove the seal housing.Mount it in a lathe and turn out from the INSIDE the diameter to accept a 55mm x 45 mm x 10mm modern lip seal. Turn out this diameter until the original seal recess is contacted, and then stop.This leaves the forward section of the seal housing and the bottom of the seal recess still untouched.The original forward section of the housing will then form an abutment up to which the modern seal can be pressed, when the seal is fitted from the inside seal housing face.Fine turn or grind the drive flange seal track 45.20 mm diameter, yes, this is slight larger than the nominal seal size. Method two, is to turn the outside diameter of the seal housing, at the front end to 2.340 inch to a depth of 0.355 inch.Make a steel adaptor ring 2.630 inch O.D with the I.D turned to provide an interference fit on the seal housing, say 2.340 - 0.0005 inch by 0.355 inch thickness. Press the adaptor onto the front end of the seal housing.Turn out the front end interior of the seal housing to 2.180 inch until the original seal recess is reached. At this point the inside vertcal face of the original seal recess is untouched.Press onto the adaptor ring diameter a modern oil seal number 268 187 37. Fine turn or grind the seal face of the drive flange to approximately 1.865 inch. Method two may seem somewhat time consuming, however it is possible and it is included because this method and seal will also suit pre-war Phantom III, Wraith and 25/30 axles at least. In the case of all Silver Clouds or Bentley S Series, method one can be used but the appropiate seal would be 50mmx 60mm x 8mm (10mm)and turn out sizes altered to suit. If any of these methods are used, the axle full of oil will stand placing on its drive flange end for a minimum of 12 hours, I test sometimes to 36 hours, without any leaks. You will find that it will save you a lot of trouble if you ensure that you extract the drive shaft flange with a bolted block puller, with a block at least 0.500 inch thick.If you cannot obtain such a tool and will insist on using a three leg puller, then at least bolt a block at least 0.500 inch thick using all four bolts to the drive flange, before using the puller. Finally face up the drive flange face, it will have been warped I assure you, by having been pulled before by a three leg puller. When facing do not forget to re-turn the depth of the female drive shaft locating spigot to about 0.100 inch, it was 0.087 inch when new. I hope the data is of some use. Best Regards Norman Norman Geeson (Message approved by david_gore) | ||
Carl Heydon New User Username: car Post Number: 7 Registered: 2-2004 |
Thanks again to all for the enormously detailed information and your willingness to take the time to share it. My immediate problem is solved. When I removed the pinion cover / seal housing I found that someone has carefully positioned the drainback hole at the top. It is a mystery why it has only just started to leak badly. I still need to have the axle overhauled soon (ish) and would be very interested to hear of a suitably competent person within a 5,000 mile radius Carl | ||
Kit Maxwell NZ Unregistered guest Posted From: 219.89.96.198 |
Mk6- B146KM. I have just replaced the drive shaft centre bearing, and UJ's. For reassembly of the spring carrier for the centre bearing and the friction and rubber washers- What is the tightening tension for the friction assy nuts to ensure that the shaft and spring stays in position (In NZ) (Message approved by david_gore) | ||
Ashley James New User Username: ashley_james Post Number: 9 Registered: 2-2005 |
I do not believe there is one, you just tighten them up and replace the split pins. There should be shoulders on the bolts to prevent overdoing it. | ||
Bill Coburn Moderator Username: bill_coburn Post Number: 529 Registered: 4-2003 |
Ash there is one for the Cloud which I think has an identical setup. When I did the PVI these washers were so worn probably because of the weight of the extra long front shaft that the springs were overstretched and you could push the whole assembly up and down quite easily. I replaced the friction washers and the rubber packing rings and tightened them to definite poundage stated in the manual which is not with me where I am sheltering in the rain forest! Loosening the nuts off allowed the whole assembly even with new springs and washers to drop down quite alarmingly. The need is to positionthe front shaft in the chassis tunnel centrally with a down slope to the rear of about three degrees. This involved a little trigonometry but the height difference front to rear was but a few millimetres. The manual does say that the positioning is not critical. I'll drop in the torque figure when I get home. The support springs by the way are no longer available and I had to have some made. And Kit please register. |