| Author | Message | ||
Jack Higginbotham Experienced User Username: jhinmd Post Number: 25 Registered: 11-2017 |
I have run the Wraith several times this season. I should note that I had a mixture of anti freeze in the beginning. After running the car for an hour, I stopped for perhaps an hour and a half. No issues at all. I returned to my house and overnight lost maybe a liter of coolant coming out near the water pump. I topped it off...next trip the same. On recommendation of this forum, I searched for Penrite WP Grease, but the only supplier in the US I could find was out and it was suggested to use Lubriplate. I filled the cap and at first it seemed to improve but the last trip led to maybe a 2-3 liter dump of coolant. This happens well after the car is shut down. I haven�t actually seen it happen. It�s my understanding that the grease cap should be turned fairly infrequently....and due to the density of the stuff, it seems like there should be some resistance when turning. After the purging, the cap rotates very easily, so it seems as though the grease is easily pushing into the pump. I am thinking I should take the pump off and check the seals, bearings and possibly repack it. Before taking this step I would appreciate opinions. I read that the coolant should be visible at the fill. Is this when cool, or when hot? Is it possible that I am overfilling the system, and it is purging to the correct level? Through all of this, I have yet to see any reading that is above 140 F using an IR gun. Thank you, Jack | ||
John Rowney Experienced User Username: johnrowney Post Number: 37 Registered: 2-2015 |
Hi Jack Penrite Water Pump Grease is available on the UK ebay site. I was lucky to buy some in Australia a couple of years ago, but it no longer appears to be listed on Penrite's site. I had problems with my water pump on my 1938 Wraith WXA68, and I took it off for redoing the seals. However, the seal mechanism had been installed incorrectly and parts were seized in the pump body and the pump was corroded. I bit the bullet and bought a new pump from Fiennes. The water pump for a series A Wraith is not available but the water pump for a Series C Wraith is identical apart from a minor internal change. I have had a trouble free run since then. If you are lucky enough to be able to pull your seal apart, Fiennes have gland material available and supply tips on installing. The Wraith handbook has a good illustration of the seal and should be used to check that your assembly is correct. I asked a few experts on a 20Ghost Club trip in Europe in June about how often the water pump grease cap should be turned and was told not to do anything unless there is a problem. I had been confused since the handbook says that 1/3 of the cap should be put in every 5000 miles, and all my mechanic friends say just a bit of a turn every now and then. I have taken the approach not to do anything unless there is a problem. I only check the coolant level when it is cold and my level always stays the same at just below the lip of the cap opening. I am using Liquid Intelligence 600 in the Wraith. This is a modern soluble oil coolant which has excellent coolant properties. I have written a note on my coolant trials for the RROCA (Australia) magazine Praeclarum which might appear in the December issue. . | ||
Christian S. Hansen Grand Master Username: enquiring_mind Post Number: 955 Registered: 4-2015 |
Jack... "Coming out near the water pump" ...can you be more specific and perhaps photo with arrow to the exit point? My gut says that if you have a seal leak, lubricating the shaft will be to no avail. . | ||
Jack Higginbotham Experienced User Username: jhinmd Post Number: 26 Registered: 11-2017 |
John, Thank you for the complete answer...I have just visited the Fiennes site and seen the price of the replacement pump! It is good to know that someone else has experienced a similar issue and conquered it. My Wraith is WXA99, 1938 chassis and bodied by Park Ward in 1939. Christian, Unfortunately, I have never seen the water escape. It happens overnight at some point well after the car has been put away. I may try to fill, drive and watch for the purge one last time before pulling the pump. It seems that you both are pointing to the need to tear down the pump and attempt to re-seal it. This was my initial thought as well, but I wanted to make sure I was not missing something obvious before taking the plunge. I appreciate both of your responses. | ||
Christian S. Hansen Grand Master Username: enquiring_mind Post Number: 956 Registered: 4-2015 |
Jack... In the case that you have never witnessed the source of the leak, I would be inclined to discover that before doing anything else. Do some tests and determine if it is the same amount lost each time. Does it escape even when the engine is not run after topping up? Does it continue to leak more with each passing day or does it consistently leak down to the same level and then stop? As an example, my 20/25 leaks out about a quart overnight but never anything more. If I fill it all the way up to the top of the neck of the radiator (too high a level to be sure) there is an obvious leak and drip, drip, drip flowing down the side of the radiator as if the overflow tube had a crack or broken joint at the top somewhere, and then the leak continues until the level in radiator has fallen about three inches and almost to the bottom of the calorstat. The level then stys at that point which effectively eliminates the overflow theory. I now suspect that there is a leak in one of the radiator channels, or perhaps in the top tank and the remedy will be a removal and disassembly in order to examine further. What I am saying is that you could very well have something similar and completely unrelated to the pump seals. Determine your direction before embarking on a journey. Good luck there. . | ||
Christian S. Hansen Grand Master Username: enquiring_mind Post Number: 957 Registered: 4-2015 |
P.S. If you are losing water overnight, you do have a puddle on the floor in the morning, yes? Is it under the water pump, or elsewhere? | ||
David Hughes Frequent User Username: wedcar Post Number: 83 Registered: 7-2004 |
Jack I am not familiar with the Wraith cooling system, (if the system is atmospheric or slightly pressurized). However, for modern systems, (after removing the radiator cap) radiator specialists use a small hand operated pump fitted to where the radiator cap was fitted, to slightly pressurize the system to check for leaks when the system is cold. If you are able to able to do a test similar to this, would perhaps show where the leak is coming from. Trust this helps Regards David | ||
Jack Higginbotham Experienced User Username: jhinmd Post Number: 27 Registered: 11-2017 |
Christian and David Thank you. The leak is at or near the water pump. I put a large plastic tub under that area ( maybe 3�x2�) which captures the water. The area around the radiator is completely dry. I will fill the system this evening and bring her to temperature and pull up a chair. I also like the idea of slight pressure...I was taught to bleed my race car using a mouth to mouth technique...it looks comical but is a good way to put modest pressure to a system with no risk. I appreciate the advice and will report back. Jack | ||
John Rowney Experienced User Username: johnrowney Post Number: 38 Registered: 2-2015 |
Christian When I was in Europe in June in my mate's 1934 20/25, he had a problem with coolant loss. We looked in his handbook and (from memory) it said that the level should be around the mid point of the top hose pipe. What ever it was, it was a very imprecise instruction and hard to see in the radiator. He had a dodgy additive in his coolant which foamed and contributed to the coolant loss. Anyway, after adding much water over an number of days and miles and diluting the additive and eliminating the foaming tendency, things settled down. The handbook was rather instructive, and helped us overcome what we thought was a big problem since filling the radiator to the top is not recommended. | ||
Christian S. Hansen Grand Master Username: enquiring_mind Post Number: 958 Registered: 4-2015 |
John... Yes. You are correct. In that instance I was filling all the way to the top simply to test the overflow pipe theory and to see how far down it would settle before the leak stopped which probably indicates the height level of the source of the loss. I would rather have a leak 3" from the top rather than 3" from the bottom! The level at which the loss stabilizes is very near to the proper level anyway so other issues take precedence with this particular car. My presumption is that the "proper" level is that which allows the coolant to expand when hot but yet not overflow. That level is essentially self setting as any extra coolant simply overflows during the first trip. . | ||
Christian S. Hansen Grand Master Username: enquiring_mind Post Number: 959 Registered: 4-2015 |
P.S. The idea of slight pressure to assist/induce the leak has merit but with the caveat that you will need to somehow plug the exit orifice of the overflow pipe to prevent pressure simply exiting via that route. | ||
Jack Higginbotham Experienced User Username: jhinmd Post Number: 28 Registered: 11-2017 |
Here is a long overdue update. I tried a few times to heat up and watch the purge....while I had some loss from around the water pump, I never was able to see this happen in person. I do have a good amount of water pump grease squeezing out in a few areas. I disconnected the pump and have it on my bench now. I will be looking within this site for the process of dismantling and servicing the pump. I�m thinking that even if this isn�t the main culprit, the grease slinging around the engine compartment indicates something could be improved. . | ||
Jack Higginbotham Experienced User Username: jhinmd Post Number: 29 Registered: 11-2017 |
Try as I might, I have not been able to find a tutorial for this water pump. I imagine the packing is behind the large brass cap, but it doesn�t appear to be very accessible compared to other pre-war pumps I�ve seen. I split the housing after some effort, but the impeller does not look very easy to remove to slide the shaft out. Any leads, pictures or tips are appreciated! Speaking of pictures, I�m struggling to post mine here so my apologies for the lack of visuals. Jack, have sent you a PM through the forum with an offer of help regarding posting photos on the forum. The process appears complicated at first however once you have done it a few times, it becomes a lot easier, Regards David - Moderator | ||
David Gore Moderator Username: david_gore Post Number: 3096 Registered: 4-2003 |
Jack, I have replied to your message and will be very happy to help. In the meantime, Christopher Carnley has forwarded the following information for me to post on his behalf: "The pump is the Derby Bentley but very similar to his. Please note that the impeller is on a left hand thread, and the thrust plug was lignum vitae/" 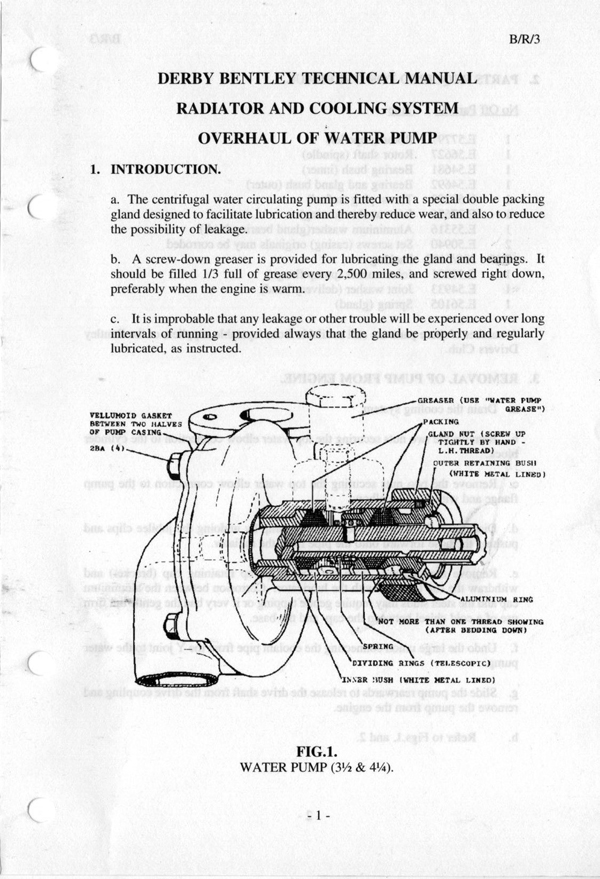  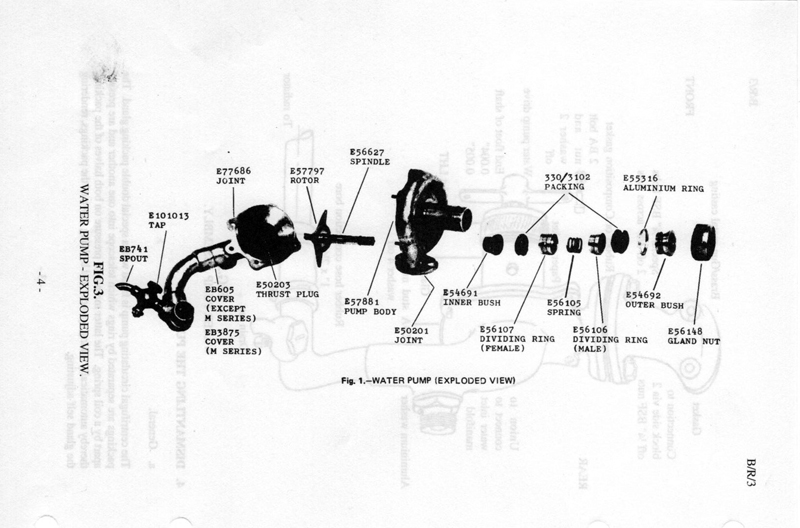 . | ||
Jack Higginbotham Experienced User Username: jhinmd Post Number: 30 Registered: 11-2017 |
David and Christopher, I can't thank you enough for your help. This alone gets me light years further down the path. Knowing the impellor is left hand thread helps and the exploded view gives me a much better idea of how this pump generally works. Thank you again. . | ||
David Gore Moderator Username: david_gore Post Number: 3105 Registered: 4-2003 |
Jack has provided the following images of his Wraith water pump - it has aged well in the years since 1939: 1. Pump Installed 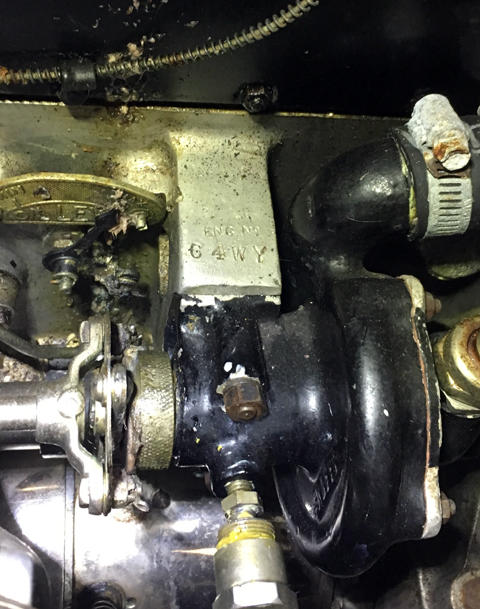 2. Drive end View 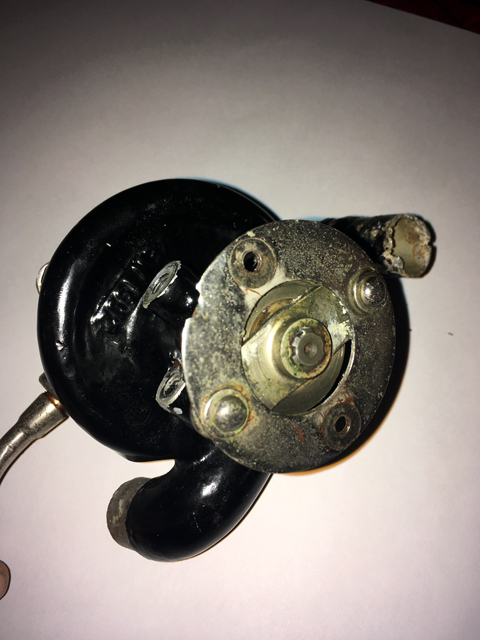 3. Pump as removed 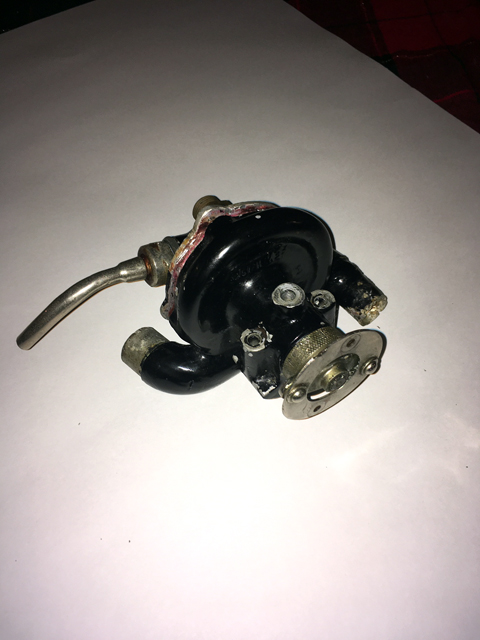 My apologies for the delay in posting - unexpected visit from neighbour seeking help intervened.  . . | ||
Jack Higginbotham Experienced User Username: jhinmd Post Number: 31 Registered: 11-2017 |
Thank you David. I will work on my posting skills soon! Going back to my original concern, you can see the grease on the oil level indicator in the top image. It was slinging out while running (too freely it seemed to me). I also experienced the periodic, mysterious coolant purge. Since grease was coming out, I reasoned that could be where the water came out. Regardless, I don�t know when this pump was last serviced, if ever, and it seems repacking the pump is a logical move. Christopher has shared that the impeller is left hand thread...I don�t see a retainer on the shaft end, so I will carefully try to remove by turning properly. I assume then, the shaft assembly will slide off and I can remove the gland nut. I also need to find a source for the bushings and determine what size packing material to use, which is available from Restoration Supply in California. Any words of wisdom certainly appreciated. Thank you again David for sharing the image. . | ||
David Gore Moderator Username: david_gore Post Number: 3108 Registered: 4-2003 |
For those who may not have seen it in my Posting Images Guide, this is Jack's 1939 Silver Wraith: 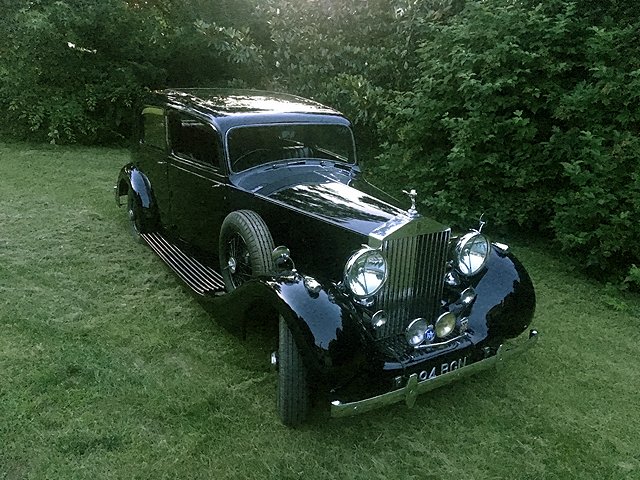 . | ||
David Gore Moderator Username: david_gore Post Number: 3107 Registered: 4-2003 |
Christopher Carnley has forwarded the following photos and I am awaiting a response to a question I forwarded to him. Chris advises all the parts are available from Fiennes Restorations. 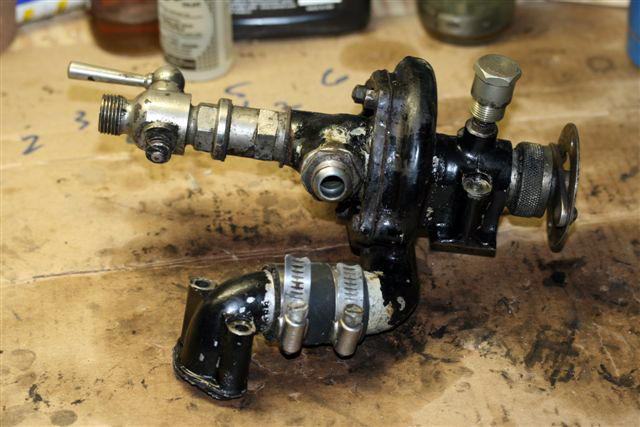  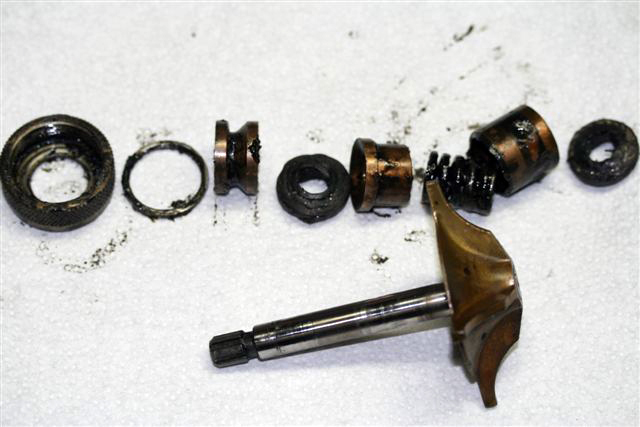  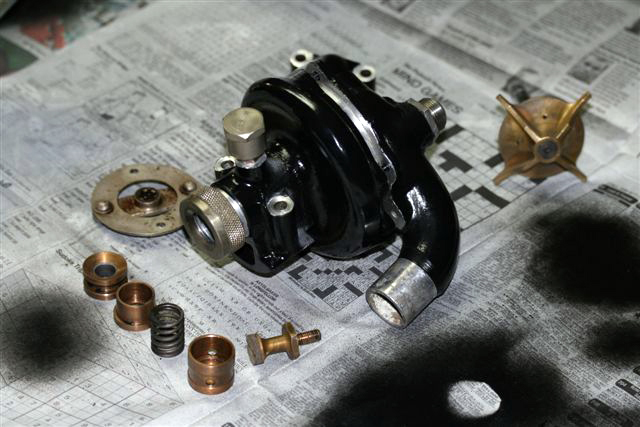 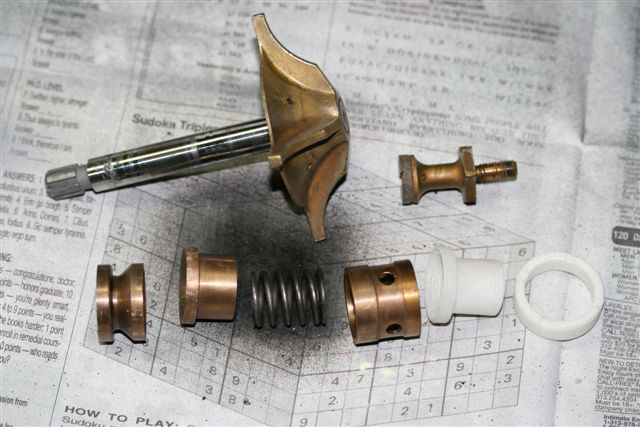 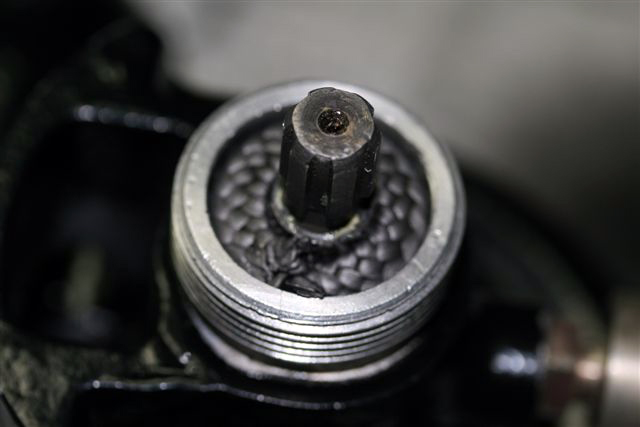 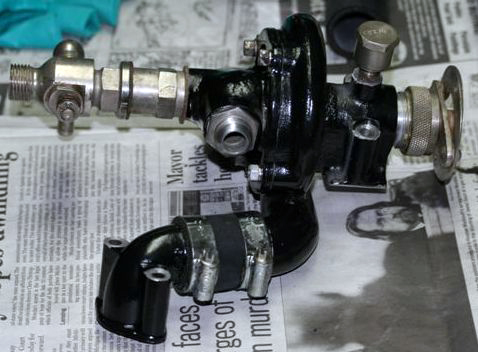 | ||
Jack Higginbotham Experienced User Username: jhinmd Post Number: 32 Registered: 11-2017 |
Fantastic information...thank you so much. I just visited Fiennes site, and see what Christopher is pointing out. I will get an order in with them as soon as I get the pump broken down and see all the parts I need. This series of images helps me envision how to proceed with the disassembly and reassembly. I will post some pics of my own progress as I go along. Many thanks! Jack | ||
David Gore Moderator Username: david_gore Post Number: 3109 Registered: 4-2003 |
Jack, Christopher was not sure if the Derby Bentley and Wraith water pumps rotated in the same direction as this would obviously determine the thread hand on the pump drive shaft. Being made from brass, the impeller would be susceptible to distortion if the "don't force it, use a bigger spanner" temptation is irresistable. If you are communicating with Fiennes, it might save some angst if you confirm with them if the respective shafts for each vehicle have identical or non-identical threads before trying to unscrew the impeller. | ||
Jack Higginbotham Experienced User Username: jhinmd Post Number: 33 Registered: 11-2017 |
David, Excellent suggestion....done! I actually shot video of the pump rotating but rotation on video is often misleading, so getting a second opinion is a great idea. If the video is telling the truth, the impeller would indeed spin off in left handed fashion. We shall see what Fiennes reports. | ||
Jack Higginbotham Experienced User Username: jhinmd Post Number: 34 Registered: 11-2017 |
According to Linda at Fiennes (who responded quickly), the impeller would be removed in standard fashion...right hand thread. I was thinking the impeller itself would spin off the shaft, then the shaft would slide out by removing the gland nut. Is this the correct way to get to the gland and packings? I�m guessing Christopher knows this for sure...maybe others have also done this procedure. | ||
christopher carnley Unregistered guest Posted From: 86.188.39.2 |
Jack, If the shaft and impeller are in good order there is nothing to gain by splitting them. As you see from the above, the parts were not split and the handedness of the Wraith thread not discovered. Just split the case, undo the knurled end caps and pull out the impeller. C. (Message approved by david_gore) | ||
Jack Higginbotham Experienced User Username: jhinmd Post Number: 35 Registered: 11-2017 |
Thank you Christopher. The impeller and shaft are in fine shape...I thought breaking the impeller from the shaft would be easier than detaching the connecting flange on the other end. I believe the flange is a press fit. If you see the image above, I suppose you are suggesting I pull the connecting flange from the splined shaft? | ||
Jack Higginbotham Experienced User Username: jhinmd Post Number: 36 Registered: 11-2017 |
Just a quick note that the pump is apart. As good as it looks to me on the outside, I can see why I had issues. There is corrosion on the knurl of shaft (on the backside) and the outside washer is very corroded. I will hit the easy button again and send you some images for posting David. Flying out for business tonight so won�t be in the shop for a week. In about a month I will be in the UK on business...I�m not sure if I can hold out that long for my materials, but if Fiennes is close to my destination (or Heathrow) it looks like a fantastic place to visit! | ||
christopher carnley Unregistered guest Posted From: 86.190.245.108 |
The drive is a close fit but it will come off. (Message approved by david_gore) | ||
David Gore Moderator Username: david_gore Post Number: 3117 Registered: 4-2003 |
Jack, No problem - service with a smile as always . P.S. This thread is a wonderful example of how our community of contributors provide invaluable help and advice to fellow members. | ||
David Gore Moderator Username: david_gore Post Number: 3120 Registered: 4-2003 |
Jack Higginbotham has kindly shared the following comments and photographs of a successful strip down of his water pump: "Here's the next chapter of my saga. I'm going to be out of town for the next week and I really wanted some closure on this issue, so I went to the shop determined to win. Christopher advised me not to disconnect the impeller from the shaft, so that left me with needing to remove the coupler next to the main gland nut. It was really stuck on there...I'm not sure how long it's been since this pump has been apart, but it was certainly not willing. I tried gently prying with two screwdrivers. Then I tried tapping in two wooden wedges. Nothing. I then broke loose the gland nut, put two wooden shims between the coupler and the nut and used the nut as a press. Worked like a charm! Once that was off, everything was pretty easy. The shaft, impeller and all the (bronze or brass) fittings seem reusable. The spring seems fine...everything seems fine, but the packing looked very old to me and not doing the job extremely well anymore. There was quite a bit of crust toward the connector. The washer behind the gland nut had major corrosion on it...so I can see various ways that water and grease could escape. Here are the complete pump internals. 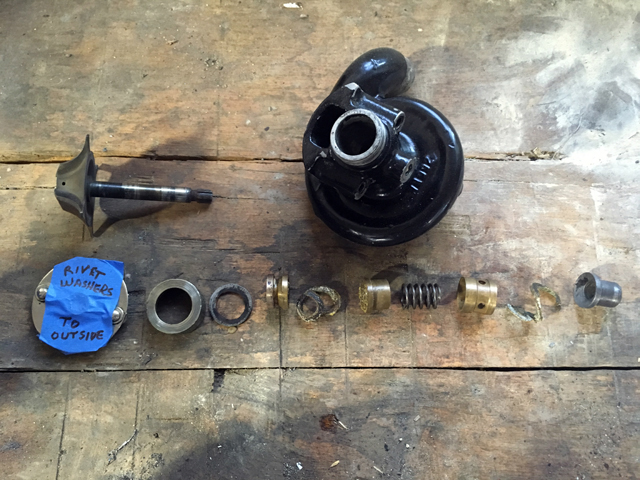 This is the washer behind the main gland nut. It cleaned up about 80%...and water being water, I will probably need to replace this. I don't think I can get a perfect mating surface with the pitting. 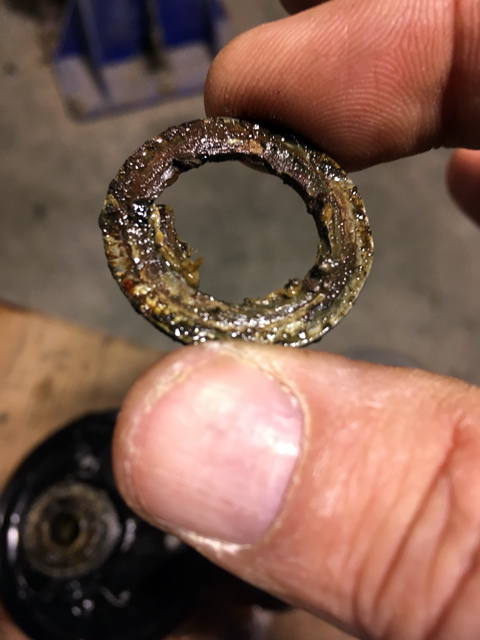 This is the outer bush on the way out...It was easy to push the entire assembly out the front using an appropriate diameter aluminum rod. 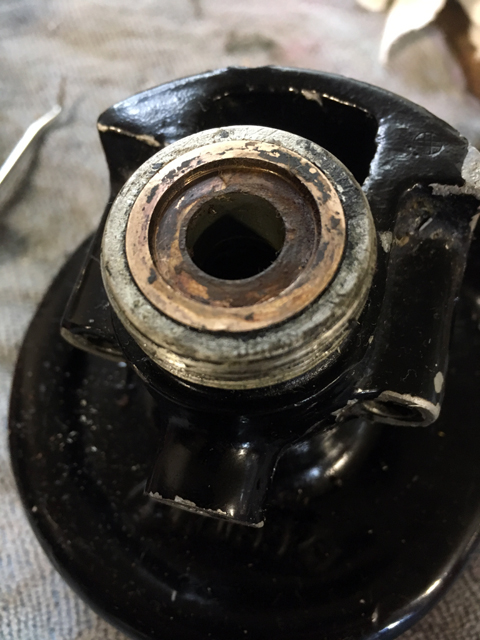 The spring and bush had some hardened grease caked throughout, but it cleaned up nicely. 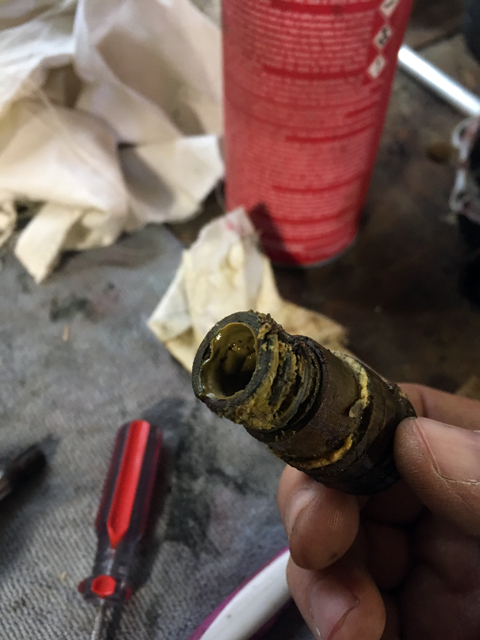 This shows the condition of the packing at the rear. 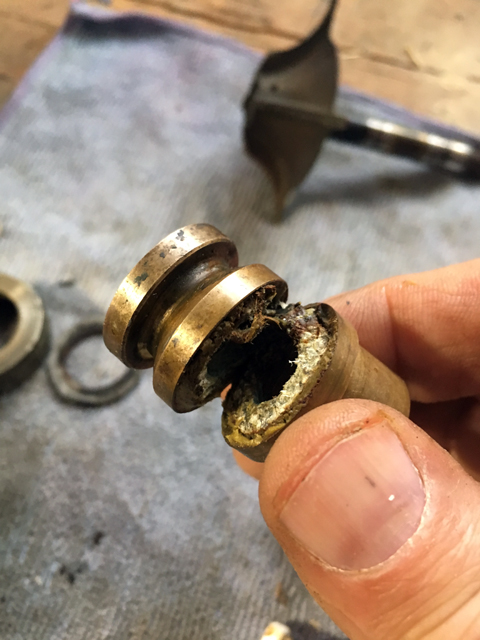 Now that I have it apart, and cleaned up, I will do a little research and order the bits I need for reassembly. At this point, I think the only things needed are the washer and the packing material, which is available here in the states. Thank you again for your support. I know I might seem a little nervous about this...and I am. After 80 years I don't want to be the guy that ruins something on this car! Thank you David and Christopher for your help and giving me confidence to get this done. It would be a different level of stress and trepidation if you weren�t there! Jack" . | ||
Larry Kavanagh Grand Master Username: shadow_11 Post Number: 322 Registered: 5-2016 |
Nice work, very rewarding, the old girl will love you back with many more years of pleasurable motoring. | ||
christopher carnley Unregistered guest Posted From: 81.148.251.129 |
Most gratifying,and for my small assistance. (Message approved by david_gore) | ||
David Gore Moderator Username: david_gore Post Number: 3131 Registered: 4-2003 |
Jack has provided me with the following information on rebuilding his water pump to post on his behalf: 1.Having a few hours and all the needed supplies, I set out to assemble the water pump. I�m hoping that this might be of help to someone in the future, and also might bring information to the surface on how I could have improved my technique. For materials, I used Restoration Supply in California. They have a wonderful selection and were very helpful over the phone and email. I was not sure what size packing material to buy, so I bought one foot of 1/8�, 3/16� and ��. I ended up using the smallest size and 1� was adequate for the job. 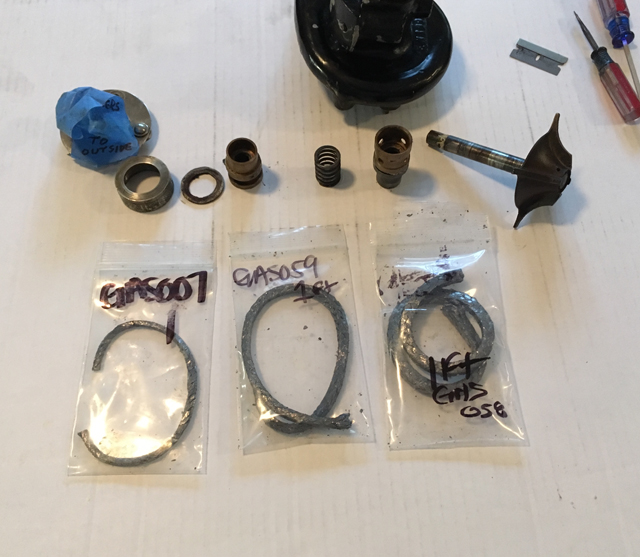 2. I read in an old newsletter to cut the packing with a scarf instead of a butt joint. The previous material was actually wound around the shaft twice and installed in one piece. That did not look like the best seal, so since I had an issue, and also because it appeared that experts in the past suggested otherwise, I made two pieces of packing for the outer seal and the inner seal, scarfing the connecting joints. 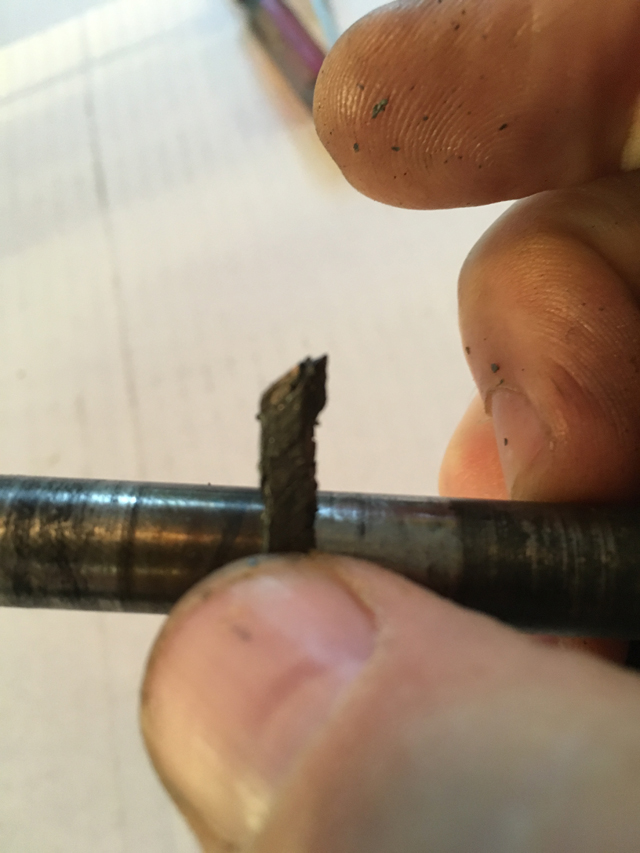 3. Since I did not remove the impeller from the shaft, assembly was a little tricky. I removed the impeller assembly and connected the outer seal to the shaft, gently twisting the two pieces together and hopefully seating the packing material. I then removed the inner seal assembly from the shaft. 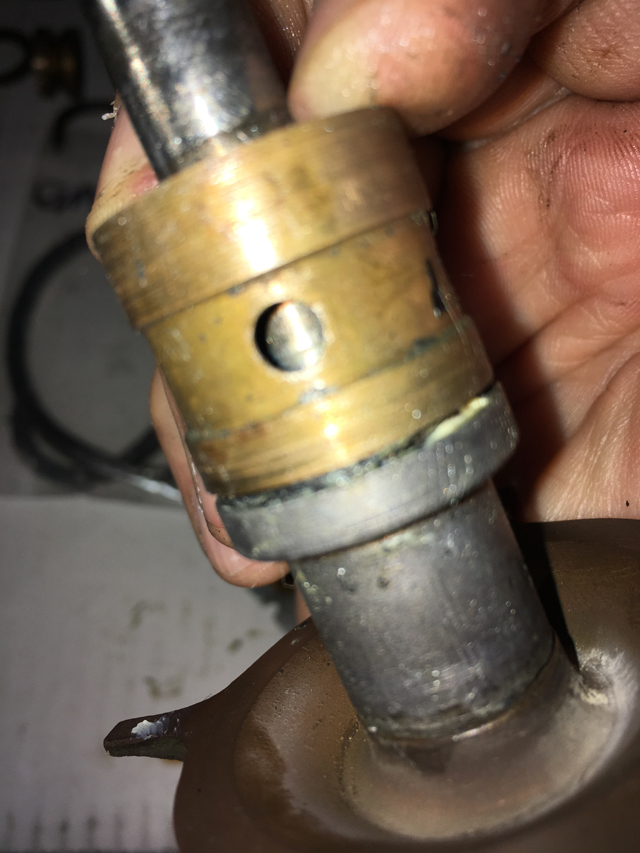 4. I did not read this anywhere, but it seemed to me that buttering the packing material before assembly was a good idea. This also kept the packing material in place during assembly. Because Restoration Supply Company does not carry Penrite products anymore, I used Lubriplate #115 Water Pump Grease.  5. I put the spring in the cup, assembled the outer seal and installed on the shaft. 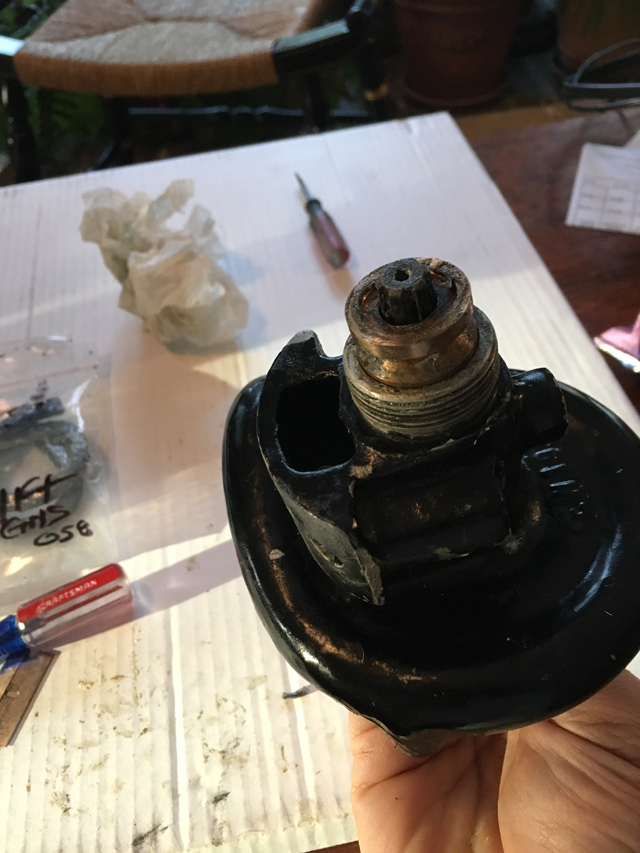 6. I then replaced the washer and the threaded cap, slid on the shaft connector and cleaned up the housing. The only thing left to do on the shaft side is install the grease cup, which I will do on the car. 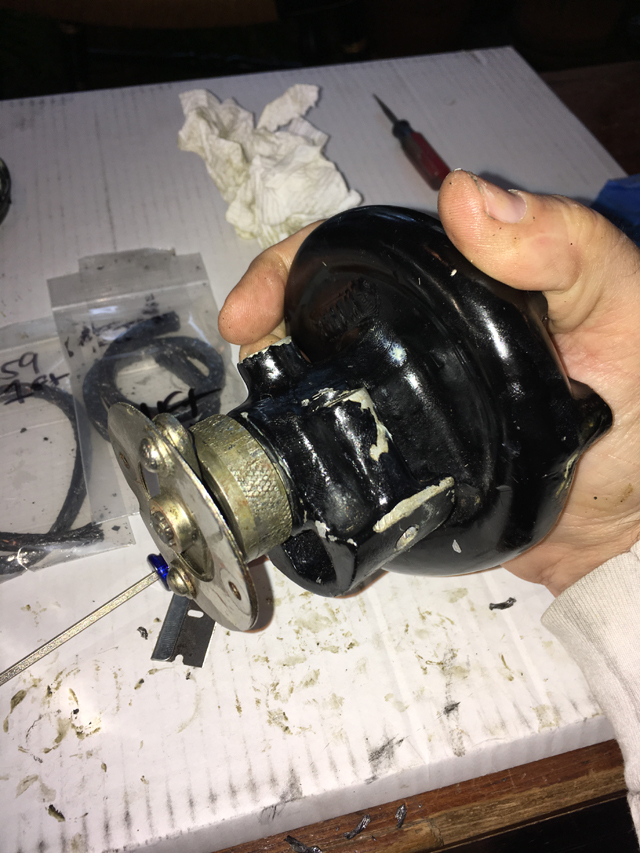 7. When I separated the shaft housing from the pump, there was only the remnant of a paper gasket, which was very thin. There was a fair amount of water pump sealer on the joint, which seemed to be more prevalent than the paper. I made a thin cork gasket (1/16") and plan to also use sealant. Opinions here appreciated. Also, the shaft and the pump are connected with four studs and nuts. There is a fifth hole that creates a passage from the shaft to the pump side. I assume this should remain clear and made a hole in the gasket. Does anyone know the purpose of this hole? I assume it helps the circulation path for the pump, but I am having a hard time imaging the flow of water, and how this hole plays a role. 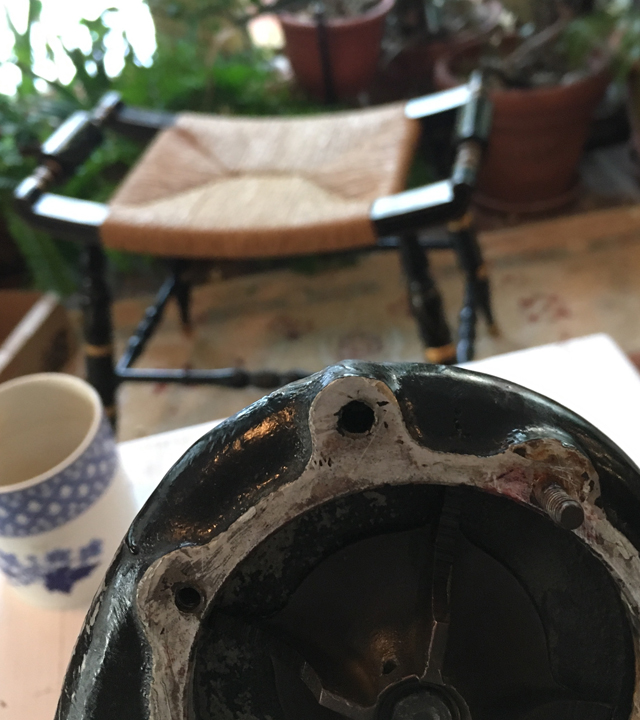 Thank you Jack for documenting this rebuild for the benefit of our members. | ||
Jack Higginbotham Experienced User Username: jhinmd Post Number: 37 Registered: 11-2017 |
David, Thank you for your help posting. I hope this documentation is helpful to a member in the future! Comments or knowledge from the community regarding the through hole in the last image are appreciated. Jack | ||
Christopher Carnley Unregistered guest Posted From: 81.131.172.150 |
A nice job and good work. The original thin Vellumoid gaskets were intended in this case to keep the separation for the impellor to thrust button right, and maybe your cork gasket is too thick. A layer of blue Hylomar may be preferable. My memory of the 5th hole is a bit hazy but it may be an air release when filling the system. (Message approved by david_gore) | ||
Jack Higginbotham Experienced User Username: jhinmd Post Number: 38 Registered: 11-2017 |
Thank you Christopher. It has been an enjoyable little project and I have learned a lot with your help. It�s a great example of �nothing is a mystery as soon as it is understood�. The location of the impeller is indeed affected by the gasket thickness....great point. I will scrap the cork and take your advice. Thank you! | ||
Christopher Carnley Unregistered guest Posted From: 5.80.21.176 |
Are you quoting "Mark Twain", ie Sam L Clemens? (Message approved by david_gore) | ||
Jack Higginbotham Experienced User Username: jhinmd Post Number: 39 Registered: 11-2017 |
That may be....He certainly had volumes of wonderful quotes! Actually, I lifted that (in paraphrased form) from my father. I think his quote to me when I gave up on something was, �it�s only confusing until you understand it�. He was a wise man, (loved automobiles) and I miss him dearly. | ||
Jack Higginbotham New User Username: jhinmd Post Number: 40 Registered: 11-2017 |
Hello all, I thought I would post status. The Wraith ran beautifully through the summer and fall here. I never saw one drop of evidence escaping the cooling system. I am looking forward to spring and stretching the lady�s legs at some local gatherings. My next small project is to change the color of the wire wheels (after deciding against covers) and putting new tires on for the season. While the current Dunlop�s show no sidewalk cracking, they are decades old and don�t inspire confidence! | ||
Larry Kavanagh Frequent User Username: shadow_11 Post Number: 557 Registered: 05-2016 |
Continued happy motoring Jack. | ||
Jack Higginbotham New User Username: jhinmd Post Number: 43 Registered: 11-2017 |
Yet another update...the water pump continues to do the job flawlessly! I did paint the wheels burgundy to match a very small penstripe and I bought white wall Dunlop�s. The Wraith is gorgeous and wonderful but I believe it is time to pass along possibly. When the weather breaks here in Maryland, USA, I will post images. |