| Author | Message | |||||
Patrick Ryan Grand Master Username: patrick_r Post Number: 1282 Registered: 4-2016 |
Gents, During judging at the RROC Federal Rally, my car was marked down due to 2 missing rubbers. They apparently go in the bottom of the boot lid lip on the inside (cant see them unless you look under the lip of the boot lid)and would contact the bottom boot lip area near the 2 small chrome trims when the boot is closed that cover the 2 drain holes in the boot rubber as shown. 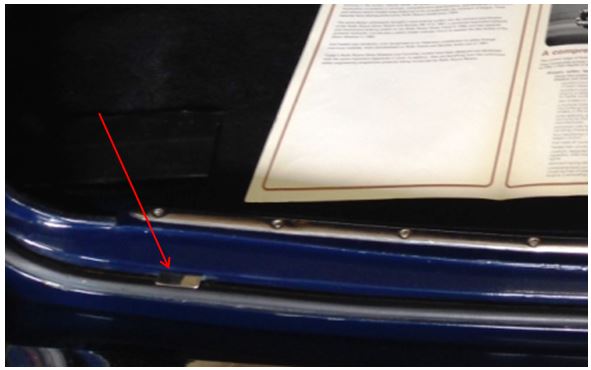 This is the part Flying Spares said is the correct part. 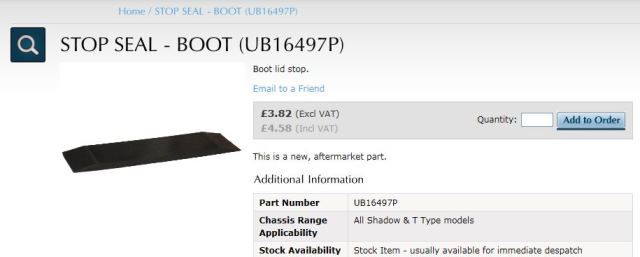 I have never seen this before on a Shadow, and I have always thought the single hole on each underside of the boot lid/lip was a drain hole? Any ideas, or pics where this is fitted to a Shadow boot lip? | |||||
Paul Yorke Grand Master Username: paul_yorke Post Number: 1776 Registered: 6-2006 |
It goes out towards the corner. If you slam the boot down hard it can connect there and chip the paint on the boot lip and pasture. If you look at Shadows you're sure to see sign of damage on some. I'd say about 1" goes up the vertical face. I'll try and get a pic. | |||||
Patrick Ryan Grand Master Username: patrick_r Post Number: 1283 Registered: 4-2016 |
Thanks Paul. Appreciate that | |||||
Robert Noel Reddington Grand Master Username: bob_uk Post Number: 1347 Registered: 5-2015 |
lovely colour blue. | |||||
Patrick Lockyer. Grand Master Username: pat_lockyer Post Number: 1174 Registered: 9-2004 |
Paul Patrick, Imo the holes in the boot lid are for water drainage and to let the internals of the lid breath. If the fault is the boot movement when closed with the lower catch s fully set down then this is what I think is needed on the lid to sit on the slam plate.  when fitted the boot lid shuts with a nice coach built clonk without the rattle tinny sound. Patrick, on the Shadow 1 etc did overiders have the plastic covers on the cars that were judged. Not many cars still have them over here. This pic shows the inner sealing strip then outer boot lid seal. The overider plastic bung can also be seen. 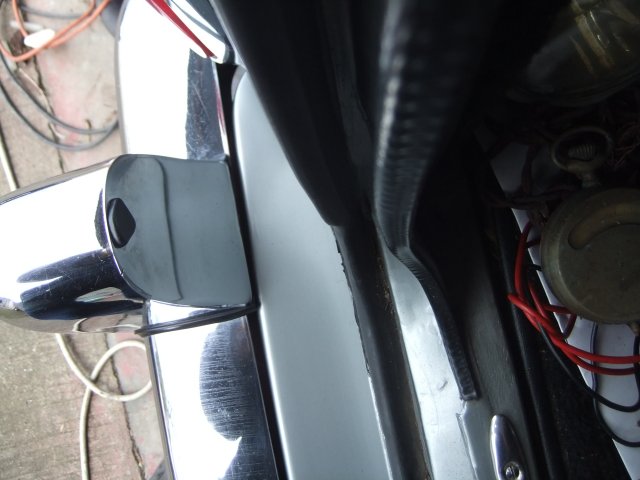 This last pic is the slam plate this gives the lid the nice solid clonk with the boot lid buffer. 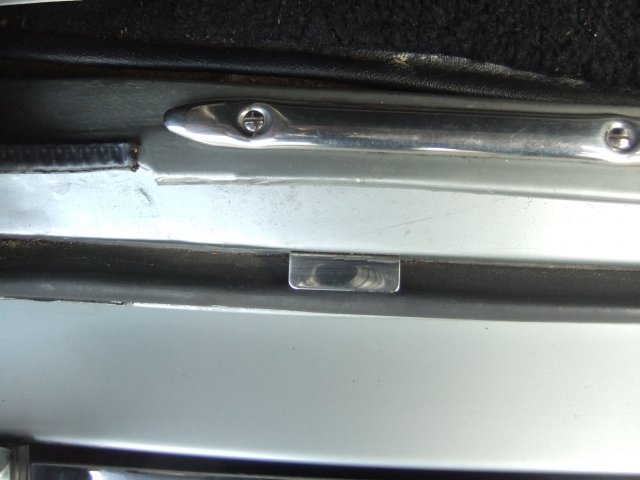 | |||||
Paul Yorke Grand Master Username: paul_yorke Post Number: 1777 Registered: 6-2006 |
Patrick L, the last picture is of the boot seal drain cover. Shadow owners, under that plate is a drain hole to allow water to run away from the seal. If not cut out when the seal is fitted or is blocked with dirt the seal will stay wet for much longer than necessary and can break down or go all wavy. If you have water pooling there or water dripping down when you open your boot you should explore these orifices. It can also overflow into the boot. Patrick R. A couple of pics of the boot stop rubbers, not very apparent under the boot seal. 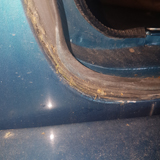 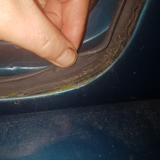 | |||||
Paul Yorke Grand Master Username: paul_yorke Post Number: 1778 Registered: 6-2006 |
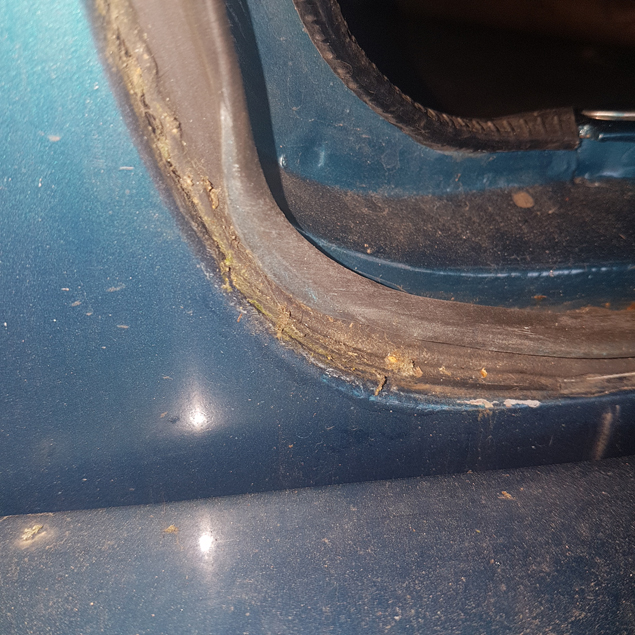  | |||||
John Beech Prolific User Username: jbeech Post Number: 262 Registered: 10-2016 |
Interesting thread because I believe Tootsie (SRX6816) would benefit from a new boot seal. Is Flying Spares my best source? Any clue regarding cost? | |||||
Kelly Opfar Prolific User Username: kelly_opfar Post Number: 164 Registered: 7-2004 |
Replacement Parts Inc. is a mere 8 hour drive away from you John. They're just west of Atlanta, Georgia. They're the factory supplier of weatherstrip and other items for Bentley heritage parts now. Here is the Shadow trunk weatherstrip they carry at $72: http://https://replacementpartsinc.com/trunk-weatherstrip-shadow-t-ub15696/ | |||||
Patrick Lockyer. Grand Master Username: pat_lockyer Post Number: 1177 Registered: 9-2004 |
IMO the rubber strip is a waste of time! Pic show it more clearly. 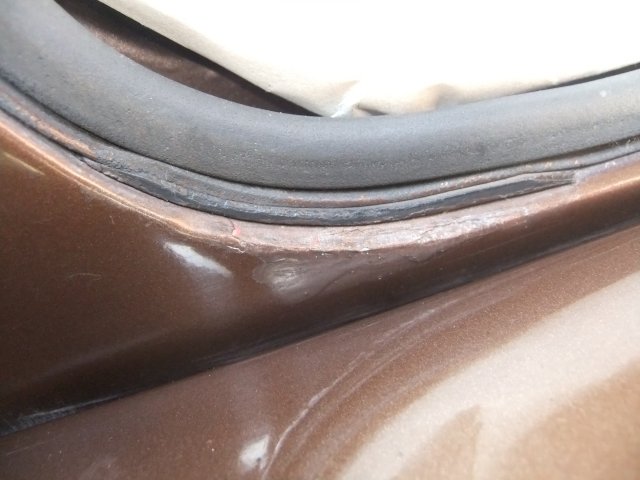 Years ago my Shadow one was recalled for a boot catch mod the boot [sloppy loose rattle] shut fitting was informed and new luggage lid seal with the short rubber strips fitted, this seemed to improve things but only for a short period of time. Most Shadows I have checked have this loose boot fitting. Maybe the Somerset Cider effects them. The end result fit the made up buffers perfect. The boot has no leaks with a good pressure wash proving how good the factory boot seals are with time. Both my cars do not have holes through the rubber below the chrome slam plates. IMO if you have water getting to the inner part of the lid seal you have problems! | |||||
Patrick Ryan Grand Master Username: patrick_r Post Number: 1286 Registered: 4-2016 |
Wow, Now this is all rather interesting and now confusing. The judge that pipped my car indicated that the rubber pushed in with a tail into the round holes. So this rubber glues on, but exactly where? Thanks for all the detailed images guys. Patrick your image of the rubber in question is interesting. Did you fit this, or was it already in place? Yes, My car has the triangular lubrication bungs/plugs for the over riders. Squirting oil trough these holes to lubricate the over riders is sure an unusual thing that's for sure. | |||||
Christian S. Hansen Grand Master Username: enquiring_mind Post Number: 554 Registered: 4-2015 |
Patrick R... You're kidding? "Lubricate" overriders?? OMG! MORE deferred maintenance of which I was not even aware!! They are not moving parts, nor do they interface with or touch any other components, as long as the rubber strips where they would otherwise contact the bumper are in place, so what gets lubricated? . | |||||
Patrick Ryan Grand Master Username: patrick_r Post Number: 1287 Registered: 4-2016 |
Christian, Apparently you are meant to remove the plug, and squirt oil into the overuder so it coats the inside surface in oil, from the top to the bottom so they don't rust out. This is what I was told, not sure if it is correct though. | |||||
Christian S. Hansen Grand Master Username: enquiring_mind Post Number: 555 Registered: 4-2015 |
...and by that same reasoning, I suppose that you apply oil liberally, and then wipe off, all over the entire surface of the underside of the chrome bumpers?...to keep them from rusting out?? | |||||
Patrick Ryan Grand Master Username: patrick_r Post Number: 1288 Registered: 4-2016 |
No idea mate. We may have to find the subject in a service manual to see what it does say. | |||||
Christian S. Hansen Grand Master Username: enquiring_mind Post Number: 557 Registered: 4-2015 |
I was kidding. The idea is absurd! LOL! | |||||
Patrick Ryan Grand Master Username: patrick_r Post Number: 1289 Registered: 4-2016 |
But I am now interested Christian. I also feel it is a dumb idea to oil over riders, and ignore the bar. It's now my mission  | |||||
Patrick Lockyer. Grand Master Username: pat_lockyer Post Number: 1180 Registered: 9-2004 |
"Did you fit this, or was it already in place?" Patrick I made these foam type buffers with self adhesive backing. They fit close to the boot drain breather hole and when the boot lid is closed they sit on the chrome slam bracket. They release enough pressure to rid the loose fitting boot and give it a nice coach built clonk on closing. As for the bumper bar and over riders they do rust from the inside out if salt and road dirt is collected and left unchecked. A blast with old oil every year will keep them ok. Bit of a dirty job but well worth it. 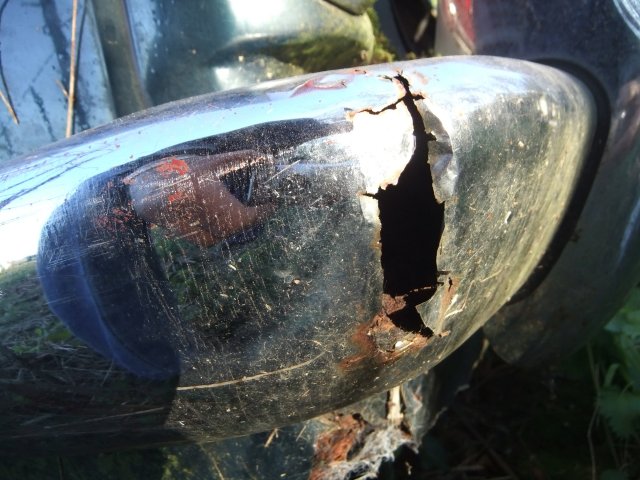 | |||||
Christian S. Hansen Grand Master Username: enquiring_mind Post Number: 558 Registered: 4-2015 |
Holy Moses!! If a particular climate can do THAT to overriders and the portion shown below, I shudder to think of the rest of the body components. I guess I am simply spoiled and incredulous from living in an essentially dry climate where rust is not even an issue and forgetful that other places are not the same. . | |||||
Patrick Ryan Grand Master Username: patrick_r Post Number: 1294 Registered: 4-2016 |
I'm with you Christian. My car was very lucky indeed to be delivered in London in 72, then shipped to Australia in 75. Some of the rusted bodies that are on the Flying Spares web site are simply stunning as to how bad they are. Patrick, That overrider is a shocker. Thank you for clarifying the overrider lube issue. I have ordered the rubbers from flying spares, along with 2 new bonnet stop rubbers (one broke during the judging of my car at the federal rally  ) and of course pointed out to me. ) and of course pointed out to me. I will report back when I fit them. | |||||
Patrick Ryan Grand Master Username: patrick_r Post Number: 1345 Registered: 4-2016 |
Patrick, I received my 2 "boot stop" rubbers today. Can you please let me know where I am meant to put these on the boot lid, and where they mate up to the boot lip itself when closed. 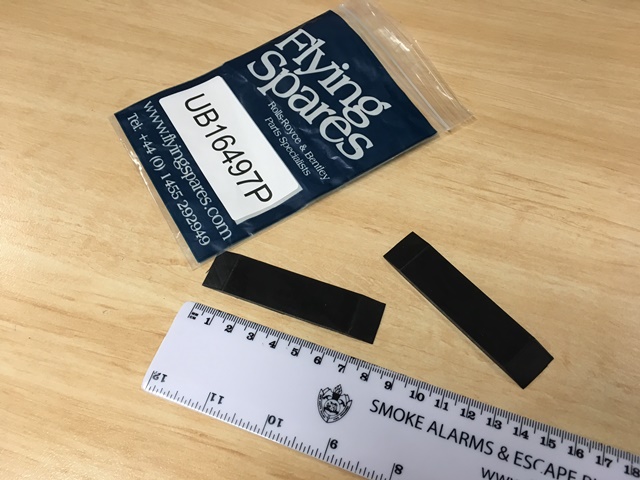 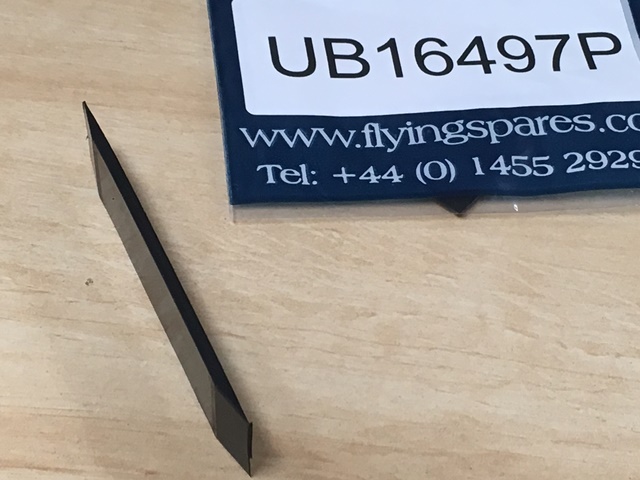 | |||||
John Beech Grand Master Username: jbeech Post Number: 305 Registered: 10-2016 |
Hmmm, I'd like to know also because Tootsie is missing the rubber where the two drain holes are on the boot's lid as well. What perplexes me is the OP (Patrick Ryan) said the rubber covers the holes but that doesn't make sense to me since I thought the idea was to allow moisture to drain freely. What am I missing in all this? Does anyone have a photo of these things actually installed as per the factory? Especially because Patrick said the judge claimed these fit with a rubber tail yet the photo of the replacement rubber shows a flat back, e.g. no such tail. I'm confused. Moreover, I'm tired of the rattle from the deck lid's loose fit. | |||||
Patrick Ryan Grand Master Username: patrick_r Post Number: 1346 Registered: 4-2016 |
Don't worry John, I am confused as well. This is literally a can of worms. Getting a lot of different things here. Patrick L posted images above. These are the first time I have ever seen any rubber on the inside of the boot lid lip as such. John, I do know the small chrome trim in pic one of this thread I posted, covers a drain hole for the boot rubber. Wether these, what I would call bump stops, meet up with this chrome trim I don't know. | |||||
John Grieve Frequent User Username: john116 Post Number: 52 Registered: 4-2012 |
Read the service manual here in relation to drain holes, additional sealing strips, etc. http://rrtechnical.info/sy/tsd2476/20.pdf Starting page 56 of the .pdf file. | |||||
Christian S. Hansen Grand Master Username: enquiring_mind Post Number: 571 Registered: 4-2015 |
Detailed as the instructions may be, the relevant illustrations S54 and S57 are less than stellar in terms of clarity. Photos posted previously on March 25 by Paul Yorke give more information in terms of the location of the sealing strips at the corners. I believe that the photos posted by Patrick Lockyer previous to Paul's and also on March 25 show different components...presumably a view of one of the buffer pads attached to the boot lid and the chrome piece attached to the boot rim upon which the pad contacts and rests when the lid is in the closed position, and thereby providing an interference contact fit such as to eliminate rattles and looseness. These are two separate and distinct issues, or do I err? The details of the drain holes are still unclear although the cited section of the manual indicates that they were not incorporated on early cars and retrofitting them involves drilling the holes. Why they are then covered, and with what, remains a mystery to me and my own '68 MPW Coupe is in storage and currently not the "daily driver", otherwise I would simply take a look at it and try to understand. . | |||||
Patrick Ryan Grand Master Username: patrick_r Post Number: 1347 Registered: 4-2016 |
Christian, Yes those workshop manual items and images are open to interpretation. I learned that very early shadows had the boot seal on the boot lid, not the body, which I found interesting. The mod, was to remove it from the boot lid & then fit it on the body. I also believe that the 2 boot stop rubbers I have purchased do not go on the boot lid at all and are in fact the 2 thin strips that Patrick L photographed for us below. 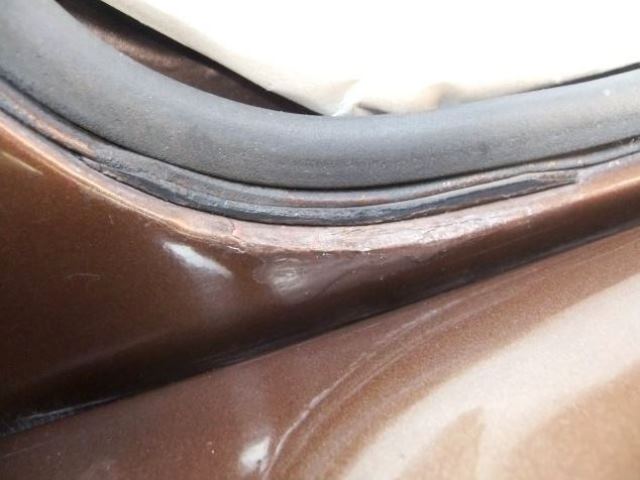 After speaking again with flying spares, and consulting a Shadow parts manual I can not see that ANY rubber of any type was fitted under the boot lip at all. 2 things interest me though. (1) Patrick L has fitted a rubber in exactly the place the rubber was described to me (2) The chap who pointed this out to me as being missing at the concours is not replying to my emails. He asked me to contact him so he could tell me all about these missing rubbers. Does anyone else have any input into rubbers, that are fitted to the underside of their boot lid similar in position to what Patrick L provided us an image of below, that are factory fitted originals? 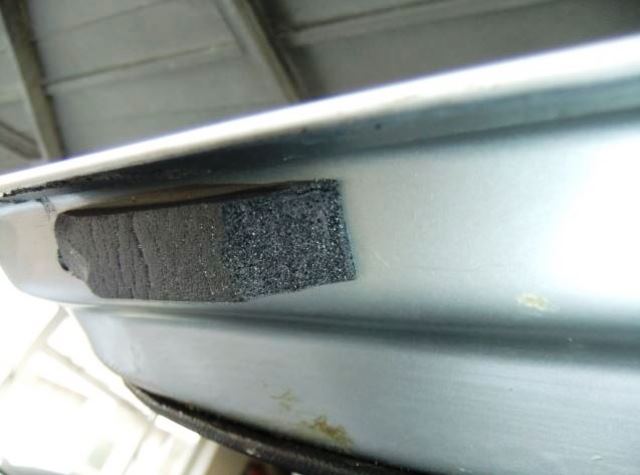 | |||||
Patrick Lockyer. Grand Master Username: pat_lockyer Post Number: 1227 Registered: 9-2004 |
Patrick I have an early parts book but where it is I do not know. I will keep searching. | |||||
Patrick Ryan Grand Master Username: patrick_r Post Number: 1348 Registered: 4-2016 |
Hi Pat, No need to look mate, I found this. What is interesting is that the items ALL relate to the boot/trunk lid only. To me this would indicate that item number 43 (part number UB 16497) all fit to the trunk/boot lid itself, except item 46, which as we all know is bolted to the body. Please see below. 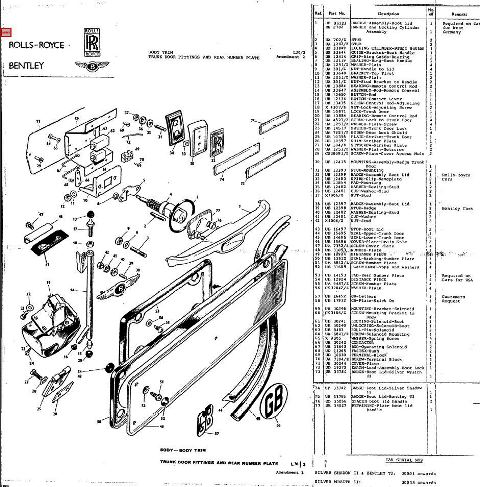 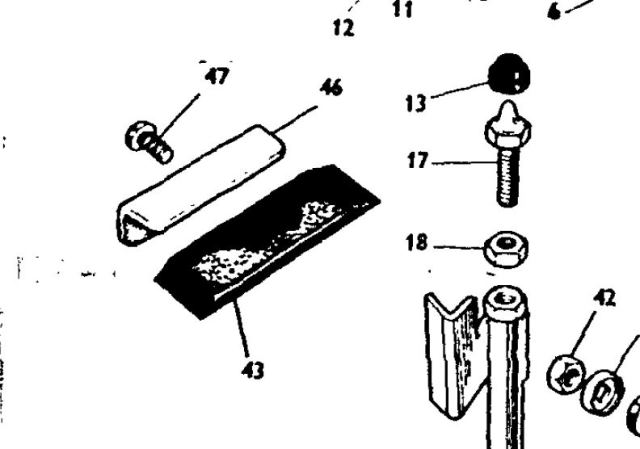  This is proving to be quite interesting indeed. | |||||
Christian S. Hansen Grand Master Username: enquiring_mind Post Number: 574 Registered: 4-2015 |
P.R.: Yes, the two parts are certainly different, and while of similar shape (long rectangle with gentle taper at each end) the width as well as the apparent composition appear to be different as well as the installed location. While I can visualize the need for the thicker piece attached to the botton edge of the boot lid, and its intended purpose, especially if it contacts the aforenoted chrome pad when the lid is closed, I cannot visualize the purpose of the thin strips that you purchased and as are attached to the rounded corners of the boot lip and under the other seal running around the perimeter of the lip, other than as an afterthought to close any gaps that may have existed and thereby to make a tighter seal of the lid and the rubber lip moulding at that corner location when the lid is closed. The installation position is clearly shown in your first photo as well as in Figure S-54. P.S. P.R.: You posted those photos while I was composing my post. Keep in mind that things changed over time, but now I am confused as well and given time, would be provoked to drive the 50 miles round trip to my storage warehouse simply to see how my early MPW is configured. In any event, the piece #46 appears to be "under" the chrome piece whereas in one of the earlier posted photos, it appears to be attached to the bottom of the boot lid and thus "over" the chrome piece when the lid is closed. ...and why the chrome piece "drain hole cover" covers the drain hole is counter-intuitive as would this not limit the ability of the hole to function as a drain?? Hmmm.... . | |||||
Patrick Ryan Grand Master Username: patrick_r Post Number: 1349 Registered: 4-2016 |
Christian, I've just emailed flying spares to see if p/n UB16497P is different to the part (item 43) mentioned UB16497 | |||||
Christian S. Hansen Grand Master Username: enquiring_mind Post Number: 575 Registered: 4-2015 |
P.R.: Want more confusion? "Boot" versus "Trunk"? I had thought that the "people separated by a common language" gave us "trunk" as the American version of "boot", and with this in mind it is odd that parts #44 and #45 use the term "trunk"! The page photo is too small to see where those parts are located, but one is for "upper trunk door" and one for "lower trunk door". Can you post photo of those parts from the page? Do you suppose that "trunk door" is synonymous with "boot lid" or something else??? Hmmm, again... . | |||||
Patrick Ryan Grand Master Username: patrick_r Post Number: 1351 Registered: 4-2016 |
Gents, I think we have an answer. As mentioned in the link John G has provided, the rubbers that I was told were missing, are in fact for earlier models only where the boot/trunk sealing rubber was fitted to the boot/trunk lid and not the body. The page clearly states that when converting the old boot/trunk lid rubber to the newer body fitted rubber: "The two buffers on the luggage compartment lid will no longer be required." Here are some images of a 67 boot/trunk lid I found. Note, the lid mounted rubber and the 2 buffers. What is interesting, is that this boot/trunk lid does not have the 2 reverse lights that I understood all earlier Shadows had. 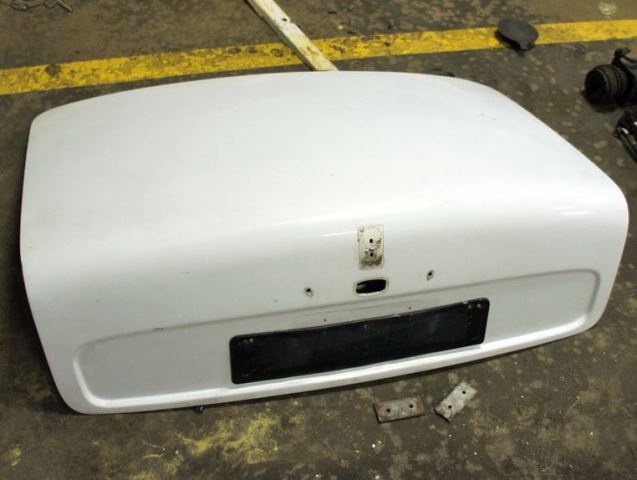 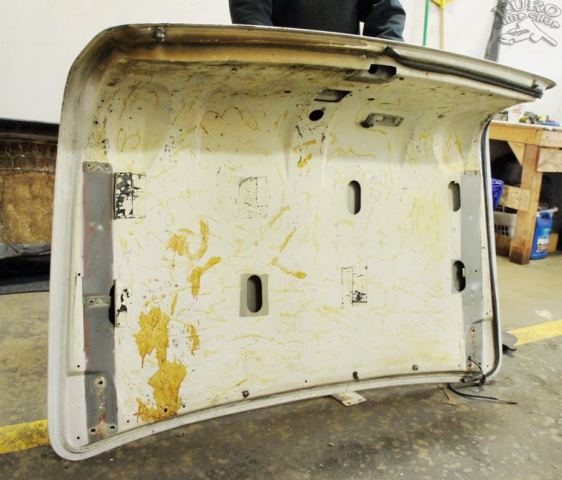 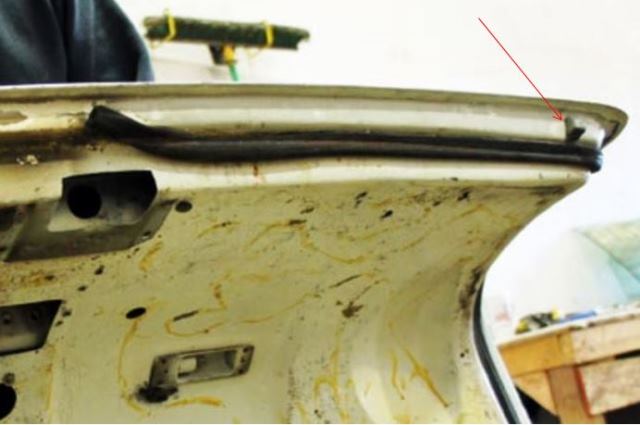 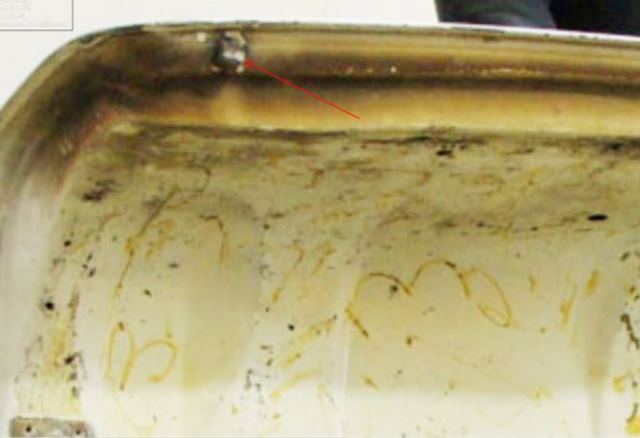 | |||||
Geoff Wootton Grand Master Username: dounraey Post Number: 1680 Registered: 5-2012 |
Well done Patrick. Great detective work. I've been following this thread with interest. The boot seal on my car needs replacing and now everything is clear as to what is required. Geoff | |||||
Patrick Ryan Grand Master Username: patrick_r Post Number: 1356 Registered: 4-2016 |
Mate, I pestered a lot of people for this LOL Even our club chief judge. The only thing I can say, is just use a good solvent or prep to the body area you will be gluing the rubber to. It is all in the preparation as to how good the end result will be. Also, be sure to follow to the letter what the glue/adhesive manufacturers say about gluing. I've seen some just fall off after just a few days mate. Now, Where is that judge that pipped my car????  | |||||
John Beech Grand Master Username: jbeech Post Number: 309 Registered: 10-2016 |
Patrick, earlier today I dashed off an email to Dave at Flying Spares and referenced this thread and asking him to kindly review and try to help clear up the confusion. Of course by then he was sound asleep in bed so hopefully he reads it in the morning, takes an interest, and helps come up with appropriate part numbers. This because Tootsie has the two drain holes in the deck lid but it's patently obvious to me nothing has ever lived there (no witness marks whatsoever in the paint). Anyway, the largish rubber bumpers in the photo of the yellow deck lid look perfect. Thing is, it doesn't have the reverse lights, which Tootsie does have . . . so I am once again rather confused. Worse, the rattle due to the deck lid is driving me nuts! But covering up the drain holes would really drive me crazy. | |||||
Christian S. Hansen Grand Master Username: enquiring_mind Post Number: 578 Registered: 4-2015 |
Patrick R: Don't want to be the fly in the ointment but contrary to clearing things up we have added additional nuances. Note that the two "buffers" (newly introduced word) shown in your photos are of a completely different shape than those in the photo provided by Patrick L and repeated in your posting of earlier today, so now there are two different "things" attached to the boot lid. . | |||||
Christian S. Hansen Grand Master Username: enquiring_mind Post Number: 579 Registered: 4-2015 |
Patrick R.: Let's go back to the very first post wherein you started this thread by saying that you were marked down for not having the two rubber pieces that go on the bottom of the boot LID lip. In your first photo it is not clear what you are pointing to but the area noted is clearly not the LID lip, but rather the boot RIM lip and appears to be the chrome plate presumably covering the drain holes. The second photo is the part recommended by FS but is clearly the thin and long rectangular piece that goes into the corners of the boot rim and under the seal at those areas as shown in both Fig S-54 and photos from Paul Yorke and Patrick L, so these are different items. Further it is now unclear why you were marked down for not having the buffers of whatever shape (we have found and photographed at least two) which were apparently only used on "early" Shadows, but, correct me if I err, yours is in the 12,000 range which is definately past the "early" chassis series, so would not have had the lid buffers anyway, so WHY were you marked down for not having something that did not exist by the time production got to your chassis?? . | |||||
Patrick Ryan Grand Master Username: patrick_r Post Number: 1357 Registered: 4-2016 |
Fully understand that Christian, I was thinking the same thing. It does appear that any older car (crap, does this mean I need to look in the chassis specs for all mods made to these cars, to get a chassis break as to when they started fitting the new body mounted seal?) had them as long as the boot rubber is attached to the lid. My thoughts are the judge had it wrong in the first place. Based on my car nothing should be there. But if you had an older car (like Johns) as long as the boot rubber is still attached to the boot lid, these rubbers need to be in place. | |||||
Patrick Ryan Grand Master Username: patrick_r Post Number: 1358 Registered: 4-2016 |
While searching the net regarding boot/trunk lid images I stumbled across this. Looks good, Not sure about that price though  https://www.jamjarjunkies.co.uk/product/rolls-royce-silver-shadow-desk/ 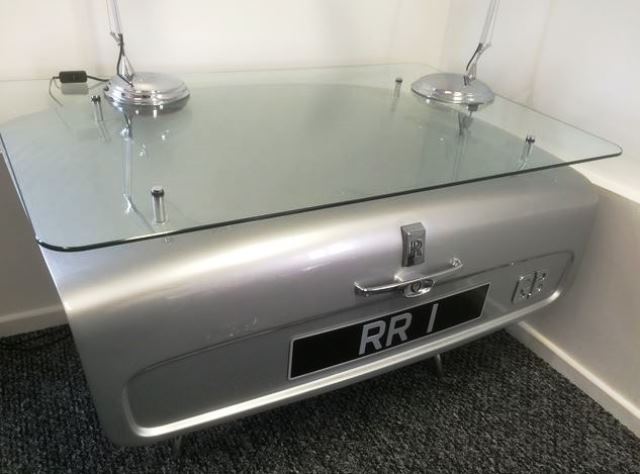  | |||||
John Beech Grand Master Username: jbeech Post Number: 313 Registered: 10-2016 |
Kind of puny size-wise as desks go, in my opinion. | |||||
Patrick Ryan Grand Master Username: patrick_r Post Number: 1363 Registered: 4-2016 |
Agreed John, Not a bad idea though. I love seeing new car related ideas that people come up with. | |||||
Geoff Wootton Grand Master Username: dounraey Post Number: 1952 Registered: 5-2012 |
This has been a very useful thread. I have just received a replacement boot seal for my SY1 (SRX18501) and am waiting for the stop rubbers to arrive. In the meantime I am preparing for fitment. I have carefully removed the original seal and am looking for advice on how to finish the preparation. There is residual rubber still stuck to the boot channel. Should I carefully sand it off? Are there any solvents I could use? I'm also wondering what adhesive to use. From the youtube videos it seems "3m Super Weatherstrip Adhesive Black" is the best way to go. I'd appreciate any guidance/opinions. | |||||
Larry Kavanagh Prolific User Username: shadow_11 Post Number: 175 Registered: 5-2016 |
Don't know what is the best product to remove the residual rubber in the channel, perhaps a narrow scraper. Flying Spares sell a special primer to paint onto the boot channel and the appropriate glue to use when the primer has dried. | |||||
Christian S. Hansen Grand Master Username: enquiring_mind Post Number: 791 Registered: 4-2015 |
Geoff... At hardware stores I frequently see a product called "Goo Gone" which from the label description seems to be intended for this very purpose. I've never been provoked to try it to find out what it does. Wanna be the guinea pig? If so, please report back! . | |||||
Steve E Unregistered guest Posted From: 5.69.191.118 |
Wow, a very interesting thread. I have now fitted several RR Shadow boot seals and it took me quite a few attempts over the years before I got it right and before I got it decent looking. Just to assist here firstly you have to use a special HyBond activated adhesive. It is sold as a special kit but quite expensive. I obtain mine from the manufacturers and for a whole litre is less than the small kit usually supplied. Marine areas and boat makers use this type of glue frequently. Basically it is a type of high temp solvent based contact adhesive and resists heat and moisture and without the activator can be used for vinyl, carpet, trim and kitchen formica contact adhesive. Not sure actually chemically what the activator does but for sure it will NOT retain the boot seal to the body without the activator and the use of any other type of standard contact adhesive will just not work. The corner rubbers are there for those that fail to know how to shut a RR boot (gently) and unless fitted damage will result to the paintwork due to over slam. They should be fitted very close to the edge and not so far inboard as shown on the gold car pictures. They DO NOT fit under the chrome bracket covering the hole, I think that is just an unfortunate position the part has been placed in the parts manual picture and should not be viewed as an assembly position. Removing the old rubber is slow and time consuming indeed if it was originally fitted correctly and should not just be pulled as it can bring off the paintwork. Removing the boot lid does make the whole job and access easier. I carefully use a scalpel and I mean carefully but first I wipe over with a solvent panel wipe and then put masking tape all round the aperture over the radius down to the top of the rubber lip where the seal is stuck to the body. Removing as much of any residue as possible sometimes just rubbing and peeling away with my fingers. I have tried various solvents but not a lot work and anything stronger risks damaging paintwork. Once the rubber is removed I then mask up the boot channel to the base of where the lower part of the rubber was bonded to the body. Now with the paintwork protected any stubborn residue gets a good rub with fine sand paper....well not actually sandpaper but the stuff the body-shops use to rub down body filler. Finally a good rub with a 'scotch cloth' a bit like a pan scrubber but again what is used by body-shops to lightly key in paint for spraying. Any areas where metal has been exposed get a standard coat of touch in primer. With the paintwork still protected with the masking tape I then refit the corner rubbers. If someone has previously not fitted them then I just make them from a standard 3mm sheet of rubber matting and file the chamfers to each end. Whether it is right or wrong I then carefully superglue these rubbers in place. Too far inboard they will prove useless and ineffective but just placed on the edge of the panel radii they are inboard enough not to look so obvious when the boot lid is shut. Now I go round the whole aperture where the boot seal is to be glued with a rubber primer (tetrosyl) which I get from a local windscreen fitting company. This is the stuff they use on paintwork prior to bonding in a windscreen. They usually have some part used bottles and generally give one to me as the stuff does not last long in the tin when be opened. Again with the masking tape still in place this is applied all round the area to be glued. When dry the masking tape is removed. Perhaps I need to explain why as when I did one thinking I could leave the masking tape on and not have excess glue to clean off (seems logical) however when I pulled off the masking tape it took glue off stretching like an elastic band so now the tape comes off before gluing. When eventually I do get to do another I may leave the masking tape on till the very end but not sure. Anyway the black primer now gives definition to the area to be glued. Mix no more than 100ml of glue with the proportional amount of activator and glue the boot aperture. Don't glue the rear area underneath the chrome brackets where the hole is or allow glue into the two drain holes where the two chrome shut brackets are fitted. This is a contact adhesive so can/should be allowed to just dry off for a while. Just in time to now glue the rubber seal. Well the one thing here that gets missed is the surface of the rubber to be glued MUST be cleaned again with a low solvent panel wipe. Sorry to say the obvious but rubbers and manufacturing processes give off silicones and glue just does not like silicones or grease. Now time to glue the rubber. It is very important to lay this out so glued bits of the rubber don't start touching other glued bits as they will just stick and one surface will be left with no glue left on it. Put a slight marker at the centre point of the rubber then glue the larger flat surface only. Again wait to dry off until touch dry to the fingers......test at each end as about a few inches each end are surplus. Now the care and fun begins. Usually contact adhesive is very friendly when fitting formica or vinyl roofs to flat surfaces. Both sides when touch dry will allow for movement until a slight pressure is applied ...... THIS DOES NOT WORK when fitting what amounts to no more than a wobbly snake to a vertical surface where you have to put some pressure on just to keep it in place to even get started. There are no second chances here and why easier with the boot lid off. Starting at the centre just underneath the rear windscreen identify the mid point marker you put on the rubber strip and attach about a couple of inches making sure you have the rubber the right way up. At all times make sure the trailing pieces of rubber are not allowed to come together so lay them out to the rear like trailer arms. The little flip that should be coming in-board and upwards on a new seal should finish level with the exterior body. This may appear higher than the old seal as eventually a set condition does take effect on the seal. However if the seal is positioned too low to the body it could result in a leak and too high too much pressure could cause the seal to be strained off the stuck area to the body. Complete one side all down to a couple of inches from the boot latch bracket then carefully slice a straight cut at the desired centre point and remove any excess to the centreline of the latch usually about 6 inches comes spare so expect about 3 inches each end to cut off. If left with more check you got the centre point right before cutting. Work your way round the opposite side and just lay the rubber end on top of the other side then carefully cut to match the joint. Again I run a slight bit of superglue on the end of the seal then butt up and stick down the joint. As there was no glue placed under the chrome brackets around the back of the holes on the bodywork the seal will not stick here as it requires mating glued surfaces to form a bond. This now will allow drainage to still occur through these holes Cleaning away excess glue close to the seal that is spoiling the finish I have found is best left for 24 hours and also the boot lid should not be shut for 24 hours until the glue bond has fully cured. Removing any excess glue needs to done then after 24 hours and not left too long and I have found wooden lollipop sticks or plastic spreaders are the best here and avoid damaging the paint or the rubber seal if you need to get close to it. The residue glue generally comes off like an elastic band when fresh. Having hopefully avoided too much excess in the beginning I never resort here to any strong solvent cleaners as they can damage the surface of the rubber and any penetration onto the freshly glued seal area would just not make me too confident. Well to date I have never had one come away apart from my first attempt with ordinary contact glue nearly 30 years ago and the picture should show you the finish I now achieve. As a final detail I take an artist brush with matt black water based leather dye paint and run over the top lip to body as the glue dries white and can always be seen sandwiched between the two. Immediately wiping over with a damp rag removing anything from the paint work just improves the visual sight of the white glue edge left at the top. Not one of RR’s best designs IMHO as the seal joint always fills back up with dirt and body polish so they never really look that perfect. hope this is useful. I do have some high resolution pictures showing it all stage by stage but can't upload them as too large a file so have just reduced this one picture format. email me if anyone wants more step by step pictures. Sorry no pictures won't even upload this picture I have reduced so sorry cannot post any pictures as says less than 1kb and not sure how to make any smaller. Regarding the holes in the overiders I think these possibly are just there for hooking onto the fixtures for dipping when being lowered into the baths for plating or possibly just a drain hole. If the overiders were hooked into the attachment holes on the flange for bolting to the bumper they would create a bath shape and not drain out so hooking at the top seems the most likely to me. Moderator input: Steve, please register as a member and you will be able to post images in your posts. Guest contributors are excluded from posting images to minimise unacceptable content posts. (Message approved by david_gore)} | |||||
5teve E Unregistered guest Posted From: 5.69.191.118 |
OK I have registered to add some pictures. I am sure I registered years ago but have forgotten my username and passwords and as we change broadband suppliers not even sure what email address would have been used years back. As it is also mentioned in this post about the bumpers and overiders I will share my little experience here too. However just to finalise the situation regarding the OP's mark down. It is the corner rubber strips that are missing off your car, nothing to do with anything on the boot lid as there should not be anything when the channel seal is fitted to the body. These strips are purely to prevent paint damage on overslam by ignorance of how to shut the boot lid. The gold car as I said they are fitted too far inboard and can be seen by the paintwork damage having no effect at all. The lip on the main seal does tend over years to take on a 'set' on the flip tip that makes contact with the inner boot skin and that is when the boot lid can start to feel a little rattly as the seal starts to lose its cushioning. A quite observant but not very knowledgable or confused judge here IMHO probably got tipped off by another competitor. But hey my Ferrari always gets marked down just because my 'nyloc' nuts are blue plastic lock ring instead of the official Ferrari yellow. With respect to the bumper comments the overiders themselves don’t tend to rust through the metal as quick in years as do the corner parts of the rear bumpers. For those of us that drive on the ‘right’ side of the road it generally tends to be the side that spends most of the time getting the road dirt and salts splashed up from the rear tyre on the kerb/gutter side, so seen more often in UK on the rear left bumper quarter piece. The two areas that rust through are where the retention brackets are welded onto the rear inner. One at the side, and one right on the corner as the picture posted earlier on the thread clearly shows how bad they can get. Unfortunately the plating processes, whilst dipped in a tank, are actually achieved by an electrical charge which attracts the plating onto the metal. The brackets therefore get nicely plated on the outer surface but act as a shield which does not allow the copper/nickel or chrome to get behind the bracket or onto the metal of the bumper behind the bracket. This results in just bare metal being left in the area around the rear of the brackets and both areas are prone to rusting through badly. The rest of the metal can be fine and totally sound. I changed both sides of mine 30 years ago when new replacements were still available albeit hard to find. I liberally painted all around the insides where the brackets, Then injected waxoil through the threaded bolt hole and then used a red oxide primer and hammerite on the whole of the bumper inner surface too. 30 years on they are still perfect and rust free. I decided to have my original right side one repaired which was just showing signs of rusting through on the outer chrome from the back and the condition of the left side was actually quite good which suggested this had probably previously been replaced before I purchased the car. Having been in the automotive engineering sector I had contacts to do the work. The new replacements were not cheap and even back then quite scarce to obtain so I thought best to keep the originals as spares in case of any aging on the chrome surface of the newer ones. The rusted one I then had the whole area laser cut out around each bracket and new metal was welded in and the outer skin refinished then both sent to be re-chromed. Apart from the weld which can be seen on the inner surface the outer is totally undetectable that any repair has been done. They have been stored in the plastic bags in the garage now and 30 years on I don’t think I will ever need them as I don’t intend changing my car so maybe will sell on one day. The rear bumpers are actually very easy to remove and well worth it to clean and paint behind if you get the chance. Best with two people just remove the two nuts at the rear and slacken off the two bolts at either side near the front of the rear quarter parts. These just fit into a ‘u’ shaped slot so do not need to be completely removed. Before pulling the whole bumper backwards place a large piece of cardboard either side between the rear wing and bumper quarter. Cutting a strip out about an inch wide half way up the centre cardboard allows this to be slid down over the side fixing and thus prevent the bumper corner damaging the paintwork as the bumper is pulled backward it has a tendency to wobbly a bit while the studs are being extracted out of the rear bracket holes. Again a person either side to do this really is required to ensure maximum support for the weight of the bumper. Whilst I did need to replace these parts on the bumper years ago I consider myself fortunate as the original owner had had the car Ziebart treated. This was a big rustproofing business in the UK back in the 70’s for injecting and coating a car with waxoyl and the car has no rust or indeed has had any panels or wheel arches needing replacing as ‘she’ approaches 47 years and 120k miles. I have just fitted an everflex roof as washing and polishing the roof skin was just getting too hard as I aged too. With the car being claret red and years of polishing I also decided to give it a repaint so as to now last me for hopefully another 30 years. I will upload all the pictures on the boot seal and bumper as soon as my registration is approved. (Message approved by david_gore) | |||||
Steve Emmott New User Username: steve_e Post Number: 2 Registered: 11-2018 |
Could not load pictures direct as size too large and struggled to get to required 640x640 so I have loaded the pictures onto PDF files and attached them here. The boot seal shows corner rubbers fitted and primed and the second PDF file the finished seal. Third file is the rear bumper quarter repair, the bracket was just patch welded but around the area you can see the scar line where the metal was laser cut and a new piece welded in. Also shown is the finished chromed outer side which from the reflection you can see is absolutely perfect finish.
| |||||
Janne Aittola Yet to post message Username: jannea Post Number: 1 Registered: 7-2018 |
I just re-installed my boot seal and according to Steve's instructions I did it all wrong? I added couple of pictures of the installation and propably I should turn the seal to different direction and also install the seal "higher" to get a watertight installation with the lid? 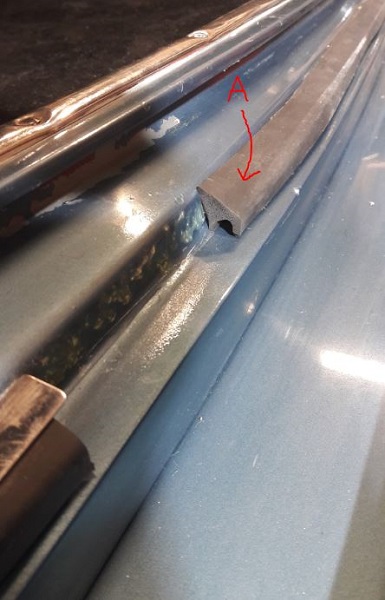 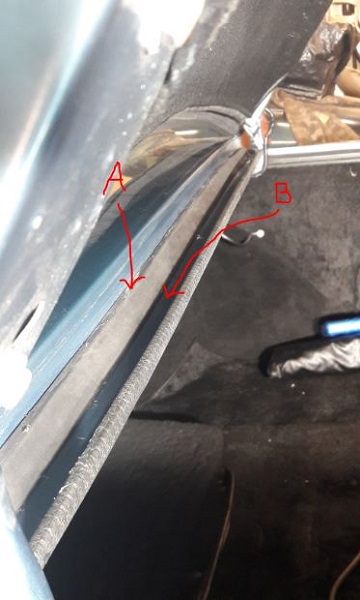 | |||||
Robert J. Sprauer Prolific User Username: wraithman Post Number: 174 Registered: 11-2017 |
The seal is in wrong. The wide flat side is the adhesive side and the round channel faces upwards to catch water when the boot is opened. 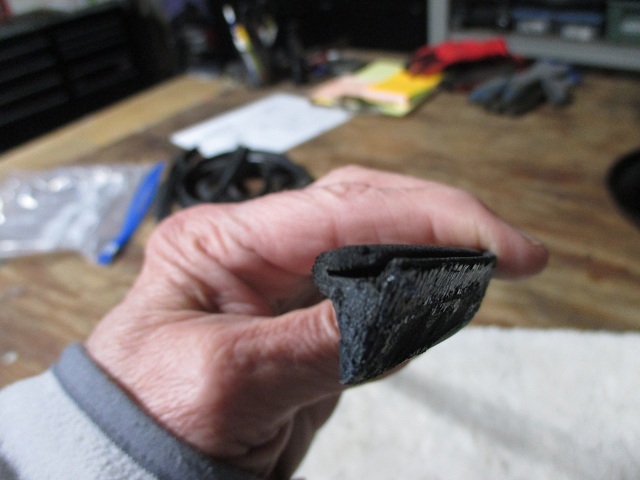 | |||||
Robert J. Sprauer Prolific User Username: wraithman Post Number: 175 Registered: 11-2017 |
The seal when attached to the body is almost flush with the body and squeezed down a bit by the boot lid to provide the seal. | |||||
Steve Emmott Prolific User Username: steve_e Post Number: 119 Registered: 11-2018 |
Robert's picture shows the correct orientation but it should, on top point of deep right hand edge, be glued to the body just about 8mm lower than the outer body skin and not level. *(see comment below). When the seal is new, before it has taken a 'set' with the boot lid pressure when closed, the flip will sit high on the folding down part seen in Robert's picture and it should not completely be collapsed when boot/trunk lid is closed so also the boot lid thickness has to be taken into account otherwise too high and the rubber can be pulled away from the body skin or even tear. *You do have to look closely though at the profile of the rubber and make some judgment on the extrusion as I have seen many variances in later patterned parts even those supplied as a genuine RR part. Your fitting is too low at the back and the seal the wrong way. It will allow water in the way you have done it. It is very important too to use the correct two part activated glue and prime the paint first. I think adequate coverage on installing is covered above but maybe a separate technical article would be better extracted. I have tried to upload pictures that show better the lip and correct position when fitted. 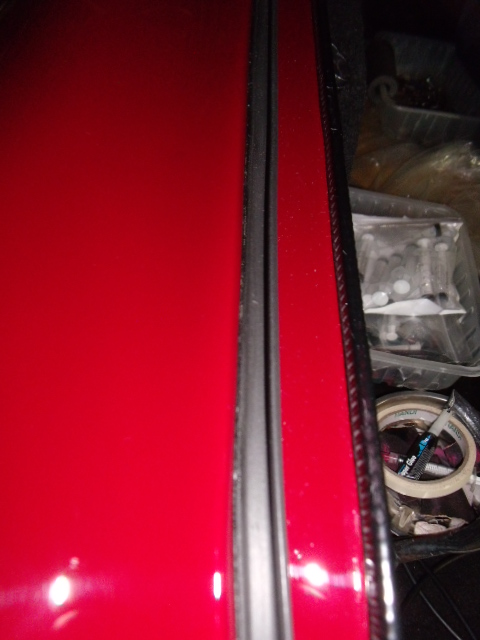 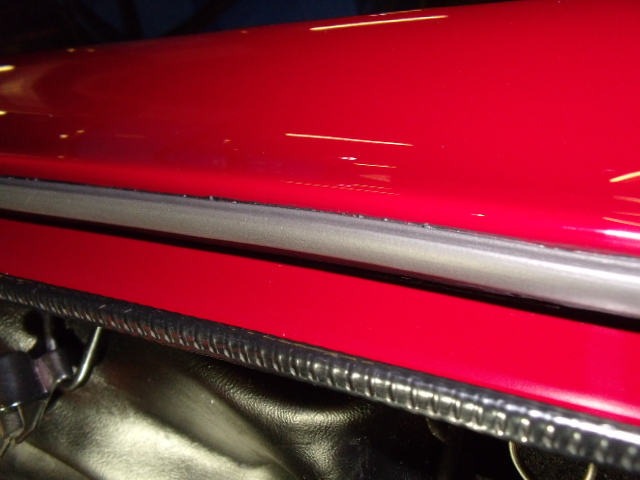 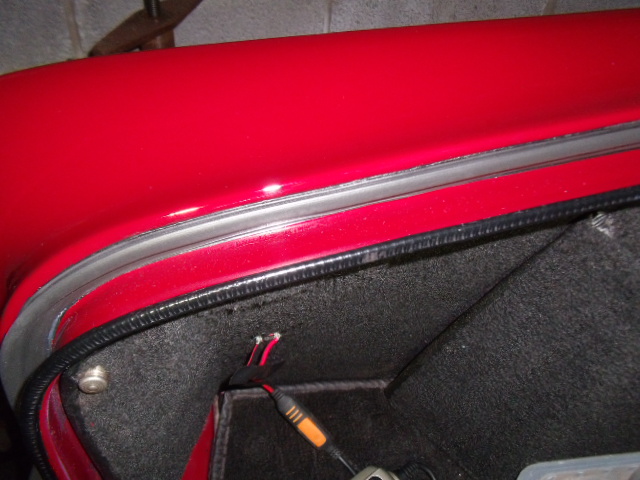 | |||||
Steve Emmott Prolific User Username: steve_e Post Number: 121 Registered: 11-2018 |
David G......any chance the PDF files I have added in one of my above posts can be altered to show them as pictures. It was all I could do before I discovered how to resize pictures.... BTW... I still have my old seal which I removed that was not actually very old. I did chose to fit another new one after repaint. Quite useable if anyone wants it FOC apart from postage costs...... Steve, No problem just send me an email at drh14434@yahoo.com.au and I will email the jpeg version of the PDF files to you. Do you want them full size or resized to forum posting size? With suitable coercion applied, I can send both versions to you. You will have to do a new post with appropriate commentary to go with the images. I cannot add the pictures to your previous post as this is not permissible with our software presumably to stop hackers or other low-life characters posting unacceptable content. Have now extracted images and they are ready for forwarding to you.  . . . | |||||
Steve Emmott Prolific User Username: steve_e Post Number: 122 Registered: 11-2018 |
Janne...Also can see from your fitting you have glued the lower part of the rubber to the wrong surface....as a result of having it the wrong way round...this will also prevent correct drainage through to the drain holes and cause water to rest in the boot interior lower part. Also why have you a large gap left? It appears to me the rubber was never fitted correctly in the first place as the paint looks very clean on the lower edge where it should be glued. Many early cars were altered as a dealer update and the rubber repositioned from the boot lid to the body channel and sadly a lot of dealers did not fit them correctly back then when the service updates were done. | |||||
Steve Emmott Prolific User Username: steve_e Post Number: 130 Registered: 11-2018 |
Thanks David, Sorry to put you to the trouble as I still have the original images and now learnt how to resize. If it means a new post I can do that now anyway. I just thought it more appropriate to filter them in to replace the PDF files in case some could not open PDF files. When I get time I may just put a post up on changing a boot seal like I did on fitting an everflex and can add all the images then. All the best | |||||
Janne Aittola New User Username: jannea Post Number: 4 Registered: 7-2018 |
Thank you Robert and Steve! And you are right Steve, I suppose that the previous owner has fitted and cutted the seal wrong at the first place and that's why it is now too short. One evidence to that is a homemade "extra" seal in the lid shown in the picture. 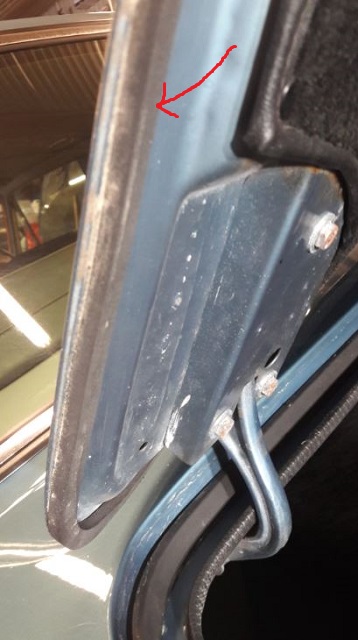 | |||||
Steve Emmott Prolific User Username: steve_e Post Number: 132 Registered: 11-2018 |
Janne that really is a bit of a concoction albeit the seal profile of the body channel you have fitted is original shape extrusion the lid seal is not even an original one back then. I think the only way depending on how good your car is would be to start from basics. A badly fitting boot seal causes water to run into the boot which then finds its way down into the front of the rear wheel arch 'dog leg' where it joins the boot/trunk fire wall inner and the rear side valances under the bumper, these are common areas where you see a lot of heavy rusting on these cars as the water gets trapped. My advice would be to remove the boot lid seal completely as that would totally not work with the correct later seal. In fact the whole job is done more simply with the boot lid off. You are in an area where some local repaint would not be too costly and no need to drift onto the outer body paint. It could even be done with aerosol cans to keep costs down. Again, I would have the body channel seal removed what you have currently fitted and the channel and surfaces up to the outer body all cleaned up and repainted too. It is also possible you do not have the holes under the two lower chrome brackets so these need to be added for drainage. Then you need a new correct seal....these are not cheap around 100 GBP but I do have a good used one you can have. You then need the correct 2 part glue (no substitutes no matter what any companies claim) and follow the process I have written above. I appreciate it will be time and cost but you have to decide on what the general condition of the car is as just leaving as is will give you future far more costly problems. If you can open the PDF files in my previous post above a couple of months ago you will see more detail stage by stage. All the best | |||||
Janne Aittola New User Username: jannea Post Number: 5 Registered: 7-2018 |
I highly agree with your suggestion of the repair style, so I would be very interested of buying the used original seal from you. And thanks a lot and I will send you a private message. BR/janneA/Finland | |||||
Steve Emmott Prolific User Username: steve_e Post Number: 139 Registered: 11-2018 |
Thanks Janne I have got the PM and sent you one back. You can have the seal free of charge as long as you cover postage costs which I will get a price for once I have your details | |||||
Janne Aittola New User Username: jannea Post Number: 6 Registered: 7-2018 |
That is great, thank you! | |||||
Graham Phillips Experienced User Username: playtime Post Number: 26 Registered: 3-2019 |
G'day everyone,.... Just a question about the rust/corrosion issue mentioned at the start, Has anyone considered using electronic corrosion protection to cover the whole car? I have a 'Counteract' electronic system in my daily driver (4x4) and I have ZERO corrosion issues, not even any signs of it. Its been driven off road and along beaches etc. Ive done 942,000klms so far. Graham. | |||||
Steve Emmott Prolific User Username: steve_e Post Number: 144 Registered: 11-2018 |
Graham.....never heard of it.....please tell me more purely out of curiosity..... BTW 942,000km wow is that a typo or do you ever get out of that car  | |||||
Patrick Lockyer. Grand Master Username: pat_lockyer Post Number: 2113 Registered: 9-2004 |
I have been on about it for years, have even shown ways for testing for it. think most folk thought I was nuts! Pleased to hear that there is some sort of running protection kit available. Clue to one of the probs, heater matrix failing. Should be one of my posts somewhere on here  | |||||
Steve Emmott Prolific User Username: steve_e Post Number: 146 Registered: 11-2018 |
Well I decided to do some research as an ex Naval Chief Engineering Officer... Electrical and Electronics Division I am used to and understand Anodics and Cathodics. I seem to remember the whole scenario of changing cars from positive earth to negative earth was a scientific discovery that it changed the way the electrons moved in the metal and reduced metal rust.... I also remember back in the early 70's the car industry moved to painting the cars using an anodic/cathodic process. I can't remember which way round but I do remember British Leyland at the time used the opposite way from the rest of the industry. This resulted in the paint just falling off the car. We used to tape up the sills/rockers when installing sunroofs on Jaguars etc and when the tape was pulled off the paint came off with it. I got to this manufacturers product and watched the video and decided perhaps there is something in the theory of how it works as ships have used things like this for many many years. However it looks like it is something being well exploited by companies for all us suckers (and I have been one in the past) that have too much money and just want our lovely classic cars to last despite the cost. Anyway here is the video link I found but I will keep looking and researching out of curiosity. https://www.youtube.com/watch?v=5kd3wU09vEs BTW Patrick you are nuts (only joking) but I am sure it is down to that Somerset scrumpy.....but you are a very useful source of information.  | |||||
Graham Phillips Experienced User Username: playtime Post Number: 27 Registered: 3-2019 |
G'day everyone,.... Steve, Well as I had it explained to me is this floods the vehicle body with negative electrons because corrosion can only happen in a positive electron environment, The vehicle body gets about 200+ volts at some miniscule amperage. This effectively starves chemical reaction process. And no, 942,000klms is NOT a typo, I have run a logbook on all my vehicles and I have done so with this one right from the day I drove it off the showroom floor back in 1995. I intend to overhaul the engine at 1 million K's. Its just down slightly on compression but still runs smooth as silk and dose not use any oil at all! And no, it dose'nt smoke either! Apart from the usual consumables, fluids, belts filters It has never missed a beat or failed to 'proceed' and apart from a few stone chips has NO rust or corrosion. I got 400,000klms out of the original brake shoes/pads, the only reason they were replaced was because the discs and drums got a little glazed and I had to have them machined, I still have fitted the first replacement set and no sign of glazing yet and they have done an extra 140,000klmts more. I do an average of 50,000klms a year just going to and from work as its a 200klm round trip for me 5 days a week. Hmmmm, I wonder if the Shadow can do that? Graham. | |||||
Steve Emmott Prolific User Username: steve_e Post Number: 147 Registered: 11-2018 |
Graham, As electronics flow from negative to positive and the battery is connected to the body -ve using it as the circuit I would have to say technically the body is already being flooded with negative electrons as soon as a positive connection of a component is connected anywhere on the car. Hence again why I believe the auto industry made the big change to negative earth from positive earth. My grey cells are very faded now, but I am sure others will throw in some opinions comments. I know we live in a high calcium water area and I have tried all the magnets and electronic devices that supposedly adjust the chemical way the calcium resides in the water but non work and I still get calcium residue on my pool and taps/kettles. Hence I am on the fence with these sort of product claims. | |||||
Graham Phillips Experienced User Username: playtime Post Number: 28 Registered: 3-2019 |
G'day everyone,.... Steve, As I said this was how it was explained to me, I will say that the finer points of electronics isn't my strong point but somehow it floods the body with more negative electrons than available with positive. Now my understanding always was that the amount of + and - electrons always stays the same on either side? But this process was explained to me almost 20yrs ago now so maybe my memory has faded but I can say from first hand that MY 4x4 IS rust free! So I think its must be working even if I don't fully understand on some level how it dose it. But this is why I posed the question, wouldn't it benefit a Rolls? The system is supposed to use less power than an LCD clock so no issue of coming back to a drained battery. But just something to consider I guess. Graham. | |||||
Steve Emmott Prolific User Username: steve_e Post Number: 148 Registered: 11-2018 |
Graham, I think we are entering a territory that could end up as bad as ZDDP in oil discussions. However my understanding is that electrons don't actually flow and both -ve +ve reside and school boy basics explain it away by they just excite each other when a voltage potential drop occurs which then gets referred to as 'current flow'. How this device could add additional negative electrons to the material is what I don't understand and how it could prevent oxidisation I just at the moment can't get my head around. Saying that your experience has been positive(no pun intended) and such is a valuable contribution.. I think David G may have some deeper knowledge on this subject and hopefully will get 'charged' up to comment. I will keep exploring though for other information. | |||||
Graham Phillips Experienced User Username: playtime Post Number: 29 Registered: 3-2019 |
G'day everyone,.... ZDDP? Ok, you got me there. The only thing I can guess at is the 'Z' refers to Zinc? Funny but I was going to bring up oil soon as somebody referenced using ATF in the engine oil to clean/silence a noisy lifter. That was in an old thread I was looking at yesterday. Reminded me of the 'oil controversy' thread on the Net-riders forum I am on. It turns out a lot of bike riders are no longer using bike orientated oil in their bikes, they are now using Diesel engine oil because it has greater shear resistance and the fact that it has detergent in it it's keeping the engine clean inside as well. As long as the SG ratings etc meet or exceed that recommended for that bike its been 99% successful. Even having the oil tested has proven benefits, I was going to ask if anyone would conceder Using Diesel engine oil instead for those very same reasons. Turns out quite a few bike riders have done just that and now use it in their cars as well. So if that dose'nt start a flame war here,.... ;) Graham. | |||||
Steve Emmott Prolific User Username: steve_e Post Number: 156 Registered: 11-2018 |
Graham I have not been on any auto/bike forum yet that the subject of oil does not end up as a controversial battle that obviously raises posters blood pressure and damages their keyboards. People can't even agree what is best oil in an SU carb piston pot. For me I never get involved in any OIL thread now on any forum and just do my own thing. Best of luck in your quest to seek information but I would start a new post with a new title. Maybe 'just a simple question on oil' in the idle chatter section    | |||||
Janne Aittola Experienced User Username: jannea Post Number: 24 Registered: 07-2018 |
Hello Steve! I wonder if the seal is still available? I have had some problems with my email and haven't reached you. "You can have the seal free of charge as long as you cover postage costs which I will get a price for once I have your details" -janneA ... |